How to Add/Modify a Job Code
This screen is used to add, modify or delete a Job Code, Job Description, Job Qualification or Job Qualification TI Code at the Board level. Each Job Code contains descriptive information pertaining to each Board job (ie. a Job Description).
•You must define each job here prior to using the Staffing module or Position Control.
•The Job Classification screen provides only a limited definition of Board Jobs. By further defining these codes within the Position Control screen, GL Account Codes can be assigned automatically, thereby reducing the likelihood of data entry errors. This information also may be used to fill vacant Positions internally (ie. by assisting in the identification of qualified staff) and to prepare job descriptions for position advertisements.
•In the case of academic jobs, the TI (Teacher Information) code also may be brought forward from the TI Code table to further define required qualifications.
•Before entering the Job Descriptions and Job Qualifications Codes, ensure all data is complete, accurate, and current. Inaccurate or incomplete data may give rise to Employee grievances or legal actions.
Use the following steps to Add/Modify a Job Code:
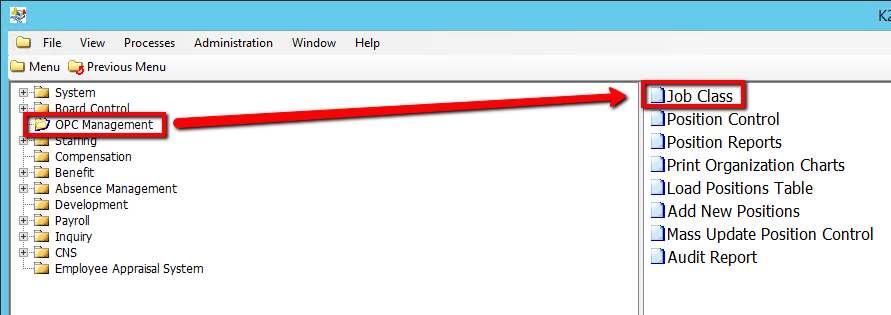
1. Click on OPC Management
2. Click on Job Class
.png)
3. Click the Find button at top of the menu bar to see all records in the database.
![]()
4. If K212 HRP dialog box displays, click Yes to continue.
.png)
5. Select a current Job Code to modify or Select New at the top of the menu screen to add a new Job Code
![]()
6. Enter a unique Job Code value (i.e ADMIN1)
7. Enter a unique Job Name value (i.e Administrator)
8. Enter a Abbreviation value (i.e ADMIN1)
9. Select a Allow K212 Portal Timesheets value (i.e Yes)
10. Select a Import Timesheets from SFE value (i.e No)
11. Select a Import Absence from SFE value (i.e No)
12. Enter in any other relevant information on the screen (If applicable) (Consult the user guides for more information about each field)
13. Click the Save button to save your changes
![]()
14. Right-click the grey grid below the Sequence Number column and Select New Record (If applicable)
.png)
15. Enter the relevant information within the grid. Double-click on a grid-column to modify the value (If applicable) (Consult the user guides for more information about each field)
16. Click the Save button to save your changes
![]()