There are two ways to enter marks: manually or with a scanner.
Manual Mark Entry
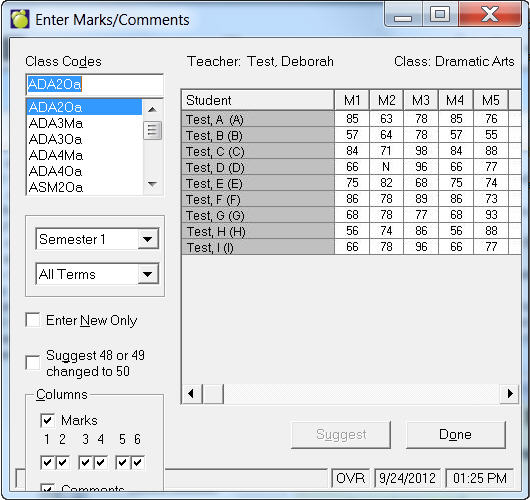
- Choose Marks, Conventional Marks, Enter Marks/Comments. An editing box will appear with all of the items for which you will need to record marks and comments. See point number 6 graphic below.
- Select the course code from the list; if you don't see the course that you want, scroll through the list. When you select a Code, teacher and class name, and then the number of students in the class will appear in its respective box.
- Click the Enter New Only check box to skip to cells in the grid that have marks. This occurs when you press Enter while working with the main Marks/Comments entry grid.
- If the course is available in 1st and 2nd semester, you will be able to select one of the two options. If the course is available in one, but not the other semester, the option button where the course is not available will be grayed out.
- In the Columns frame you can select what columns of marks and comments that you want to see. Simply click the check boxes and a check mark will appear.
- Click on the grid cell to enter a mark/comment. Press Enter each time you have entered information to register it in the system. Marks can range from 0 to 100 or from A to Z and can include + or -. Comments i.e., "Excellent Work", can be up to 60 characters in length. Each comment is assigned a comment number (1 through 255) which is used in the entry of comments into comment columns. A comment number of 0 represents no comment.
Additional Information
- To see all of the marks and comments columns, use the scroll bar at the bottom of the box.
- If you are working with Comments, the Suggest button will be enabled to give you access to a list of pre-made comments.
- Report cards printed through Marks, Print Report Cards/Application Forms will print "Inc." for letter grades of 'I' (representing an incomplete mark), and "None" for letter grades of 'N' (representing no mark available). Both Report Builder and the Report Cards/ Application Forms features will not print any information for a course with a mark of 'X' (representing a class that is not printed such as a supervised study class.