
This method is for Office use only. Teachers use Maplewood connectEd for the mark and comment entry, and this method should only be used to see the overall class marks, or to make corrections where needed. Access to the Maplewood connectEd markbooks is not available through this method – only the summary/term marks.
Choose Marks, Topic-based Marks, Enter Marks/Comments.
Start typing the first few characters of the course code. Select the Class and click Select.
A Topic List box will appear. Highlight the desired heading and click Select. Use the Select All button to check/uncheck all topics/subtopics underneath the selected Term/Topic.
The Select button changes to Unselect when you have selected a topic and highlighted it; the Select All button changes to UnSelect All when you highlight a topic that has been selected.

Entering Marks
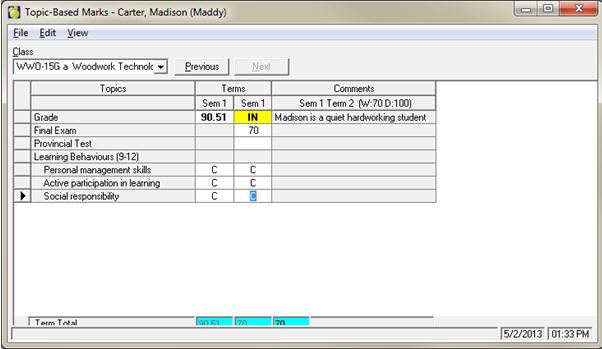
Click in a cell to enter a mark. If the term/topic you are accessing is defined with a letter grade group, the letters available will appear in a “Letter Box” window. Numeric marks can be entered up to a value of 150 (or 150% of the denominator which is 100).
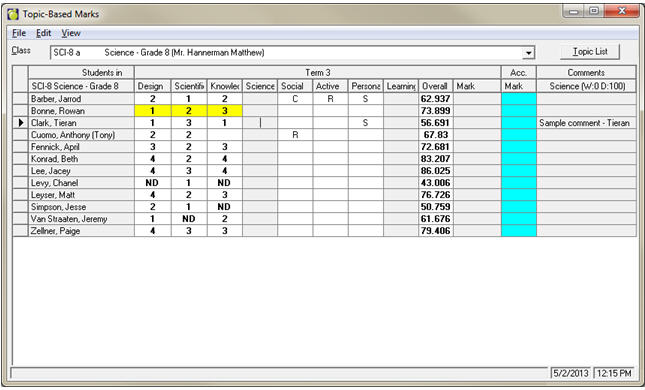
Bold marks indicate that a Maplewood connectEd markbook has been defined behind that topic.
Yellow cells indicate that an override has been entered either through Maplewood connectEd or the Topic-Based Marks screen. The columns can be resized to provide more space.
Click in the cell of a given topic to see the comment for that topic in the far right column (e.g., “Science” topic in the above screen shot).
Click the Topic List button to change your term/topic selection.
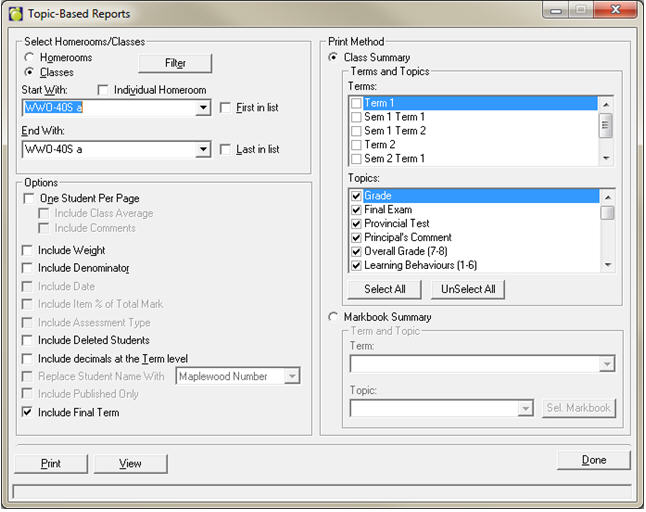
File – Topic Based Reports
The topic-based reports provide the office staff with a way to print out all marks and comments for a class. If you use the Markbook Summary option (bottom right), office users can see the Maplewood connectEd markbooks. Many options exist along the left-hand side to include weights, denominators, etc on the report.
Comments can only be viewed if the One Student Per Page option is selected.
File – Print Grid
This feature will send exactly what is selected in the Topic-Based Marks screen DIRECTLY TO THE DEFAULT PRINTER.
Entering Comments
Choose Edit, Comments.
As a shortcut you can also double-click on the comment text in the far right column (make sure to select the appropriate topic first).
Choose the student from the dropdown list at the top, and click the appropriate term and topic from the list on the left.
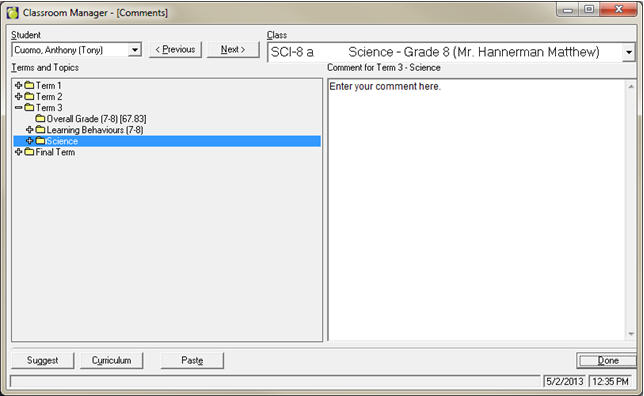
If comment parameters have been defined correctly, you will be able to type the comment directly into the large text box on the right. The text will turn the colour defined in the comment parameters (defaults to red) when the comment has exceeded the defined size. Please note, there is a 3-second delay in this feature to accommodate collaborated comments (comments entered in different topics but sharing the same comment parameters).
View options (View menu)
Letter Box: Shows/hides the letter box.
Overrides: Shows overrides (yellow cell) or hides them to show the original mark.
Comments: Shows/hides the comment column (far-right)
Statistics: Shows/hides class statistics (average, median, standard deviation) at the bottom of the screen.
Marks as Entered/Letter Equivalent: Displays marks as the letter equivalent if applicable.
Totals: Shows/hides the accumulated mark column.
Deleted Students: Shows/hides deleted students – deleted students will have “(Deleted)” after their name.
Open the student record and go to the Achievement tab. Choose the Topic-Based Marks radio button at the bottom of the Window.
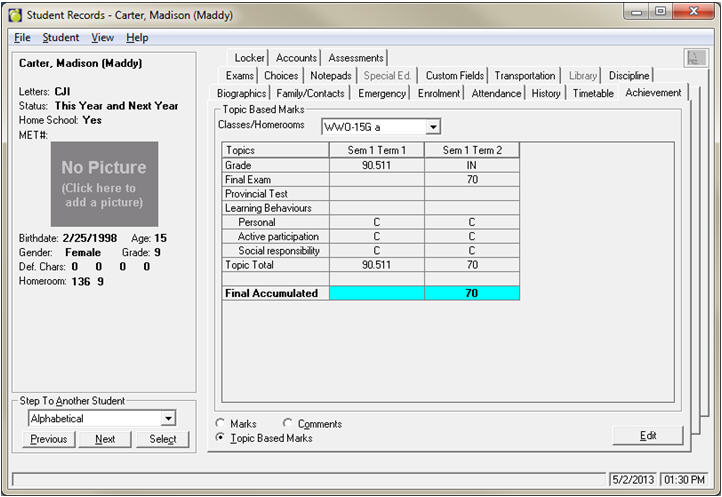
Select the class from the dropdown list and click Edit.
Similar options and functionality exist in this screen as in the Enter Marks for Class/Homeroom area described above.