![]() Select a report from the list by clicking once and highlighting. You can select multiple Individual Reports. Click the blue arrow from the main menu.
Select a report from the list by clicking once and highlighting. You can select multiple Individual Reports. Click the blue arrow from the main menu.
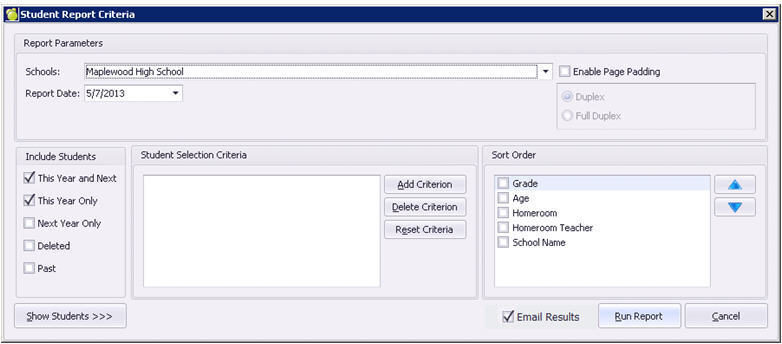
Specify the Report Parameters
School: If you are running this from the Central Office, select one or many schools from the drop down lists, or leave it at the default “Central Office”. If you are running this from a school, your school will already be selected.
Enable Page Padding: This feature allows the user to create the document for double-sided printing. Once selected, the Duplex/Full Duplex options will become available. Duplex will pad each student’s report out to multiples of two pages for use with double-sided printing. Full-Duplex will pad each student’s report out to multiples of four pages for use with booklet-style printing. Please note, the appropriate printer settings must also be selected.
Report Date: There is a Report Date Field available when you are in Design mode that can be placed anywhere on the report. When you select a Report Date from the Report Parameters screen, the field will be populated.
Include Students: This Year and Next and This Year Only are selected by default. Change this selection if you wish to expand the number of students selected.
Next, add student selection criteria, as explained below.
Add Student Selection Criteria
Click Add Criterion. The list of available criteria is dependent upon the school selection.
If Central Office is selected, the only option for Criteria is Inquiry List.
If just ONE school is selected, the full list is available: Alphabetic, Personal Details, Student Number, Homeroom, Class, Inquiry List, Excursion List.
If TWO OR MORE schools are selected, only Alphabetic, Personal Details and Student Number are available (only field types that are common between schools).
With one or many schools selected, leaving the selection criteria box empty will print ALL students. Use the Show Students >>> button to show which students are going to print.
In the following example we have selected Alphabetic, and the options available become visible by clicking the drop down arrow. We have selected Surname, and input the text “S*” which will narrow the list of students down to only those whose surname begins with S.
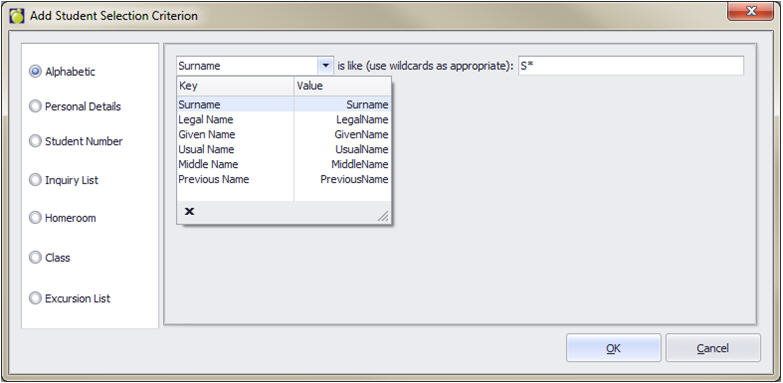
The criteria are inclusive. This means that if many criteria are defined, the list of students will narrow down even more. Using the above example, if we added a grade (under Personal Details) of 8, the list of students would be narrowed down to those with surnames beginning with S, AND in grade 8.
Specify Sort Order
As an option you can have the printout sorted by Grade, Age, Homeroom or Homeroom Teacher.
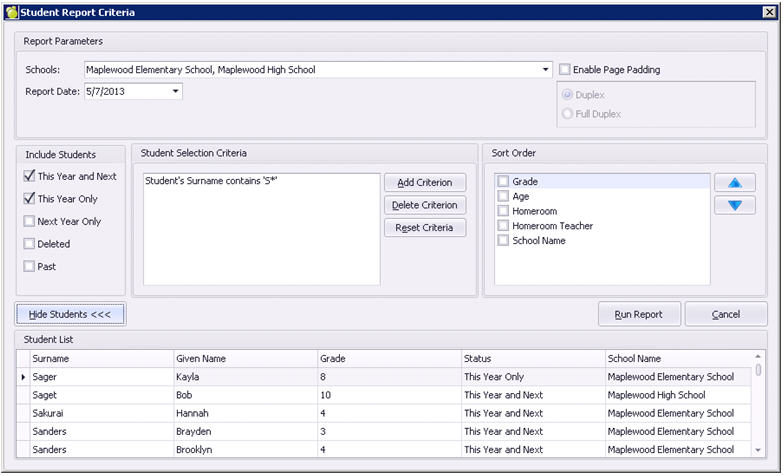
Show Students >>>
Click Show Students >>> to see which students are going to print. The button changes to Hide Students >>> so you can hide the list after viewing.
Click Run Report. A Print Preview of the report will be generated.
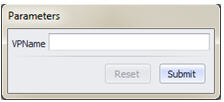
Parameters
If the report has been defined with Parameters, the user will be asked to provide some information to print on the report. For example a division may require the Vice Principal’s name to display on the report card. The report can be set up to accept user-input parameters such as this:
The Print Preview Screen

Print the Report
| To print the report to the default printer, click the Printer icon or go to File – Print. To print using a different printer or to change your printer settings, click the Printer/Question mark icon or choose File, Print. |
| To export the report to a different format (e.g., PDF), click the green disk icon or go to File – Export Document. The default format is PDF, but if you click the arrow beside this icon or menu item you will be provided with these options: |
PDF
HTML
MHT
RTF
XLS
XLSX
CSV
Text File
Image File
Send Via Email
| To send the entire document in an email message, choose the envelope icon or go to File – Send Via Email. The default format is PDF, but if you click the arrow beside this icon or menu item you will be provided with the same format options as Export Document see list above (above). This function will open your default mail client and will allow you to enter the To Address, Subject, and body of the message before sending. |