Creating A New Report - Five Steps
1. Creating a New Report
| Select the New command from the File menu, or click the icon from the menu bar. This is not necessary if you have just started Report Builder, and you have not opened an existing report. | 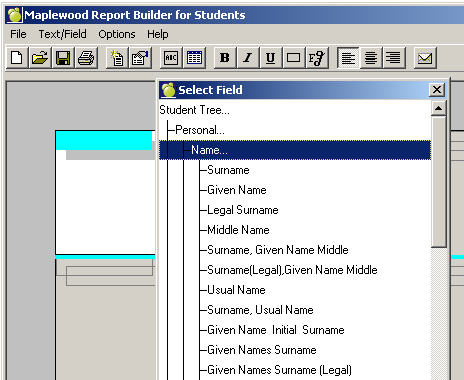 |
2. Setting Up The Page
Setting Up the Printer
The Report Builder feature uses the default printer setup in Windows. If this printer’s settings need to be altered or if another printer is required, choose File, Printer Setup. The printer selected will be used as the default printer for Report Builder reports. Refer to the Windows documentation for further information about installing printers. Always select the printer before formatting the report. The available fonts depends on the selected printer. You can change printer settings: paper size and source, and orientation (portrait or landscape).Note: Always select the printer before formatting the report. The choice of fonts depends on the selected printer. The printer settings, which you can alter, include the paper size and source, and orientation (portrait or landscape).
Dimensions can be in either inches or centimetres. Once you have changed the settings, click OK to display the report page size. The Width and Height of the page are specified here. Normally the size is 8.5 (width) by 11 (height) inches. You can enter different sizes for special forms or labels. Note: If the printer is set up to print using the landscape orientation, then the width should be changed to 11 inches and the height should be changed to 8.5 inches.
Header and Footer Heights
A Header is printed at the top of each page. A Footer is printed at the bottom of each page. The height of the header and footers are initially set to zero. Once you have indicated the size of a header or footer, you can move/adjust by,Grid
The Grid is an invisible mesh that controls how text, field and pictures are aligned on the report. When you enter a large value, the print justification between grid lines will be coarse; when you enter a small value, it will be fine. The grid values are only applicable when you use the Snap to Grid feature under the Options menu.Margins
Margins are specified by using the Top, Left, Right, and Bottom options. Each of these settings is initially set to 0.5 inches. The margin space appears on the screen as a dark gray border around the plain white page.Records
The Number of Records Across and Down control the number of records (e.g., students) that the report will contain. The defaults for these settings are 1 student record across, and 1 student down. This would allow a single record to be reported on each page, since the whole page is available to design a report.
If you want to change these settings, select the Across and/or Down box in the Records frame and type new settings. If you have indicated that you want 3 student records per page, the following Report Builder will appear: If you are reporting on 2 records, then only half the page is available. By specifying 2 records down, the page is printed with the first record on the top half of the page and the second record on the bottom half. By specifying 2 records across, the first record is printed on the left side of the page and the second record on the right side.Included on this screen are vertical and horizontal record setting lines. These lines provide a fast way to set record numbers without having to go back to the Page Setup option. To change the number of records per page, simply click on the blue line, drag the line and then release the mouse when you have the location you want.
When using multiple records, the text and fields are placed in the first record only. The information for the other records is automatically repeated. The gray area of the Report Builder screen shows how the report will look overall.
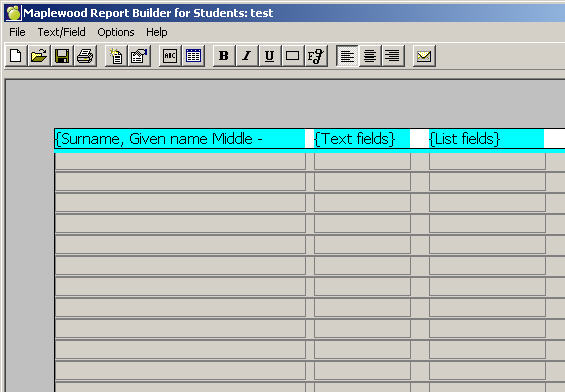
3. Placing Boxes and Specifying Information
There are two main types of boxes: Data Fields (cyan) and Text Fields (grey). To build a report simply insert, arrange and specify the size of the boxes on the page the way you want the report to print. Place Text, Field Picture or Barcode boxes in the body and in the header and/or footer of a report. Then customize the height, width, font and font size.
Hints: When placing boxes on a page that is longer or wider than your screen, click the mouse where you want and place a box. Otherwise, you will have to scroll to the beginning of the page to find the placed box.
Placing Report Body Text
![]() To place Text in the body of a report, click the icon from the menu bar, use Place Body Text from the Text/Field menu, or press ctrl + t.
To place Text in the body of a report, click the icon from the menu bar, use Place Body Text from the Text/Field menu, or press ctrl + t.
When a box displays pull handles it is in "size mode". To size a box, move the mouse pointer to a handle and drag/resize. The pointer will change to an arrow. To move a box, click and drag the box.
![]() To enter/specify information in a box, you must "toggle" (switch) between "size mode" and "data specification/entry mode". To do this, right-click your mouse once. You will notice that the pull handles disappear. Depending on the type of box (Text or Field), you will either begin to type in the text entry or double-click normally (left) to specify the information.
To enter/specify information in a box, you must "toggle" (switch) between "size mode" and "data specification/entry mode". To do this, right-click your mouse once. You will notice that the pull handles disappear. Depending on the type of box (Text or Field), you will either begin to type in the text entry or double-click normally (left) to specify the information.
Note: If your mouse is set for left-hand use you will use the left mouse button to toggle.
Placing Report Body Field
![]() To place a Field in the body of a report, click the icon from the menu bar, use Place Body Field from the Text/Field menu, or press ctrl + f. Specify a Field by using criteria from the Selection Tree: Use the following method to place a Field:
To place a Field in the body of a report, click the icon from the menu bar, use Place Body Field from the Text/Field menu, or press ctrl + f. Specify a Field by using criteria from the Selection Tree: Use the following method to place a Field:
Placing Report Body Pictures
To place a Picture in the body of a report, choose Place Body Picture from the Text/Field menu (or press ctrl + f). (There is no icon button for this command).
To specify a Picture:
Notes: The file name will appear in the box, not the picture. To see the picture, access the Print Preview screen. If you have to resize the picture, return to the main report body.
![]() To preview the picture,
To preview the picture,
Click the printer icon from the menu bar or choose Print Report from the File menu. A class list of students will appear. Click the View button on this screen to access the Print Preview screen. This shows the picture as it will be printed. To edit, resize or relocate the Picture box return to the main Report Builder screen.
Note: Since you cannot directly resize on the Print Preview screen, this may take a few times before you have the correct size.
Placing Report Body Barcodes
To place a barcode in the body of a report, choose Place Body Barcode from the Field/Text menu. You can place a barcode, link it to one of the fields in the Selection Tree. Then, when you scan the barcode, it will read the correct information for you.
Editing Boxes
In Report Builder, you work with a single box at a time. Before you can edit a Text, Field, Picture or Barcode box, it must have the focus. To place focus on a box, click inside it, or select either the Next or Previous command from the Text/Field menu until the box that you want is active. You can also use the tab key. If a Text box has focus, use the right mouse button to toggle to Edit mode. When you see a flashing cursor you can enter text. When you see handles around the box you can size and locate the box.
When you see a flashing cursor, double-click the box to choose fields from the Select Field window, or choose Edit from the Text/Field menu. When you see handles around the box you can size and locate the box.
Keyboard Hints
| Feature | Key Combination |
| Move to Next Field | Ctrl + N |
| Move to Previous Field | Ctrl + P |
| Move all Data Fields on top | Ctrl + Plus sign key |
| Move all Text Fields on top | Ctrl + Minus sign key |
| Move all Picture Fields on top | Ctrl + Shift + Minus sign key |
| Move all Barcode Fields on top | Ctrl + Shift + Plus sign key |
4. Saving A Report
![]() When you have finished working with a report, you may want to save it for future reference or printing. If you are saving a newly created report, click the icon or choose Save from the File menu.
When you have finished working with a report, you may want to save it for future reference or printing. If you are saving a newly created report, click the icon or choose Save from the File menu.
Type the name of the report in the box and, if you want a location other than the one defaulted, click Browse and navigate to a folder. Click OK to save the report. If you are saving an existing report in which you have made changes, click the save icon or choose Save from the File menu. Your report will automatically save, overwriting the existing report file.
If you want to save the report under a new name, choose Save As from the File menu. The Save File As window (see previous page illustration) will appear. Type a name for the report and choose OK to save the report.
![]() New to Report Builder is the ability to email PDF files to students, parents and/or guardians. To accomplish this, there are two main steps: The email template (message), and compiling the Student Information to email. The email addresses are derived from the new field within the student record on the Family tab.
New to Report Builder is the ability to email PDF files to students, parents and/or guardians. To accomplish this, there are two main steps: The email template (message), and compiling the Student Information to email. The email addresses are derived from the new field within the student record on the Family tab.
5. Printing Reports
![]() To print a report, click the print icon or choose Print Report from the File menu. Then choose the Print Order from the screen. The report can be printed for all students or selected students only. And the reports can be printed for males or females, or males and females.
To print a report, click the print icon or choose Print Report from the File menu. Then choose the Print Order from the screen. The report can be printed for all students or selected students only. And the reports can be printed for males or females, or males and females.
Setting Up the Printer
The Report Builder feature uses the default printer setup in Windows. If this printer’s settings need to be altered or if another printer is required, choose Printer Setup from the File menu. The printer selected will be used for all standard reports in the Report Builder feature, and is set as the default printer for Report Builder reports.
Always select the printer before formatting the report. The choice of fonts depends on the selected printer. The printer settings, which you can alter, include the paper size and source, and orientation (portrait or landscape).
Defining The Print Order
Choose File, Print Report. The Print Orders box will appear with these options: Alphabetically, Grade, Homeroom, Class, Defined Characters, Inquiry List, Sorted List, Excursion List, Individually Bus List.
Each print order a box has specific printing instructions. All Print Parameters boxes operate in basically the same manner.
Alphabetical
This is the Print Parameters box that will appear.
Click the First Student in School check box to start printing with the first alphabetically listed student. Otherwise, enter as many letters as you know for the student and the list will be displayed. Select a student from the list as a starting point for printing.
Click the Last Student in School check box to end printing for the last alphabetically listed student. Otherwise, enter as many letters as you know for the student and the list will be displayed. Select a student from the list as an ending point for printing.
Click the check boxes to indicate the status of students to be included.
Click the check boxes to print sibling information for the selected students. Choose from All Students, Youngest Sibling or Oldest Sibling.
Note: Only Children are included with any/all sibling lists.
Click the View button to access the Print Preview screen. Here you can see the way a report will look when it is printed. Print Preview is useful to check the report for errors. If this is the case, return to the main Report Builder screen and edit the appropriate boxes.
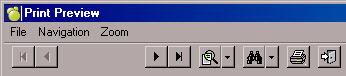
![]() To move through the pages for printing, use the First Page, Previous Page, Next Page and Last Page buttons.
To move through the pages for printing, use the First Page, Previous Page, Next Page and Last Page buttons.
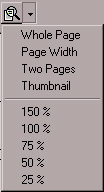 Click the Zoom button or click the drop-down menu to use the pre-sets.
 Click the Search icon and enter the text, or click the drop-down menu to use the pre-sets.
![]() Click the Print icon to print the report.
Click the Print icon to print the report.
![]() Click the Close icon to close the print preview screen.
Click the Close icon to close the print preview screen.
Report Builder for Printing Options
Cross-Hair Grid
![]() When you place a Text or Field box, an automatic cross hair grid will appear for easy alignment with other boxes. Simply right click to remove the cross-hair grid. If you want to move the box again later, the cross-hair grid will reappear automatically.
When you place a Text or Field box, an automatic cross hair grid will appear for easy alignment with other boxes. Simply right click to remove the cross-hair grid. If you want to move the box again later, the cross-hair grid will reappear automatically.
![]() Changing Fonts
Changing Fonts
Choose Font from the Options menu, or choose the font icon button from the menu bar and a font selection box will appear. Select Font from the first box. If you don’t see the font that you want, click the up or down arrows, or cursor through the list.
Next, select Font Type. If you don’t see the font style that you want, click the up or down arrows, or cursor through the list. Finally, select the Size of font.
The Sample area displays the font exactly as it will appear on the screen and in print. Click OK when you have finished.
Note: You cannot use more than one font, or font style size per box.
![]() Placing Borders
Placing Borders
If you want to outline a box, select the box and toggle to the cursor. Select the box to outline and click the border icon or choose Border from the Options menu.
Aligning Information with the box
![]() Use these icon buttons to centre, left and right-align information within a box.
Use these icon buttons to centre, left and right-align information within a box.
Adjusting Title/Text Alignment
Information or pictures that will print can be aligned within the area’s box. To adjust the alignment you can use an automatic feature called Snap To Grid. Choose Snap To Grid from the Options menu. A check mark (ü) will appear beside Grid. The box will automatically move to the nearest grid definition. To remove the grid, select the command again.
Deleting a Box
To delete a text, field, picture or barcode box, be sure that it is in edit mode (handles around the box), and then choose the Delete command from the Text/Field menu or ctrl+d.
Displaying Rulers
Optional rulers are provided for exact measuring and aid with the creation of reports. Choose the Horizontal Ruler and/ or the Vertical command from the Options menu. A check mark will appear beside the selected command. The ruler will appear at the top or the left side of the page. You can re-position the ruler by dragging and dropping.
![]()
To remove the ruler, re-select the command.
Status Bar
You have the option of working with the Status Bar on or off. To activate this option, choose Status Bar from the Option menu. On your Report Builder screen, the Status Bar at the bottom provides the name of the field, which is currently active.