Independent
Study: Teacher Contact Session & Mark Entry
In an independent study course each class has 3 sets of data entry.
They are:
- Entering Teacher Contact
Sessions (Absent or Present)
- Entering Completed
Work Unit Marks
- Entering Midterm
& Final Course Marks
Contact Sessions and Unit marks are accessed through the Maplewood connectEd
achievement markbook area. In order to access this area follow the steps
below.
Entering Teacher Contact
Sessions
- Log into your Maplewood connectEd account.
- Select the Achievement link
- Select the Marks/Comments by Class option
- Select the class code from the class dropdown
- Change the term to the FY Final/S1 Final or S2 Final option. Note:
The Teacher Contact Sessions and/or Work Units Completed categories
will only be active and available for mark entry within the final
term that is assigned to the class.
- Make sure the From and To dates reflect the entire term. For Full
year classes the “From” date should be the first day of school, and
thee “To” date should be the last day of school.
- Find your student’s name.
- Enter A (absent) or P (present) under the correct session number.
If you are entering data for a previously offered session, please
be sure to change the date (that appears beside the entry you have
made) to the correct date.
- Select Done to exit back to menu or select a different class to
enter additional contact session attendance.
Data Entry TIP to resize your screen: To shrink your screen to
see all of the work units in one screen use hold down the control key
and hit the minus sign (beside letter 0 or top right corner of number
pad) as many times as you need until the screen is the size you want.
To expand your screen, hold down control key and hit the plus sign
(beside minus sign or below on number pad) as many times as you need until
the screen is the size you want. The larger the screen, the more
scrolling you have to do.

Entering Completed
Work Unit Marks
- Log into your Maplewood connectEd account.
- Select the Achievement link
- Select the Marks/Comments by Class option
- Select the class code from the class dropdown
- Change the term to the FY Final/S1 Final or S2 Final option. Note:
The Teacher Contact Sessions and/or Work Units Completed categories
will only be active and available for mark entry within the final
term that is assigned to the class.
- Make sure the From and To dates reflect the entire term. For Full
year classes the “From” date should be the first day of school, and
thee “To” date should be the last day of school.
- Find your student’s name.
- Scroll over until the Work Units Completed area is displayed. (Note:
select the minus sign
 under the Teacher Contact
Sessions to minimize the items under this category)
under the Teacher Contact
Sessions to minimize the items under this category)
- Enter the numeric mark under the unit number. If you are entering
data for a previously completed lesson submitted, please be sure to
change the date (that appears beside the entry you have made) to the
correct date.
- Select Done to exit back to menu or select a different class to
enter additional course marks.
Data Entry TIP to resize your screen: To shrink your screen to
see all of the work units in one screen use hold down the control key
and hit the minus sign (beside letter 0 or top right corner of number
pad) as many times as you need until the screen is the size you want.
To expand your screen, hold down control key and hit the plus sign
(beside minus sign or below on number pad) as many times as you need until
the screen is the size you want. The larger the screen, the more
scrolling you have to do.

Entering Midterm
& Final Course Marks
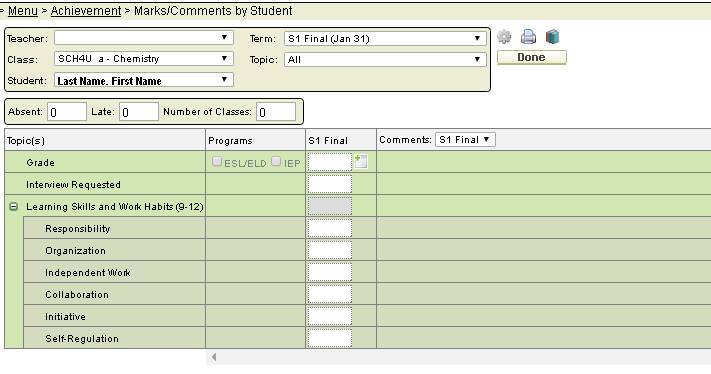
- Select the Achievement link
- Select Marks/Comments by Student
- Select the class code, and student name from each of the pull-down
menus. Note: If you don’t see the student name in the pull-down menu,
then select the options button
 (appears above the
done button) and ensure that “Show Deleted Students” is selected.
This will include students who have been dropped out or completed
of the course.
(appears above the
done button) and ensure that “Show Deleted Students” is selected.
This will include students who have been dropped out or completed
of the course.
- Select the appropriate Term from the pull-down menu at the top.
Enter the mark in the grade column, learning skills if appropriate
and the comment in the comment box. (Note: if you have the contact
sessions and work units completed displaying go into the options button
(appears above the done button) and ensure that “Show Markbooks”
is NOT selected. This will allow for ease of mark entry.
- Select Done to exit back to menu or choose another student from
the drop down box.
- To preview the Ontario Provincial Report Card, select the print
icon
 that appears above the Done button, once selected you will received
3 options; Verification Sheet, Provincial Report Card and Report Card.
Choose the Provincial Report Card option.
that appears above the Done button, once selected you will received
3 options; Verification Sheet, Provincial Report Card and Report Card.
Choose the Provincial Report Card option.