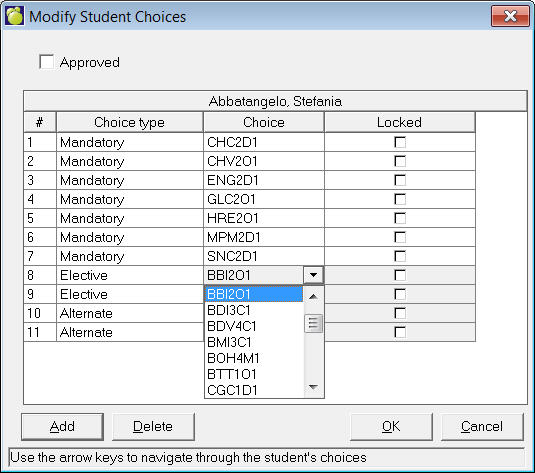
To modify individual student choice records after assignment, use either of these methods:
A. Choose Students, Student Records, and select a student from the list. Then select the Choices tab and click the Edit button. This method is useful if you are working with, for example, a new registrant’s record.
B. Choose Scheduling, Students’ Choices, Edit Choices. Then select the student and make the appropriate changes. This method is useful when working with students who are already attending the school.
Either method will call up a box like this:
This will display the choices that you previously entered for the selected student. You can erase the current choice using the backspace key and type in a new choice course code or use the delete button to delete the entry completely. A confirmation message will appear. Click Yes to continue deleting.
To add another choice, click the Add button and a new choice will appear at the bottom of the list. Use the pull down menus to specify course code (or type it in) and choice type (mandatory, elective or alternate).
The course number can be entered as well if course numbers have been entered in the course number field in the Next Year Course file.
When the Section column reads "Any" (is blank), the Load Students process is free to schedule the student into any section of the class.
There may be times when a student must be scheduled into a specific section of a course rather than being scheduled into any section of the course that best matches the students timetable, for example, if a student has requested MAT9 and there are 4 classes of MAT9 (e.g., MAT9a, MAT9b, MAT9c, and MAT9d). Due to special circumstances, this student can be timetabled into MAT9c using these steps:
Enter the MAT9 course into the student’s choices as you normally would do through Enter or Edit Student's Choices.
Choose Scheduling, Rebuild Classes, Assign All New Classes or choose Students, select a student's record, click the Choices tab and then click the Edit Special button.
Select the student’s name.
The list of course choices requested by the student will appear along with a column for the class section. Click in this "Section" column, to select the section letter of the class which the student must have (e.g. select section ‘c’).
Depending upon the school, for most students, this feature will not be used. When the Section column is blank, the Load Students process is free to schedule the student into any section of the class.
If a class section is assigned to a choice, the section letter will be visible from the Choices tab in the students’ record (e.g. you will see MAT9 c). It is not visible within the Scheduling, Students' Choices, Edit Choices screen since it cannot be edited from that screen.
Note: Entries to Choices will impact the Automatic Placement and Load Students program.
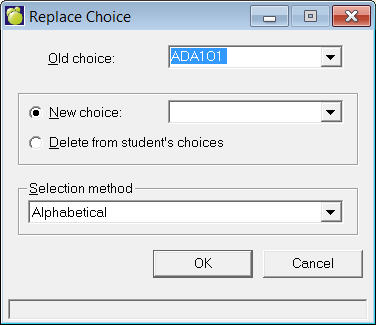
You can replace one course in the students' choices with another course (or delete the course all together) without having to modify each student's choices individually. This is only possible if all the students will have the same replacement course (e.g., all the students selecting the AMU3G course are to have AMU3A instead).
1. Choose Scheduling, Students' Choices, Replace All of a Choice to see this box:
2. Select the Old Choice from the drop-down list to be replaced.
3. Select the New Choice from the drop-down list to be included or select Delete from students' choice to delete the old choice from all students who have chosen it.
4. Click OK and you will be prompted to choose a selection method. Select the group of students for whom the choice will be replaced.
5. Click the Method button to access the selection method box (if necessary).