Occasionally, the school structure for the upcoming school year will differ from the structure currently in place. For example, there may be more periods in a day, or more days in the cycle too.
Choose File, School Setup, School Information, click the Next Year tab and change the structure.
For Pattern Schools
The Set for Pattern schools is simply the name given to a group of patterns. Each Pattern represent one possible teaching time. For example, a Set called "Single" may have two Patterns called "Sem 1" and "Sem 2".
Within the Windows version, the Patterns are completely user-defined. You can control the set and pattern names, and you have the flexibility to indicate where each pattern is taught.
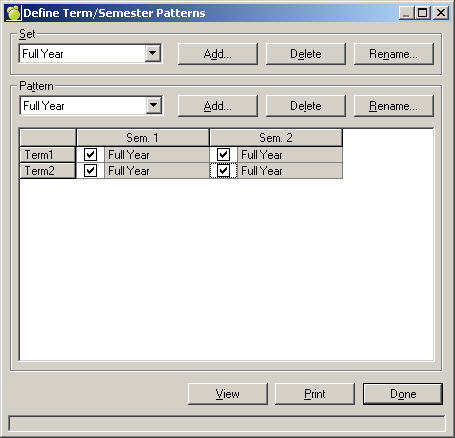
In this example, a school is set up as 2 semesters, and 2 terms per semester (as defined using File, School Setup, School Information, Next Year Tab). Clicking the Patterns button allows you to make modifications or add new patterns. From this example, the Set name is called Single and one of its Patterns is called Sem 1. As you can see from the check marks, Sem 1 is scheduled for both terms in Semester 1. There is also a Pattern called Sem. 2 (which you would see if you clicked drop down arrow ) which has check marks in the Semester 2 column only.
If the school offered classes that are to be taught over both semesters, you would have another Set called Full Year (or you might prefer to call it Both or Linear). One Pattern would exist called Sem 1&2 and it would have both Semester 1 and 2 columns checked.
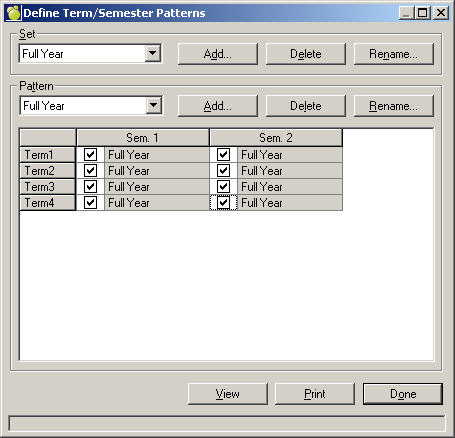
If classes are taught in a single term, you may wish to create a Set called "Single Term" and create 4 Patterns called "Term1" (semester 1/term 1 checked), "Term 2" (semester 1/term 2 checked), "Term 3" (semester 2/term 1 checked), and "Term 4" (semester 2/term 2 checked).
After you have made your Pattern Set names, you must then define your Semester/Term information by creating patterns.
Choose File, School Setup, School Information and click the Next Year tab.
Click the Patterns button in the Semester/Term frame. A Define Semester Patterns box will appear.
Select a Set from the drop-down list. This is where you will store the names that you are going to create.
In the Pattern Names frame, click Add and enter a name.
To rename, select the Pattern Name from the drop-down list and click Rename. Enter a new name.
To delete, select the Pattern Name from the drop-down list and click Delete.
Note: If you do not select a Set first, Pattern Names will be placed from the first Set in the list.
To print a copy of the current Pattern Grid box, click Print.
In the Windows system, the Period and Day fields are combined and named to Period/Day. The Period/Day requires 2 pieces of information: a Set and a Pattern.
The Set is simply the name given to a group of patterns. Each Pattern represent one possible teaching time. For example, a Set called "Single" may have four Patterns called "Period 1", "Period 2", "Period 3", and "Period 4". Some schools may prefer to call them "Block A" through "Block D". Since the Pattern controls where the class is taught each day in the cycle, there is no need for the school’s Class Rotation.
Let’s assume a school has a 4 period day, 2 day cycle, where the classes are taught in reverse order on day 2 (e.g. rotation for day 1 is 1,2,3,4 and day 2 is 4,3,2,1). A Set is created called "Single" and a Pattern is created called "Period 1". Check marks are placed in the first period on day 1 and the last period on day 2. Once checked, the pattern name appears.
As the four patterns are created, the names appear so that you can tell where they are defined.
If you have classes that are taught on every other day, you might use a Set called "Alternate Day" and have 8 Patterns called "Per 1 Day 1", "Per 1 Day 2", "Per 2 Day 1", "Per 2 Day 2", etc.
Do you have to create all your patterns from scratch?
No. You will automatically have patterns for all the different class assignments you currently carry over in the initializing of school. The names will be similar to those explained above. You are free to rename these.
Scheduling Daily Period Times
You should specify the start and end times for each period for each day in the rotation for a term in a semester. The days that you specified will appear in tab format.
Enter the Start Time for each period.
Enter the End Time for each period.
Duration for each period is automatically calculated.
Click the All days alike button to copy the same times and durations for the same period numbers to each day.
Click Print to print a copy of times and durations for periods in the currently displayed day.
Setting Up Lunch Information
If you need to edit lunch information for next year,
Choose File, School Setup, School Information and click the Next Year tab.
Click the Lunches check box.
Click the Lunches check box and enter the period(s) when lunch can occur.
Please remember that you will only need to edit your school's setup if it will be different for next year. Otherwise, the information above should already be setup for your school for next year.