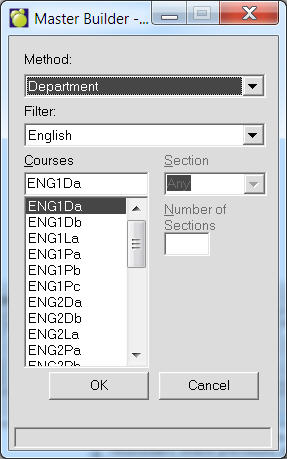
Add button: Calls up the screen below. This allows the user to add to the list of classes to be placed. The user can specify a single course or uses wildcards (e.g.: CHV*)
The actual master timetable construction process follows the common model of placing the classes of a school. Classes are placed in turn, with those most constrained by space (room and equipment access), by availability (e.g., single section classes are placed first), and by significance of conflicts:
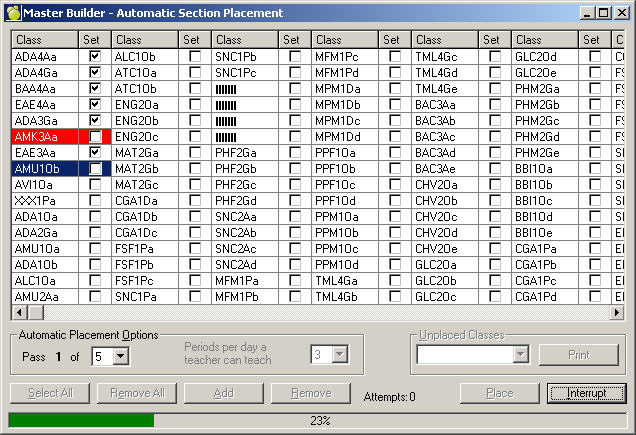
Automatic Placement automatically places individual classes or groups of classes in the timetable. All student choices, teacher and room assignments, and period balances are considered to produce a master timetable with the fewest conflicts possible. Individual classes may be fixed in a specific period and/or semester if it is desirable to prevent reassignment by the Automatic Placement feature.
Manual Placement allows the user to place individual classes into a specific semester and period. As each class is considered for placement, teacher and room timetables and conflict information are displayed on the screen.
Load students determines the practicality of the class placement by loading students into classes, creating the student timetables.
Timetable of a Specific Group lets you view the Master Timetable or portions of it.
You can also view available teachers and rooms, and teacher and room timetables.
The heart of student scheduling is the production of the master timetable through the assignment of semesters, periods, teachers, and rooms to the classes in the Classes File. If you wish to enter these assignments manually, then you can enter information into the Classes File, or use the Manual Placement option in Master Builder. Master Builder is designed to provide complete information on classes as they are assigned and will normally be the easier program to use in making class assignments. Master builder has a limit of 15 periods + homeroom, and 16 days using period patterns.
The Automatic Placement option within Master Builder is identical to the Manual Placement feature except that the computer uses the information to make the assignment of the semester and period itself rather than the user making the decision.
The most successful scheduling technique seems to be the assignment of the restrictive parts of the school first. For example, it may be that in your school the Physical and Health Education classes are severely restricted by the available gymnasium space. Other examples are courses with single sections. They can be set up at the beginning to try and prevent conflicts between them. OAC courses would be other examples since you want students to have as many of the courses as possible that they requested into their timetables.
Automatic Placement is a tool to help build the school’s master timetable. The user specifies the semester/term set and day/period set for each class in the scheduling Classes file and the Automatic Placement program analyzes the students’ choices and ‘places’ each class in the master timetable so as to minimize conflicts. In other words, for a period pattern school, ‘placing a class’ simply means scheduling the class by assigning a specific semester/term and/or day/period pattern to each class selected. For a DOS Basic period school ‘placing a class’ means the system schedules a classes by assigning a semester, a day, and a period to each class in accordance with the tumble that has been specified in School Information.
Automatic Placement is usually run in stages on groups of classes. For instance, a user will usually run the program to place only the grade 12 classes and then see where they are placed using Timetable of a Specific Group. If they are happy with where the classes have been placed, they can run Load Students to build the student timetables, then analyze the conflict information, make any changes to the placement of classes (either in the Classes file or using Manual Placement), and rerun Load Students, analyze conflicts again, etc, until they are satisfied with the grade 12 timetable. They then move on to building the grade 11 timetable, and so on.
Because Automatic Placement looks at choices to decide where a class should be placed, Choices must be entered first, otherwise it just loads every class into sem1, day1, period 1. Automatic Placement will try to place (or re-place) only the classes the user selects for placement and so it is not necessary to fix a class after it has been placed.
Fixing information in the scheduling Classes file:
If there are any restrictions on when a class can be scheduled, the user can ‘fix’ certain classes into a specific semester/term pattern or a day/period pattern by putting a checkmark next to the pattern selected before running Automatic Placement. The program will then place or schedule any selected classes so as to avoid conflicts, but will never reschedule a class that has been fixed. In short, Automatic Placement knows to place classes around those classes that have been fixed. The user can fix the semester/term pattern, leaving the system to decide the day/period pattern, or vice-versa, or both or neither.
Automatic Placement only decides when a class occurs, it does not assign teachers or rooms. Teacher and room information is specified by the user in the scheduling Classes file. This can be another source of restrictions as the system cannot assign a different teacher in order to avoid a teacher conflict if a teacher has already been assigned or if a room is already in use by another class in a certain period. If a room is assigned to a class it is a good idea to specify an alternate room where the class can take place to reduce the likelihood of room conflicts.
Order of priority:
When classes are selected to be placed using Automatic Placement they display in a certain order on the screen. The order displayed is the order in which they are processed. Here is the order:
Courses with just one section (singletons) are placed before courses with 2 sections, which are placed before courses with 3 sections, etc. This is because when there is only one section of a course it is important that it be placed so as to ensure that the students can get into that class, as there is no other section for them to take.
Higher grades are placed before lower grades. Grades are determined by the grade field. In Ontario, any OAC code (a zero in the fourth character position) will be interpreted as a grade 13 course.
Alphabetically by course code and section letter.
Note: If a grouped class is selected, the classes that are grouped with it are added to the list automatically according to the order above.
What criteria are used for placing a class into a specific semester/term or day/period?
The system tries to place each selected class in the order described above according to the criteria below:
Fixed classes are placed into the semester/term or day/period as specified in the classes file.
The teacher must be available (if a teacher has been assigned) to teach in that day/period.
The room must be available (if a room has been assigned) in that day/period.
Lowest number of conflicts between classes. It puts the class where it will cause the lowest number of conflicts, based upon student choices.
Nominal or ideal balance: If placing a class in one period will generate the same number of conflicts as placing it in another period (a tie), the system tries to balance the classes between periods, terms and semesters to ensure that courses of the same grade have as even a distribution of students as possible in each period, term and semester. E.g.: if 30 students have chosen a course and placing it in period 1 will result if 4 conflicts and placing it in period 2 will also result in 4 conflicts, then the system will consider how many students would ideally be loaded into each period by looking at where all the other classes of the same grade have been placed and consider how many students would ideally be loaded into each period. The system then places the class in question into the period with the lowest balance.
What factors that will prevent a class from being placed?
The system places classes so as to reduce the number of conflicts, but it doesn’t fail to place a class just because there will be conflicts. Conflicts between student choices will never prevent a class from being placed.
The following conditions must be met before Automatic Placement will place a class in a specific day and period:
The teacher (if specified) must be available to teach on that day. The user must specify the maximum number of periods per day that a teacher can teach. If a teacher is already scheduled to teach that many periods on that day, the system cannot place that class in any period that day. The user would need to assign a different teacher to teach that class (or else increase the number of periods a teacher can teach).
The room number and alternate room number: The room must be available in that period and day. For instance, if class A is scheduled into a certain period, then Automatic placement cannot place another class (B) in that same period if that same room number has been assigned. If a class cannot be placed in a room due to such a room conflict the system will place the class into the alternate room if an alternate room has been specified.
Lunch periods
Automatic Placement won’t place a class into a period if that period has been identified as the lunch period on the Next Year tab of School Info. If more than one lunch period has been specified, it will load a class into such a period, provided that the students who have chosen will still have a lunch period free.
Note: If Automatic Placement is run on a class that has already been assigned to a semester/term and/or day/period and the program cannot place the class, this information is removed.
Additional factors taken into consideration by Automatic Placement:
Grouped classes: If one class is grouped with another, then placing one class automatically places the other class into the same semester, term, day and period. The same teacher and room are also assigned when the class is grouped. When a grouped class is selected to be placed, the classes grouped with it are automatically displayed.
Certain forms of sequencing: Pre-sequencing, Co-sequencing and Alternate sequencing. These forms of sequencing dictate the order in which courses must be placed in the master timetable.
Occurrences: These are set up in the scheduling Classes file or in Manual Placement. Occurrences are always automatically fixed.
When the Automatic Placement of classes is running, you can now see the indicator of whether or not the class is fixed.
Factors NOT taken into consideration by Automatic Placement:
Certain forms of sequencing: Teacher sequencing and Blocking. These forms of sequencing are important for Load Students to ensure that students are scheduled into classes with certain teachers or into specific section letters, but Automatic Placement does not need recognize teacher sequencing and blocking.
Pre-requisites are not considered. Pre-requisites are specified for the purposes of preventing invalid choice entry.
How to read the Automatic Placement Screens:
Add button: Calls up the screen below. This allows the user to add to the list of classes to be placed. The user can specify a single course or uses wildcards (e.g.: CHV*)
Method: Select from Course, Class, Department, Teacher and Grade. You can then filter the classes being placed by Class, Teacher, Department, and by Grade.
Filter: Select a item listed from the Method options. For this example, we have selected Department, and chosen the Filter English to display the English courses.
Section: Allows the user to filter course codes by a specific section letter. E.g.: Only section b of GLC** course.
Number of Sections: Allows the user to select only the classes that have single sections (singletons), double sections, triple sections, etc. This option is greyed out if a section letter has been specified.
Pass: The number of times the program will attempt to place the entire list of classes that have been added. With each pass the program reconsiders where previously placed classes were placed and re-evaluates whether it should be re-placed to further reduce conflicts. Select at least 2 passes.
Periods per day a teacher can teach: This is the maximum number of periods a teacher can teach on any one day. For example, if 3 is selected and a teacher has been assigned to teach 4 classes and 3 of them have been placed in the same day, the automatic placement program will not be able to place the fourth class in that same day. The class will have to be placed in another day or else a previously placed class will need to be moved to another day. Note that a double period class is counted as 2 separate periods, a triple period class counts as 3 separate periods, etc.
Unplaced Classes: The classes that could not be placed due to teacher or room conflicts will be listed here along with the room number (if one has been assigned) and the list can be printed. The list does not include all unplaced classes from the Classes file, just the classes that Automatic Placement just tried to place. Manual Placement can be used to determine why a class was not placed.
Checkmarks: A checkmark indicates a class has been placed. No checkmark indicates an unplaced class.
Blue highlighting: The class the system is presently trying to place.
Red highlighting: A class the system has so far failed to place due to room or teacher conflicts.
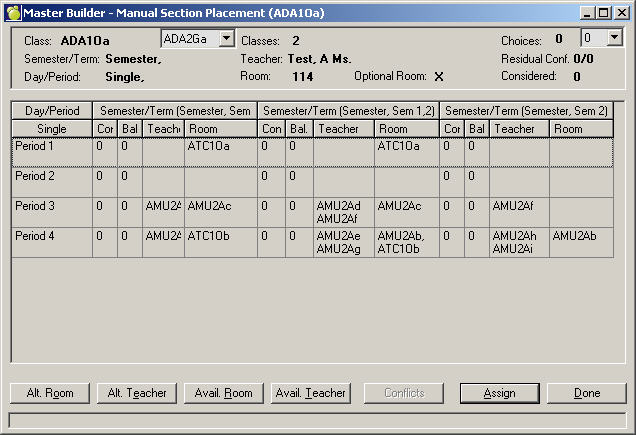
The Manual Placement Program is a tool that lets a user place one class at a time into the master timetable. It displays information about potential conflicts and balance for each period where a class could be placed. For this reason Manual Placement can only be used effectively once the choices have been entered and class sections have been created in the scheduling Classes file.
By analyzing the information displayed on the Manual Section Placement Screen (shown below) the user can decide into which period a class should be placed or if a different room or teacher should be assigned.
Manual placement is normally used when a class proves difficult to schedule because of conflicts. Most users resort to Manual Placement for only a few classes after they have built most of their timetable (either by hand or with Automatic Placement) and have run Load Students and printed out conflict information to identify those classes that are the source of conflicts.
After a class has been placed using Manual Placement, users should re-run Load Students and re-analyze their conflict printouts. To access Manual Placement, choose Scheduling, Master Builder, Manual Placement.
Select the class you would like to place manually by either typing the class code or using the scroll bar and clicking on the desired class. Click the Place button to continue.
For each of the classes to be scheduled, a screen will display the information needed to make a placement decision based upon potential conflicts (column labelled Conf.) first and then in the case of equal conflicts, on nominal loading for that grade (column labelled Bal. (for balance)). Until the first classes are placed, there will be many periods which will have no conflicts (conflicts are based on the students choices and the period assignment of these classes). You will see a screen similar to this:
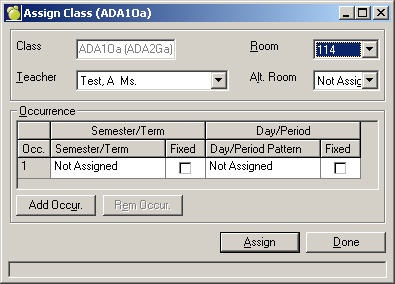
Click the Assign button on the Manual Section Placement screen above causing an Assign Class dialogue box to appear. Within this dialogue box (see below) you can assign a teacher, room, alternate room, specify semester/term or day/period information, fix patterns and even add or remove occurrences.
The sets cannot be changed within Manual Placement and the available patterns are only those which are part of the assigned set.
Clicking the Assign button within this dialogue box will save the changes to the scheduling Classes file:
How to read the Manual Section Placement screen:
Class: The class section that is about to be placed. A dropdown appears next to the class to list classes grouped with the class that is to be placed (because grouped classes must be taught at the same time, in the same room, by the same teacher).
Classes: How many sections of the course there are in the Classes file.
Semester/Term: The semester/term pattern that has been selected for this class.
Day/Period: The Day/Period pattern that has been selected for this class, if any.
Teacher: The teacher that has been assigned to this class, if any.
Room: The room that has been assigned to this class, if any.
Optional Room: The alternate room that has been assigned to this class, if any.
Choices: The number of students who have chosen this course. If the class is grouped a dropdown list appears next to this number to list the number of choices entered for each grouped course.
Residual Conflict: These numbers represent conflicts that exist prior to placing the class in question. The totals are based upon all the choices that have been entered for each student and where those classes have been placed so far. The first number is the number of students who have chosen this course who already have multiple conflicts (i.e.: students who already have a conflict between three or more of their choices, based upon where those other classes have been placed). The second total is the number of students who have chosen this course but who already have a single conflict (i.e.: students who already have a conflict between two of their choices, based upon where those other classes have been placed).
Considered: The number of choices minus the number of multiple conflicts. Multiple conflicts are not ‘considered’ because if multiple conflicts already exist (based on choices and where those other classes have been placed) then re-placing this class will still result in a conflict. In other words, students who have multiple conflicts prior to placing this class will not be able to take this class no matter where it is placed. Their conflicts are such that moving the class in question won’t make a difference to their getting into this class so they are not considered.
Conflicts: This column holds the number of conflicts that will result (based on choices and based on what has already been placed in that period) if the class were placed in a specific period. The more classes are placed the more conflicts will be displayed.
Bal (Balance): This number is used to determine which period a class should be placed into based upon how many classes have already been placed into that period. Usually conflicts are the most (or only) important consideration when deciding which period to fit a class into, but if the number of conflicts are the same or very similar, the classes should be placed into the period that has the lowest balance.
The number in each column and row indicates the number of students who have chosen courses that are of the same grade level as the class which is to be placed. The system displays an ideal balance of students between sections of a course based on where those sections have been placed. For instance, suppose 100 students have chosen a grade 10 course that has 4 sections and these sections have all be placed into separate periods (p1, p2, p3, p4), then the system will display an even balance of 25 students in each period. If there were only 2 sections placed (into period 2 and 3), then they would be evenly loaded with a balance of 50 in each period 2. The system is displaying an ideal distribution of students into each section. When a user places a class into a period the system calculates the ideal number of students that would be loaded into each section.
Example: A user has already placed ENG2Da into period 1 and is about to place ENG2Db into period 2 with a balance so far of 230. This means that before ENG2Db is placed into period 2 there is already an ideal or nominal loading of 230 students (who have chosen grade 10 courses) that already have sections scheduled into period 2. If there are 20 students who have chosen ENG2D and section b is placed into period 2, the balance of period 2 for any grade 10 course will increase by 10. This is because, ideally, if the course has 2 sections and there are 20 students who have chosen the course, then 10 students should be loaded into period 1 (where section a has already been placed) and 10 students should be loaded into period 2 (where section b has just been placed).
Because this is an ideal balance, the system is not looking at the number of students who have actually been loaded into a class or period, it is simply looking at the number of students who would be loaded into each period by assuming that those students will be evenly distributed between each section of that course. It does this based upon the choices for all courses of the same grade and where the sections of those courses have actually been placed. It does not look at the student’s timetables. For this reason, Load Students does not have to be run for these numbers to be accurate.Note: The program considers courses within the same grade only, based upon the grade field, not the 4th character.
Teacher: Shows the other classes taught by this teacher. This information helps prevent a teacher from being overscheduled. There is nothing to prevent the user from creating a teacher conflict.
Room: Shows the other classes taught in this room. A room conflict will result if one tries to place a class into room where another class is being taught at that time.
Alternate Room Button: Displays the timetable of any room to see which classes are assigned to a room for any period.
Alternate Teacher Button: Displays the timetable of any teacher to see which classes are assigned to a teacher for any period.
Available Room Button: Displays a list of rooms that are available in any specified period.
Available Teacher Button: Displays a list of teacher that are available in any specified period.
Assign Button: Allows the user to manually place the class immediately into any semester/term or day/period pattern, to fix the patterns, to add or remove occurrences, to assign a room, alternate room, teacher, instead of having to go to the scheduling Classes file.
Note, when you add an occurrence, the occurrences are all automatically fixed and cannot be removed without removing the occurrences.
Conflicts Button: This button displays a list of those students who would have conflicts if the class were placed in that period in a specific semester and period. The user must specify the semester and period. It also shows each student’s choices but be sure to expand the screen or it will only show the first two choices. It does NOT show which class is conflicting. The best way to determine which classes are actually causing the conflicts is to run Load Students and print the conflict information (under Scheduling, Print Conflict Information).
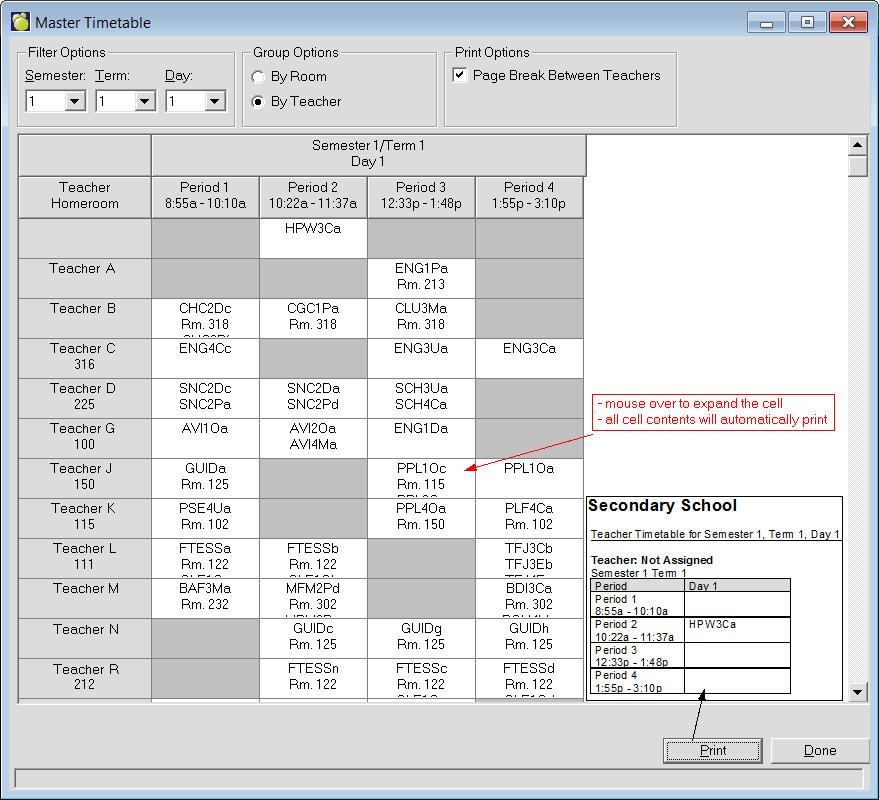
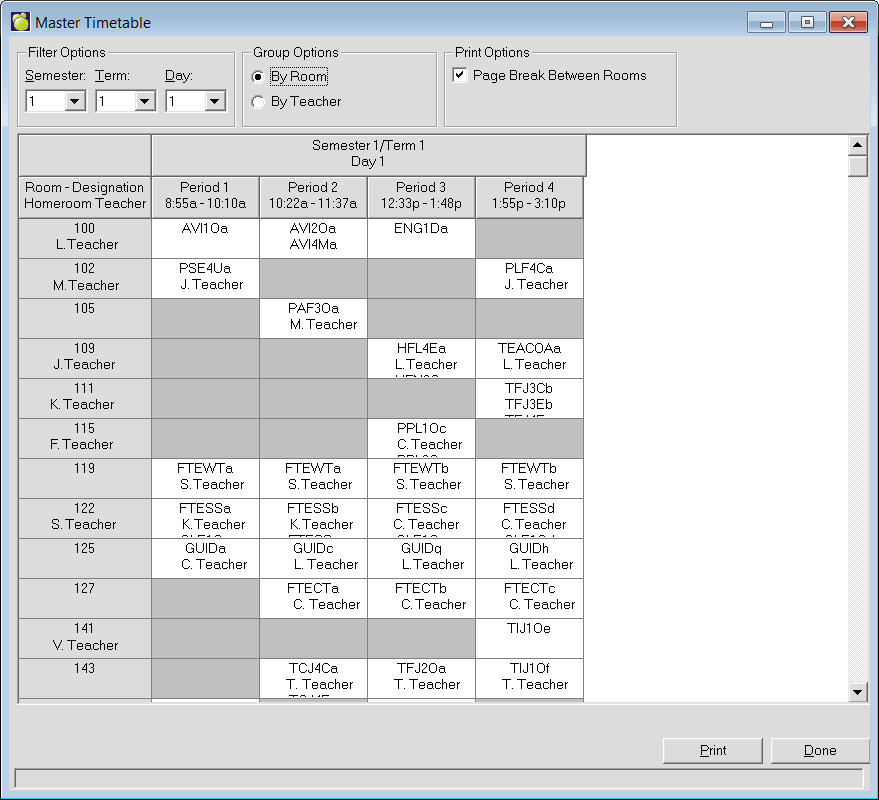
This feature is available by choosing Scheduling, Master Builder, Master Timetable (for next year's timetable) or File, School Setup, Master Timetable (for the current table). A table will appear listing all the classes taught in the school's master timetable corresponding to the semester, term, period and days in which the classes are scheduled. The master timetable may be sorted in order by Room or by Teacher. It will always provide columns for every period, however it may include just a single semester, term, or day, or it may include all semesters, terms, and days depending on what is selected from the corresponding filter options presented on the screen. The first column will also include the homeroom information if that room or teacher is assigned a homeroom. If the information is to be printed so that it may be post in the classrooms or to provide to the teachers, select the Page Break check box. Use the Print button to see the preview of the report. From there users may print or save to PDF or export the view.