Courses File
Adding/Editing The Courses File
The Courses File is modified using Scheduling, Modify Files, Courses (Codes for Next Year).
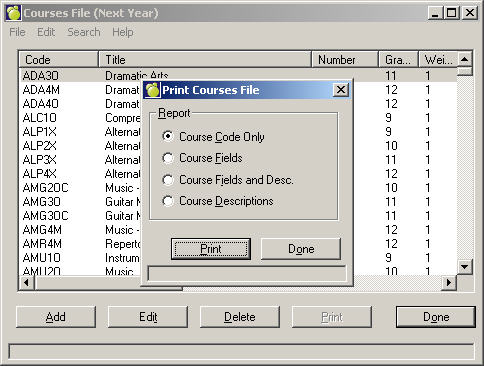
Then click Add, Delete or Edit. You can also print. You will need to specify the type of report that you would like (see above).
This is an example of an Edit screen:
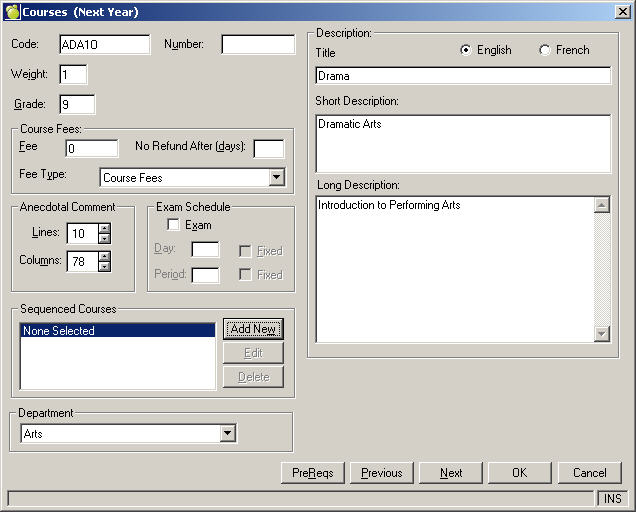
The scheduling Courses File is a listing of all the courses offered at your school next year. During the initialization of scheduling, the courses which are currently being taught in your school were copied into the scheduling Courses File. Any courses which will not be offered next year should be removed, and any new courses should be added before you enter the students’ choices, all courses that may be taught next year must be entered into the scheduling Courses File..
The scheduling Courses File contains the following information:
Course Code: The course code may be up to seven characters in length (e.g. MAT1A1F). We recommended that a number indicating the year level be placed in the same character position for all courses. You can then use Inquiry to search for courses and classes of certain grades. For example, an Inquiry search for ***1 would include only the first year level courses (e.g. grade 9 courses) providing the course codes were entered such that all the year levels were placed in the fourth character position. Note: Manitoba can now set the credit value for course codes in the code file.
Course Number: Every code in the Code file must contain a course code, and optionally a course number. Some schools setup a course code such as CMA25S with a course number such as 3911-25S. This subject code is the first 4 characters and the subject level and course type are the last 3 characters. Other schools just use the course code 391125S with no course number. The course number may be up to ten characters in length.
Anecdotal Comment: There are four anecdotal comments that may be entered for each course. Enter the number of lines that should be allotted to each anecdotal comment (a maximum of 10) and the number of columns (a maximum of 78). You can use these controls to fit anecdotal comments into specific areas of report cards set up through report builder.
Weighting: The weighting factor represents the work load for the course. By assigning a weighting factor to each course, the work load between semesters may be balanced.
Sequenced Courses: In semestered schools, you may indicate the "order" which choices must be completed. The maximum number of sequenced courses is 30. The following examples explain the different types of sequenced courses:
Alternate: If course A has an alternate course B, courses A and B may not be taken in the same semester.
Blocked: Use mostly for grade 9 to keep students grouped together in classes during the day. Automatic Placement doesn't consider Blocking but Load Students does.
Co-sequenced: If course A has a co-sequent course B, and if both course A and B are among the courses to be scheduled, course B must be taken before or during the same semester as course A.
Pre-sequenced: If course A has a pre-sequent course B, and if both course A and B are the courses to be scheduled, course B must be taken in semester 1 and A must be taken in semester 2.
Teacher: Used to keep students with the same teacher for 2 or more courses (e.g., if A has a teacher-sequenced course B, and if both course A & B are among the courses to be scheduled, the student must be timetabled into course A and B taught by the same teacher.
Title and Description: You cannot edit the course description of courses that are in your current courses file until you transfer to current. Newly added courses can have their Titles and Descriptions entered or changed at any time.
Exam Schedule: Click the Exam box if there will be an exam for this course and the schedule is known. Then select the day and the period. Click the Fixed check box if it is a fixed exam. Normally, the examination day and period are automatically assigned by the Automatic Placement feature of Examination Assignment. This information is available through the Courses File primarily for reference. Print the scheduling Courses File (optional).
PreReqs: Prerequisites lets you define what courses must be completed before another course can be taken. This is relevant to Choice Entry by choosing Edit Choices, Student Record, Online Choice Entry. You can set up prerequisites by choosing:
Note: Automatic Placement and Load Students do not consider Pre-Recs, since they are only relevant to Choice Entry.
On the Select Course Prerequisites box you can set up one or more groups. If you set up more than one group, it would mean that the student must meet at least one of the prerequisites in both groups.
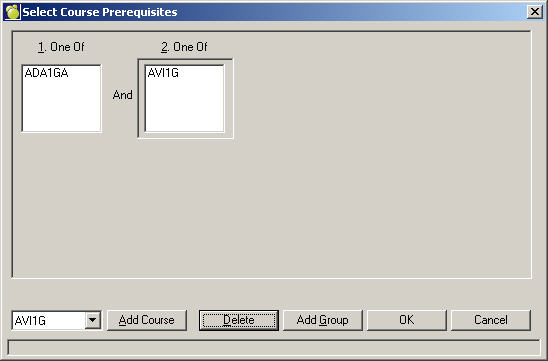
To set up a list of courses in a group, first select a course from the drop-down list.
Click Add Course. Continue to add courses as required.
If you need to add another group, click Add Group and use the same procedure to add a list of courses.
When you have finished click OK.
Classes File
Adding/Editing The Classes File
If student timetables will be recorded in each student's record then you must enter the classes into the Classes File. Before you enter the classes you must first enter the corresponding course code into the Scheduling Courses File. For access to the classes file, choose Scheduling, Modify Files, Classes.

Then click Add, Delete or Edit. You can also print. You will need to specify an option in the Sort By frame and check applicable boxes in the Include Items frame (see above).
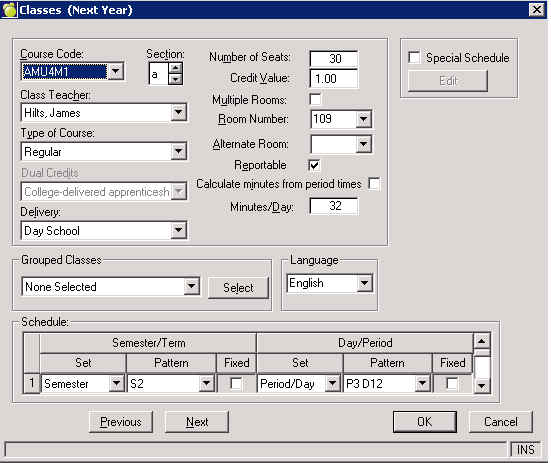
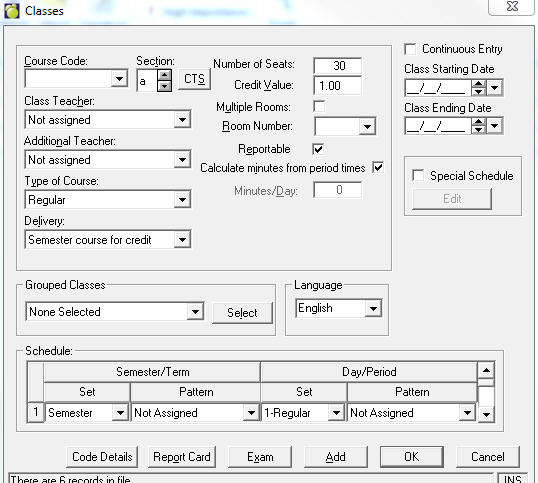
This is an example of an Edit screen. It is by default set to Reportable and after the fact (i.e. once all sections are established) the schools can go under Scheduling, Modify Files, Classes and make any further class specific adjustments to our defaults. Fields that are available in Scheduling, Modify Files, Classes that have defaults assigned to them in the Assign Classes tool and are there not available there include:
Alberta Only:
 Alberta schools will see a CTS button beside the Course Code. When you click on this button, you can flag a class as
Master class and select from the list of classes the class(es) that are to be assigned to this Master. When you click on the CTS button on an assigned class the user will see the Master class this class was assigned to.
For example, if there were two classes of grade ten French (FRE2A), the Courses File would require the course code FRE2A and the Classes File would contain the two classes/sections FRE2Aa and FRE2Ab.
Notes:
You will see warning messages after making certain changes:
Editing Classes
To edit a class, select one of the lines of information and double-click, press Enter or click the Edit button.
Course Code: Click in the Course Code box and enter a code or click the pull down arrow to display a list of codes.
Section box: Enter a new section code. You can also use the up and down arrows to move forward or backward alphabetically.
Class Teacher: Click the down arrow to display a list of teachers if the teacher is known at this time. Note: the teacher drop down list only displays those staff members who teach. The Teach box must be checked in the staff records and those teacher’s must have a status of "this year and next" or "next year only". For access to this box, choose Staff, Staff Records. Then click the Biographics tab and click the Edit button.
Type of Course: You can use the drop down menus to specify the Course (e.g. Out of school Co-op).
Delivery: (e.g. summer school).
Grouped Classes: Click the down arrow to display a list of grouped classes. Select one of the grouped classes from the list. To edit the grouped classes selection, click Select if applicable. Grouped Classes refers to multiple classes which are taught in the same period by the same teacher in the same room.
Number of seats: Enter up to a 3-digit value.
Credit Value: Enter a credit value of the class.
Multiple Rooms: Click the check box if there are Multiple Rooms where this class is taught. Click the Edit Rooms button to specify which rooms will be used by this class on which days and periods.
Room Number: Select from the drop down menu.
Alternate Room: Select from the drop down menu. This information only has to be entered if known at this time.
Reportable: A checkmark appears here by default to indicate this class will be included on Report Cards, Report Builder printouts and Ministry reports. Remove the checkmark if this class does not need to be included in such reports.
Language: Select the language of instruction for the class.
Schedule: In the Schedule frame select the placement if known at this time. Depending on whether you are working with Period Patterns or Basic Patterns, this frame will differ.
All Classes should be specified as Secondary at the present moment in the Class Type frame. For those schools who have both elementary and secondary students, you can indicate whether the class is to be scheduled using a rotary timetable by selecting the Elementary button. Call Maplewood Support if this is applicable.
At the bottom of the editing box you can move forward and backward in the list of classes by clicking the Next or Previous buttons. When you have finished editing, click OK. To exit without saving changes, click Cancel.
Adding Classes
Click the Add button and the editing box will appear. Enter information for the same options as found above in Editing Classes. Once you have chosen a course code, the section letter will automatically move to the next available section letter in the alphabet. You can add additional classes by clicking the Add button on this screen. When you have finished, click OK.
Deleting Classes
To delete a class, select the line of information that you want and click the Delete button. You will be prompted if you attempt to delete a class containing students. You can only delete a class with no students assigned to it.