
Every student has a history area where information on completed courses, final marks, accumulated credits, diplomas granted, and other related information for the student's transcript is maintained and printed. When the final marks have been entered for the students, the Automatic Transcript Update choice within Mark Reporting will automatically transfer the completed courses and marks into the history area. Before a course may be transferred into the history area, the course code must be recorded in the Code File. To access the a student's History tab, choose Students, Student Records select the student and click the History tab.
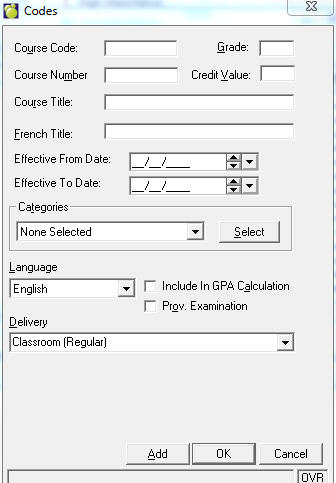
Enter codes that are available in the school. To access the Codes File list, choose File, School Setup, Codes. The Codes File editing box will appear.
Note: When the user opens a table, the program will select (highlight) the first item on the table. Without using the search menu, the user can enter e.g. "S" and the focus will move to the first item starting with "S".
Use the option buttons at the bottom of the screen to add, delete or edit codes.
Note: When the user attempts to remove a code, it will now list up to 10 students who have that code in their transcript. The code may not be deleted if it is used in any student's transcript.
Course Code: Generally, the course codes are the same as the course codes in the Courses File. Over time, the Courses File and the Code File will differ. The Courses File contains only the courses taught in the current year whereas the Code File contains all courses that have been taught in the school over an extended period of time (i.e. every course that may appear on the students' transcripts). It is important that the Codes are entered identical to the Courses (codes). The list may differ, but the codes can't. i.e. using uppercase instead of lower case, using uppercase O instead of number 0.
A course code (up to seven characters) is entered through this option. The entry may be made in lower case and will automatically be capitalized. If a record exists on file for the course code entered, the description on file will appear on the screen, if not, the previous description will remain, ready to be edited.
In some instances you may have to store the same description for more than one course (i.e. MAT1G, MAT1A). Simply highlight the course description that has already been entered, right-click, Copy and click OK. Highlight the course you wish to add the course description to and click the Edit button. Next, click in the text box for the course description, right-click and Paste. Finally, click OK.
Note: Although the full course code is entered here, only the first 5 characters are printed on the transcripts.
Course Number: Every code in the Code file must contain a course code, and optionally a course number. Some schools setup a course code such as CMA25S with a course number such as 3911-25S. This subject code is the first 4 characters and the subject level and course type are the last 3 characters. Other schools just use the course code 391125S with no course number. The course number may be up to ten characters in length.
Ontario Only: In Ontario this field is used as an ‘Anti-requisite’ field. With the introduction of the double cohort in 1999, schools were offering 2 streams of courses (OSS and OS;IS) which had the same curriculum content. To ensure that a student did not take 2 courses with the same content, the Anti-requisite field was adopted.
In later years the use of this field has expanded to include those course codes that have the same first 5 characters, but differing 6th characters. Again in this instance the course content was the same.
When using the Course number as the Anti-requisite field, please ensure that BOTH courses have the opposite course code in the course number field. Please contact Maplewood if you have any questions on how to set up the anti-requisite field.
Course Title: The English title of the course may be up to 39 characters in length (e.g. Introduction to Instrumental Music). If a student's language preference is English, the English course titles print on the transcript.
French Title: The French title of the course may be up to 39 characters in length (e.g. Communication & methodes des affaires). If a student's language preference is French, the French course titles print on the transcript.: The French title of the course may be up to 39 characters in length (e.g. Communication & methodes des affaires). If a student's language preference is French, the French course titles print on the transcript.
Categories: The category of the course may be selected from the following possibilities:
To assign a category to the course, click on the Select button. Select a category from this list, then click OK. To deselect a category, click on the highlighted category and it will deselect.
Language: Select from the provided options.
Grade: Enter a grade in the provided space.
Delivery Type: Select from the provided options: Class Instruction, Distance Learning
GPA Calculation: Check the box to include or leave unchecked to exclude calculations.
Credit Value: Enter an appropriate Credit Value in the provided box. The default is 1. Note: Manitoba can now set the credit value for course codes in the code file.
Type: Click the Type button. From here the course is identified whether it is a Day School, Night School, Summer School, Correspondence, or Other type of delivery, as well as has to select whether it is a Regular, In-School Co-op, or Out-School Co-op.
Ontario Users Course Codes
The list below includes all senior level Language courses
Classical Languages
LVGCU
LVLCU
International Languages
***CU
***CO
***DU
***DO
Native Languages
***EO
Jurisdictional Specific Codes Windows
The following screenshots show the differences among the Codes windows for each jurisdiction.
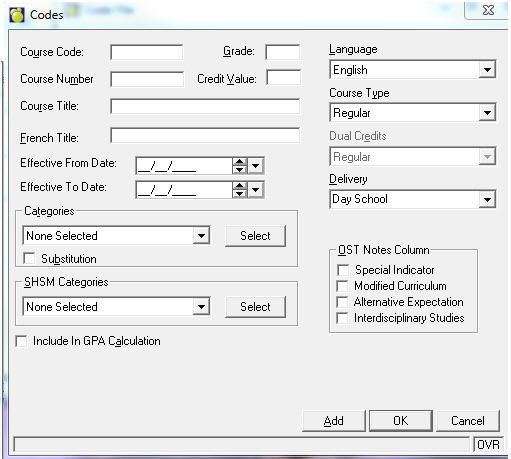
Ontario Jurisdiction
OST (Ontario Student's Transcript) Notes Column
Ontario users will see an OST Notes Column. These different checkboxes will handle the specific code different from the norm, i.e. Alternative Expectations - This is a revised course which is an alternative to another course.
You can enter a High Skill Major: the list of High Skill Major is being defined in the Category table (Marks, Define Categories). The program will know that when a category has a Board Code of H**, it will be diverted to the High Skill Major selection. If the Board Code does not start with H**, it will remain in the Categories selection.
To access the Codes File list, choose File, School Setup, Codes.
Use the option buttons at the bottom of the screen to add, edit, print or delete courses.
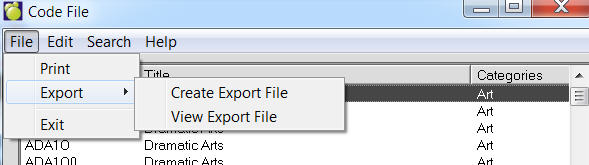
Codes Tables can now be exported to a file. To do this, use the menu at the top to select File, Export, Save. Once the file is created, it may be viewed by selecting File, Export, File Export View. The file is in comma delimited format (csv) and includes headers. For hosting customers, if you want to use the file in Excel (as an example), use the View option to find the file and then copy and paste it to a local machine licensed for Excel.
Each jurisdiction will have a different Codes setup screen. This is the Ontario Codes File editing box.
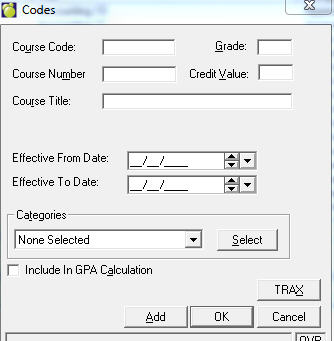
British Columbia Jurisdiction
To access the Codes File list, choose File, School Setup, Codes. This is the British Columbia Codes File editing box.
Alberta Jurisdiction
To access the Codes File list, choose File, School Setup, Codes. This is the Alberta Codes File editing box.
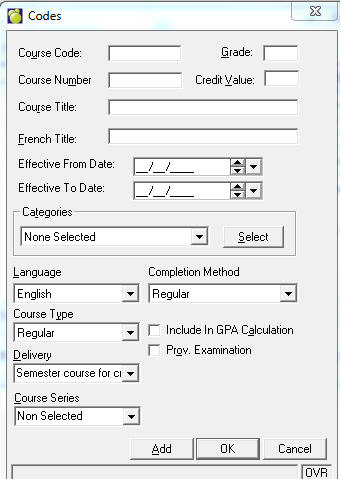
Manitoba Jurisdiction
To access the Codes File list, choose File, School Setup, Codes. This is the Manitoba Codes File editing box.
Saskatchewan Jurisdiction
To access the Codes File list, choose File, School Setup, Codes. This is the Saskatchewan Codes File editing box.
