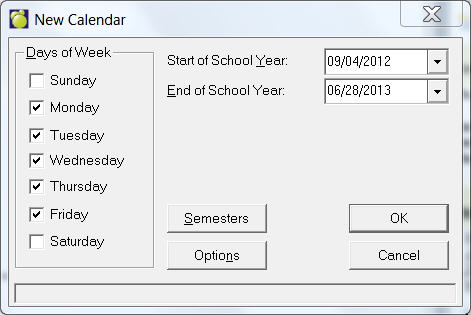
* If a calendar already exists, the Edit menu option will appear rather than the New option. See Editing The Calendar.
The school calendar specifies the school days throughout the year. The calendar is used to determine whether or not a student is expected to attend school today, and to determine a student's age.
Every day in the calendar has attributes that indicate whether it is a normal school day or a non-school day. Non-school days are flagged as either Holiday (e.g. a statutory holiday), Special (professional activity/development day where students do not attend school), Board day (a non-school day affecting all schools in the board such as March/Spring Break), or Grant day (an unexpected closure such as weather or no heat in the school). Secondary schools can also flag days as Exam days where exam day attendance can be taken rather than regular daily attendance.
Each normal school day can have a daily cycle assigned to it (e.g. a 2 day cycle would have some normal days flagged as day 1, and other days flagged as day 2). The daily cycle is important in those schools where classes are taught in different periods on different days, or classes are not taught on every day of the cycle. For example, if a class is taught in period 1 on day 1, and in period 2 on day 2, the calendar is used to determine what class the student is expected to attend in period 1.
School that have students attending full days but not every day, can flag each date as a specific alternate day (e.g. full day kindergarten where students attend Monday, Wednesday, and every other Friday would flag these dates in the calendar as Alternate Day 1 while Tuesdays, Thursdays, and every other Friday is flagged as Alternate Day 2).
A new calendar is created every school year. It is automatically created during the year end roll over process, so only new schools will have the option to create a new calendar. Once a calendar exists, it may be edited, however there are many protections in place to prevent changes to the calendar for days in the past.
Note: Automatic student and staff age calculation will not be accurate until you have created the calendar.
Once you have entered these dates click OK. The calendar is now ready for editing. The daily rotation follows the cycle of days entered into the school's structure (defined using File, School Setup, School Information, This Year tab).
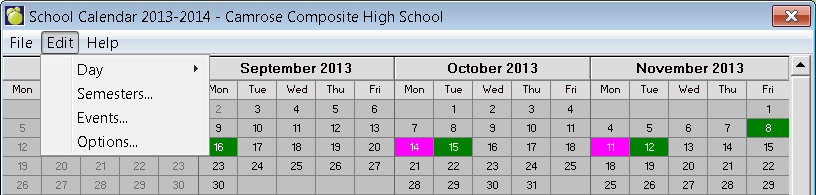
To access the editing screen, choose File, School Setup, Calendar, Edit.
The initial view will show all the months in the school calendar, and optionally may include inactive months such as July and August. The days in each month will appear colour coded for all non-school days. The colours correspond to the day types in the buttons at the bottom of the interface (e.g. Green for Grant Days, Yellow for Exam Day for secondary schools only). Optionally, Saturday and Sundays may appear. If school is not offered on those days, they will appear disabled.
Today's date (as selected by the school's office in Maplewood), will have an asterisk in the cell (e.g. June 26th in this example). The date currently "selected" will be a darker grey (e.g. February 12th in this example).
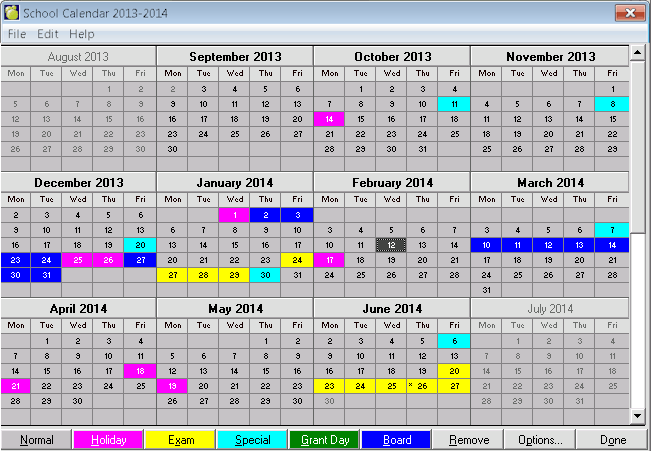
To see an expanded view of any month, click the cell containing the month's name. For example, clicking the cell with the words "December 2013" will show the expanded view of December.
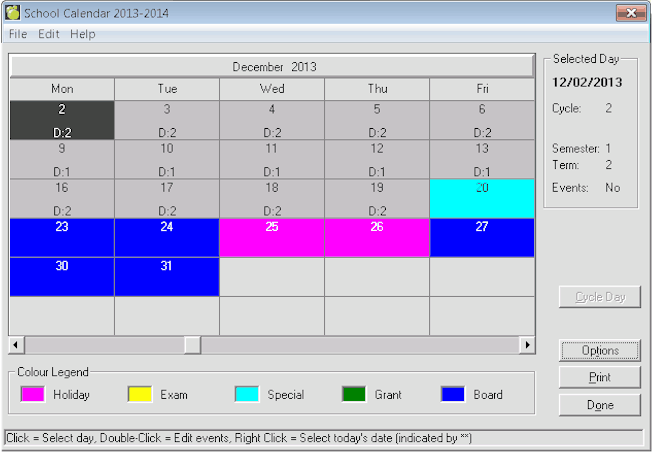
The selected day will appear with a dark grey background (e.g. December 2nd in the example above). Details on that day will appear in the right where it shows selected day's date, day in the cycle, semester, term, and whether anything has been entered in the calendar of events. The Cycle Day button will be disabled if the selected day is in the past. This will prevent the accidental changing of the day in the cycle for dates that already have past and attendance would have been recorded for it.
Changing The Type Of Day - From the year view (not a single month view) of the calendar, select a day by clicking it and assigning an day type by clicking one of the option buttons at the bottom of the screen. You can specify Holidays, Exams (for Secondary Schools), Special Days, Grant Days and Board Days. For example, click cell for December 25th and then click the Holiday button to make December 25th a holiday in the calendar.
Changing the Cycle Day or Alternate Day - From the month view (not the year view) of the calendar, select a day by clicking it and they click the Cycle Day button or Alt. Day button. On the resulting form, enter the desired cycle day or alternate day. Upon making the change, it will prompt a message asking if all subsequent cycle days are also to be updated.
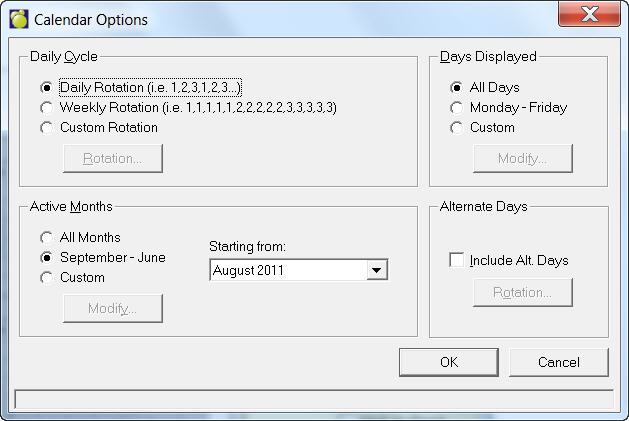
Options Button - From the year or month view, use the Options button to control the presentation of months and days to be displayed in the calendar by selecting the preference from the Active Months and Days Displayed frames. The Options button is also used to define daily and alternate day (if applicable) rotations. This is the Options interface:
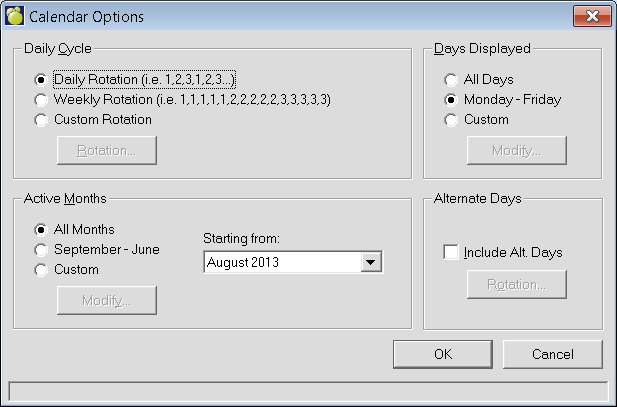
Use the Daily Cycle options to define how the schools defines the rotation from day 1 to day 2 to day 3, etc. This is only applicable to those schools with more than 1 day in the cycle. Daily rotation will always assume that the next calendar date is the next day in the cycle (e.g. days always cycle from day 1 to 2 to 3 to the highest day and then start over again. The weekly rotation, if a school had a 2 day cycle as an example, would flag all days in one week as day 1 and the next week would be all day 2, then the next week would be all day 1, etc. The Custom Rotation is defined by selecting the Rotation button and then setting up the rotation on the resulting interface:
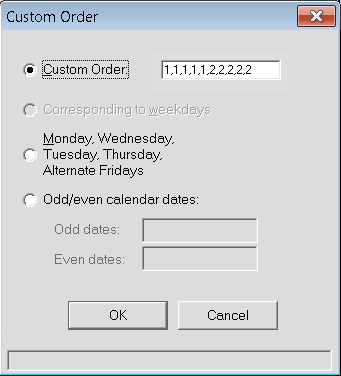
The Odd/even calendar dates option, if selected, allows the user to select what the cycle day is on odd dates vs even dates. For example, if a school needs to setup a daily rotation that reflects odd days of the month as Day 1 and even days of the month as Day 2, the entry would be Odd Dates: 1, Even Dates: 2 .
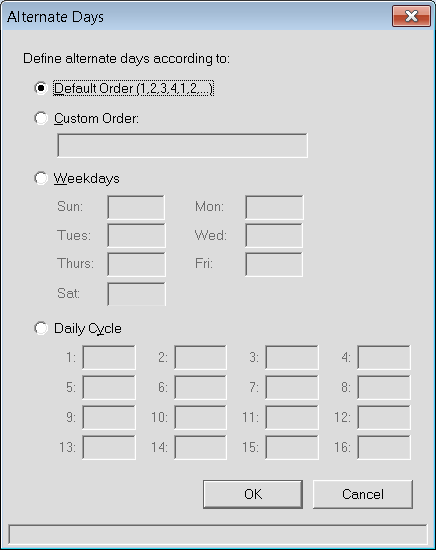
Use the Alternate Days options if the school has students half time students (e.g. kindergarten or junior kindergarten students) who attend on alternate days. Each student in this situation is assigned an alternate day group. The calendar defines what days they are expected at school. Once the Include alt. Days box is checked, use the Rotation button to define the alternate day rotation on the resulting interface:
Please contact Maplewood for assistance in defining the daily or alternate day rotation if unsure which option is best for the school's situation.
Schools with multiple semesters/terms
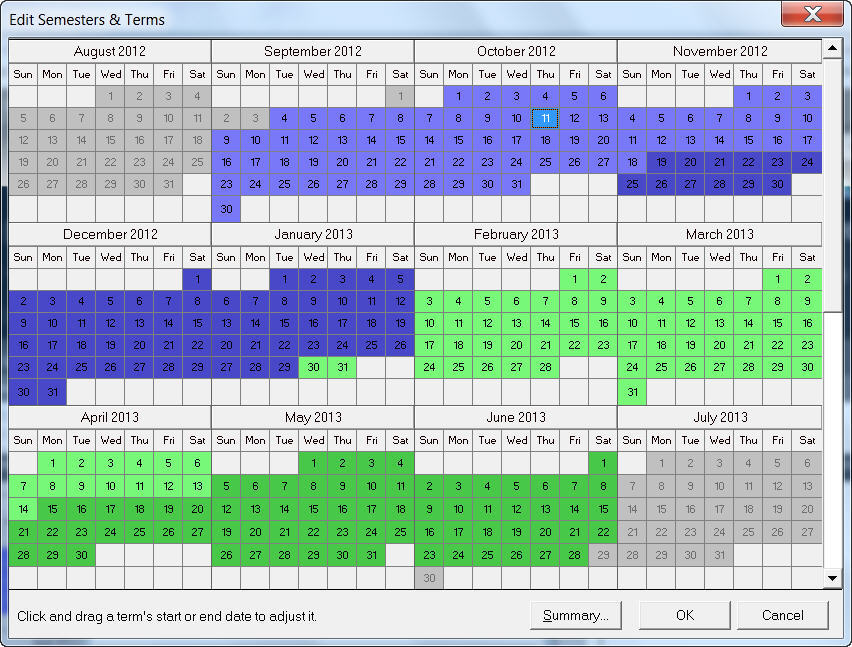
Schools with multiple semesters/terms (e.g. secondary schools) can choose Edit, Semesters from the main calendar to display the year’s calendar with colour changes corresponding to the change in semesters and terms.
A school with 2 semesters and 2 terms per semester will look like this example, where the purple colours represent semester 1 and the green colours represent semester 2. The light purple and green days represent the first term in each semester, while the darker purple and green days represent term 2.
If the dates of the semesters/terms need to be changed, click on the semester/term start or end date and then drag it to the new date. For example, to change semester 1/ term 2 start date from November 21 to November 14, click November 21 and hold down the mouse button and drag the cursor to November 14 and then release the mouse button. Changes to semester/term dates can be applied to classes if the Maplewood date is on or before first normal school day. In the calendar, if a user changes the semester and/or term dates, the following message will be prompted if the Maplewood date is on or before the first normal school day in the calendar: "Each class has a start and end date. The semester/term dates have been modified. Do you want to reset all class start/end dates to match the new semester/term dates?" If you indicate Yes, all classes will have their start and end dates reset corresponding to the semester(s)/term(s) in which they are scheduled. Some provincial reporting includes these dates. It is important to have these dates set accurately at the start of the year, as some provincial reports do not like these dates to change once the report has been submitted.
Alternatively, users can double-click on a day and manually change the Semester or Term start/end dates, by entering the date or by choosing the day from a dropdown.
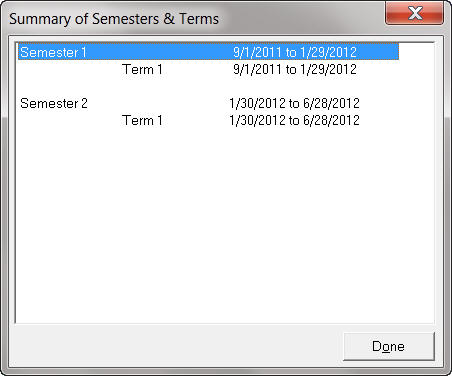
Clicking on the Summary button will show a preview pane of the Semester and Term dates, clearly indicating start and end dates.