Choose Students, Print Lists and use these commands to print lists of information.
Topic-based/Classroom Manager Reports
Students In A Sports House (St. Lucia and Caribbean Community)
Choose Students, Print Lists, Alphabetical List of Students. A Print List box will appear with options to select for printing.
On the Filter tab, select the Start and End student for printing. Click First In List and Last In List or use the Select button to choose a specific student. Next include one or all of: students registered in Both This and Next Year, This Year Only, Next Year Only or Deleted. Specify if you want Each Surname Initial on a Separate Page and if you want the list Double Spaced.
On the Name Formats tab, select the Given name and middle name or the Usual name, to be printed. Then check if you want to print the Student 3 letter code and the Student number.
On the Student Information tab, select either Student Name Only or select from the available fields by checking the ones you want.
On the Bus tab, select either to include Bus Route Information or select from the Inbound and Outbound available fields. Finally, specify if you want to Include Bus Top Information.
On the Fonts tab, use the Header/Footer, Title, Student Name and Student Info buttons to select the type of font. Select if you want to print the Operating System date, the Administration System date or no date. Finally, specify if you want condensed line spacing, left justified student information and indented text for a 3 hole punch binder.
Click View to preview or Print the list.
Choose Students, Print Lists, Students on Bus Routes. A Print List box will appear with options to select for printing.
On the Filter tab, select either Individual Bus List and select from the Start With list, or select from the Start and End list. Specify Student Information that you want included, Bus Stop and or Comments), Inbound or Outbound bus routes. Next include one of or all of: Sort by bus stop, Each bus stop on a separate page and if you want the list Double Spaced.
On the Name Formats tab, select the Given name and middle name or the Usual name, to be printed. Then check if you want to print the Student 3 letter code and the Student number.
On the Student Information tab, select either Student Name Only or select from the available fields by checking the ones you want.
On the Fonts tab, use the Header/Footer, Title, Student Name and Student Info buttons to select the type of font. Select if you want to print the Operating System date, the Administration System date or no date. Finally, specify if you want condensed line spacing, left justified student information and indented text for a 3 hole punch binder.
Click View to preview or Print the list.
Choose Students, Print Lists, Homeroom Lists. A Print List box will appear with options to select for printing.
On the Filter tab, select the Start and End homeroom list for printing. Check the First In List and Last In List or select from the list. Next include one or all of: students registered in Both This and Next Year, This Year Only, Next Year Only or Deleted. Specify if you want Each Surname Initial on a Separate Page and if you want the list Double Spaced.
On the Name Formats tab, select the Given name and middle name or the Usual name, to be printed. Then check if you want to print the Student 3 letter code and the Student number.
On the Student Information tab, select either Student Name Only or select from the available fields by checking the ones you want.
On the Bus tab, select either to include Bus Route Information or select from the Inbound and Outbound available fields. Finally, specify if you want to Include Bus Top Information.
On the Fonts tab, use the Header/Footer, Title, Student Name and Student Info buttons to select the type of font. Select if you want to print the Operating System date, the Administration System date or no date. Finally, specify if you want condensed line spacing, left justified student information and indented text for a 3 hole punch binder.
Click View to preview or Print the list.
Choose Students, Print Lists, Class Lists. A Print List box will appear with options to select for printing.
On the Filter tab, select either Individual Class List and select from the Start With list, or the Start and End class list for printing. Check the First In List and Last In List or select from the list.
Next include classes in a Period in Day or Specific Pattern.
Now specify if you want to include Student
Information, the Attendance Entry Grid or the Mark Entry Grid. Finally,
select one or all of: Include Grouped Classes, Page Break Between
Classes and Include Class Schedule in Title.
° If Print Grouped classes together is not checked off, it will treat
each class as if it's not grouped.
° If classes are grouped, then using an example where CLASS1 (with
10 students) is grouped with CLASS2 (with 5 students), the options
work as follows:
-If "Print Grouped classes together" is not checked
off, it will treat each classes as if it's not grouped.
-If "Print Grouped Classes Together" is checked off,
it will result in CLASS1 with the 10 students printed first immediately
followed by CLASS2 with 5 students. It will look at the Page Break
Between Classes setting to determine if 1 or 2 pages print.
° If both "Print Grouped Classes Together" and "All
Students Alphabetically" are checked off, it will result in one
class lists (CLASS1 and CLASS2 will appear at the top) and all 15
students will print alphabetically as if in one class together.
On the Name Formats tab, select the Given name and middle name or the Usual name, to be printed. Then check if you want to print the Student 3 letter code and the Student number. For Teacher Name, select Given Name or Initial and then select if you want to include the teacher's title.
On the Student Information tab, select either Student Name Only or select from the available fields by checking the ones you want.
On the Achievement tab include one or all of Marks and Comments. If you are printing Comments, specify if you want comment numbers or the text from the column. You can include comments from specific column or all comments. When All (comments) is selected, then the program will list the comments for each column. Should some columns not have a comment assigned, the program will skip those columns. If you are using semesters, select the semester's marks and comments that you want printed.
On the Bus tab, select either to include Bus Route Information or select from the Inbound and Outbound available fields. Finally, specify if you want to Include Bus Top Information.
On the Fonts tab, use the Header/Footer, Title, Student Name and Student Info buttons to select the type of font. Select if you want to print the Operating System date, the Administration System date or no date. Finally, specify if you want condensed line spacing, left justified student information and indented text for a 3 hole punch binder.
Click View to preview or Print the list.
Choose Students, Print Lists, Students In An Excursion. A Print List box will appear with options to select for printing.
On the Filter tab, select the excursion and whether or not you want the list double-spaced.
On the Name Formats tab, select the Given name and middle name or the Usual name, to be printed. Then check if you want to print the Student 3 letter code and the Student number.
On the Student Information tab, select either Student Name Only or select from the available fields by checking the ones you want.
On the Bus tab, select either to include Bus Route Information or select from the Inbound and Outbound available fields. Finally, specify if you want to Include Bus Top Information.
On the Fonts tab, use the Header/Footer, Title, Student Name and Student Info buttons to select the type of font. Select if you want to print the Operating System date, the Administration System date or no date. Finally, specify if you want condensed line spacing, left justified student information and indented text for a 3 hole punch binder.
Click View to preview or Print the list.
Choose Students, Print Lists, Specific Grade. A Print List box will appear with options to select for printing.
On the Filter tab, select an Individual Grade or a First and Last Grade to print. You can choose to also print Deleted students and have each line double-spaced.
On the Name Formats tab, in the Student Name area select the Given name and middle name or the Usual name, to be printed. Then check if you want to print the Student 3 letter code and the Student number. In the Teacher Name area, specify to print Given Name, Initial and click the checkbox if you want the Title printed.
On the Student Information tab, select either Student Name Only or select from the available fields by checking the ones you want.
On the Bus tab, select either to include Bus Route Information or select from the Inbound and Outbound available fields. Finally, specify if you want to Include Bus Top Information.
On the Fonts tab, use the Header/Footer, Title, Student Name and Student Info buttons to select the type of font. Select if you want to print the Operating System date, the Administration System date or no date. Finally, specify if you want condensed line spacing, left justified student information and indented text for a 3 hole punch binder.
Click View to preview or Print the list.
Choose Students, Print Lists, Birthday Lists. A Print List box will appear with options to select for printing.
On the Filter tab, choose one of, All Students, All Students By Homeroom or Students Born in a specific month. If you select All Students By Homeroom, see step 3. Next include one or all of: students registered in Both This and Next Year, This Year Only, Next Year Only or Deleted. Specify if you want the list Double Spaced.
Select either Individual Homeroom list or select a start with and end with list from the drop-down list. If you wish to use the first and last in the list, click the checkboxes. You can have the list sorted by Room Number, Designation or Teacher.
On the Name Formats tab, select the Given name and middle name or the Usual name, to be printed. Then check if you want to print the Student 3 letter code and the Student number.
On the Student Information tab, select either Student Name Only or select from the available fields by checking the ones you want.
On the Fonts tab, use the Header/Footer, Title, Student Name and Student Info buttons to select the type of font. Select if you want to print the Operating System date, the Administration System date or no date. Finally, specify if you want condensed line spacing, left justified student information and indented text for a 3 hole punch binder.
Click View to preview or Print the list.
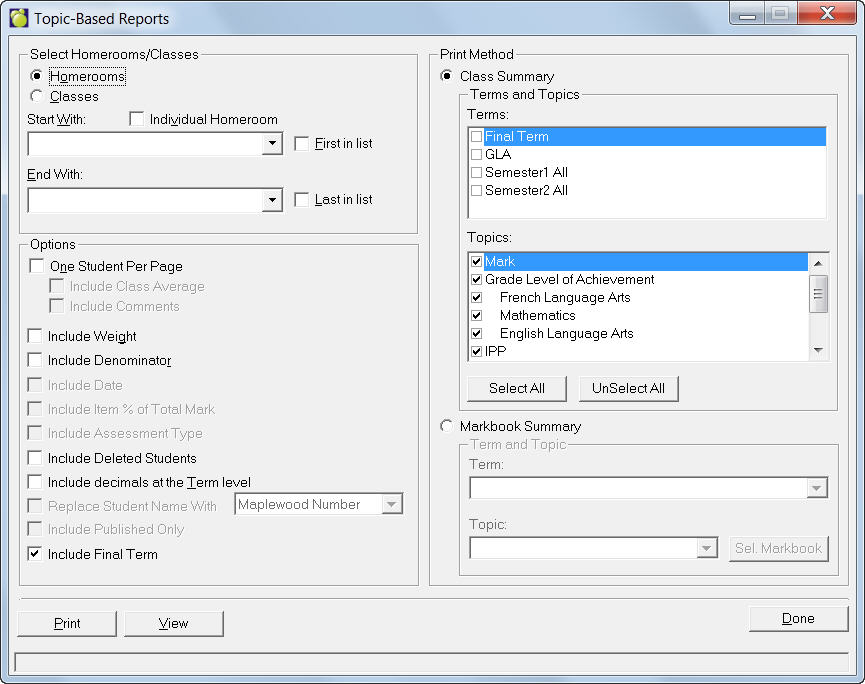
Choose Students, Print Lists, Topic-Based Reports. This box will appear with options to select for printing.
Select Homerooms or Classes and a start with and end with homeroom or class from the drop-down list. If you wish to use the first and last homeroom or class, click the First in List and /or Last in List checkboxes.
In the Options frame, you can choose to print One Student Per Page (with Class Average and Comments), Weights, Denominators, Date, and Deleted Students.
To select Terms and Topics, first click the Class Summary option button and then check the applicable boxes in the Terms and Topics areas.
To select Markbook Summary options, first click the Markbook Summary option button and then make a selection from each of the Terms and Topics drop-down lists.
Click View to preview or Print the list.
Choose Students, Print Lists, Students In An Advisor Group. A Print List box will appear with options to select for printing.
On the Filter tab, select either Individual Advisor Group List and select from the Start With list, or the Start and End Advisor Group List for printing. Check the First In List and Last In List or select from the list. Next include Sort Students By Grade and if you want the list printed double-spaced. Next specify if you want to include Student Information, the Attendance Entry Grid (select month) or the Mark Entry Grid (select Number of Marks).
On the Name Formats tab, select the Given name and middle name or the Usual name, to be printed. Then check if you want to print the Student 3 letter code and the Student number, and if you want the name underlined. For Teacher Name, select Given Name or Initial and then select if you want to include the teacher's title. You can choose to have the name width Automatically Calculated, or specify your own width. Finally, choose to print Lines for Headings and/or Add Extra Lines to the printout.
On the Student Information tab, select either Student Name Only or select from the available fields by checking the ones you want.
On the Fonts tab, use the Header/Footer, Title, Student Name and Student Info buttons to select the type of font. Select if you want to print the Operating System date, the Administration System date or no date. Finally, specify if you want condensed line spacing, left justified student information and indented text for a 3 hole punch binder.
Click View to preview or Print the list.