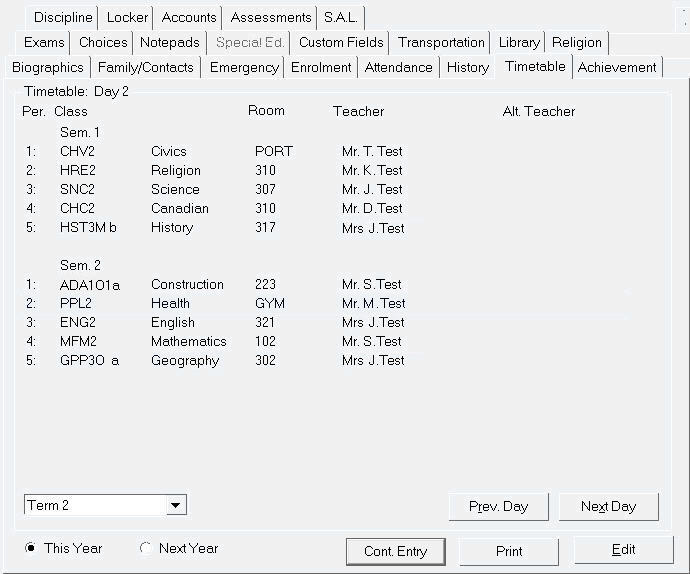
The classes in which a student is enrolled may easily be changed for either this year or next year. Choose Students, Student Records, select a student, click the timetable tab and click the This year or Next Year option. The class currently in progress will be highlighted with a blue box.
Note: The blue box is a built-in colour that cannot be changed.
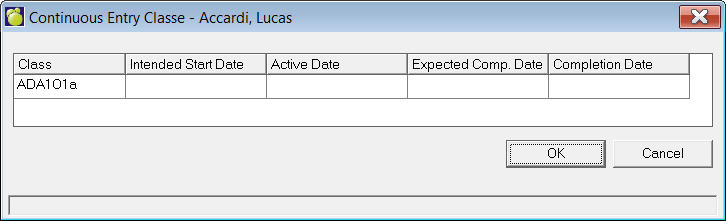
If a student is enrolled in a class that is flagged as a Continuous Entry class, the new Cont Entry button on Timetable tab of student's record will be enabled. This button will provide access to information regarding the student's enrolment in the continuous entry program (such as their start date and completion date).
A Continuous Entry class would be e.g. an online course where there is no set entry or completion date and students can sign up and work at their own pace until the course is completed.
You can access the edit timetable feature using the Timetable tab of a student's record, or by choosing Students, Students, Edit Timetables, Edit Individual Timetables. Using the latter method will give you the same Edit timetable screen as you see through student records, but it saves calling up the record, accessing the timetable tab, and clicking Edit. To edit the timetable for either year, click the Edit button. You will see a screen similar to the one below.
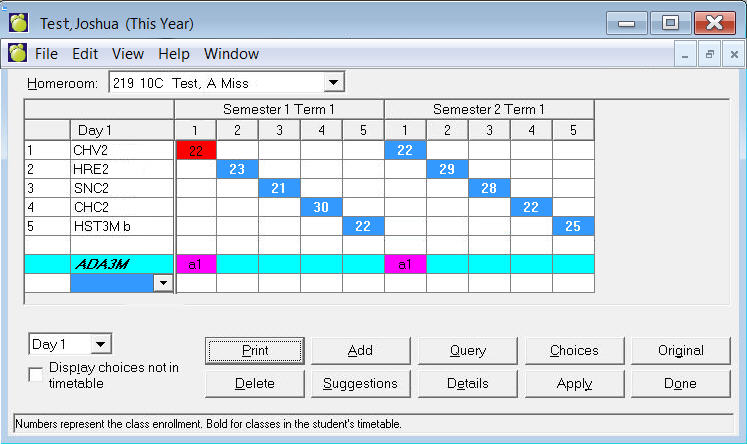
The semesters, periods and day are displayed across the top of the screen. You can change the day using the drop down menu in the bottom left corner.
Beside each class, a row of numbers is displayed. The numbers correspond to the number of students enrolled. The student is enrolled in those classes which are displayed in blue. The other displayed numbers represent other sections of the same class and the number of students in each of those classes.
If more than one class of a course is taught in the same period of the same semester, only one of those classes can be displayed. Courses in this situation are marked with an asterisk (*). An asterisk indicates that there is more than one class (section) of that course in the period.
If the timetable change requires a new homeroom assignment for the student, the homeroom can now be edited at the same time. The student’s homeroom is presented above the timetable grid.It will now display the columns for term 2, 3, etc, only if the student's timetable changes between the terms.
The class sections in the student’s existing timetable will appear with a Blue background (previously they were blue numbers in a white background).If a student is enrolled in a course that has multiple classes, the other classes will still appear in the grid with their enrolment numbers. The user may now click on any of these other classes to automatically change the student’s class section rather than deleting the student from the original class and then adding them to the new class.
The user may now temporarily allow a conflict in the student’s timetable while making adjustments. The conflicting classes will have a Red background. To remedy a conflict, one of the classes must be deleted (e.g. click a different class section or use the Delete button). When the conflict is resolved, the cell will appear in blue. Please note, if a user attempts to use the Done button when conflicts still appear, a message will appear indicating "There are conflicts in the timetable and it cannot be saved".There is now a blank row after the last class in the timetable. This row allows the user to select any course and view its class sections in the timetable grid. To do this, click the blank course cell at the bottom of the timetable, then click the drop down list to select the course from the list or type the course code. The course will appear in Italics to representing a “course” for consideration and the entire row will appear in Cyan representing a course not yet added into the student’s timetable. Once the class sections appear in the grid, those sections that conflict with existing classes will have a Magenta (Pink) background. The user can click any class section to enroll the student in the class.
For both This Year’s Timetable and Next Year’s Timetable, there is a new check box called Display Choices Not in Timetable. When checked, any courses requested by the student that are not in the student’s timetable will appear at the bottom of the timetable with the Cyan background. It works the same as step 7 above, however the course code is not italicized. During the scheduling process and at the start of a new school year, users may want to have this checked as it will remember preferences.Note: You will need to force a re-read of your preference for this check box by changing the cycle day in edit timetable or exit Edit Timetable and then re-enter.
Please also note: For a student who Walks In without any timetable, it may be more time efficient to use the Choices and Suggestions Buttons as they take into consideration the impressive Maplewood Scheduling Algorithm.
At this point there are several options when
working with the student's timetable. Use the menu options listed below
the student's name
![]()
or use the buttons located in the bottom right corner of the timetable screen:

Click Print to send a copy of the current timetable to your printer.
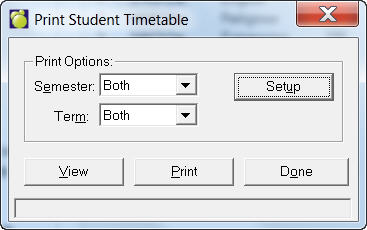
Click the Setup button to specify fonts, semesters, terms, and any student information that you would like printed.
When you have everything specified, click View to see a preview or click Print to print immediately.
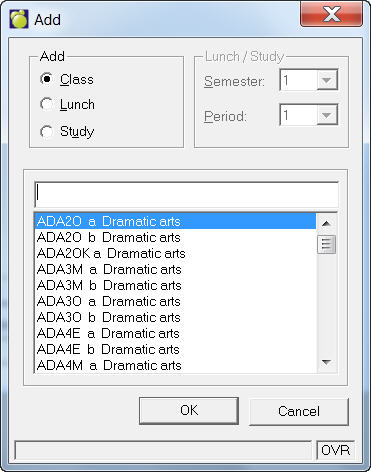
Click Add on the Edit Timetable tab. This option adds a class to the student's timetable upon entry of the class in the add window. The class must appear in the classes file in order for it appear in the add window. The added class appears on the screen if not conflicts exist. If a conflict exists between an existing class and a class you are trying to add, you will be told that there is a conflict and the class will not be displayed. If the student already has a full time table, you will not be able to Add any other classes to his/her timetable.
To delete a class, first select from the list on the left side of the Edit Timetable screen, and then click Delete. You will be asked to confirm that you want the class deleted. Choose Yes to continue with the deletion.
This option deletes the selected class from the student's timetable.
If class is added/deleted in Edit student's timetable, the program will ask if "Do you want to adjust the student fee for Added and Dropped courses that carry a fee amount?"
When you select Yes, the program will charge/credit the fee to the student's account.
If the fee was never charged, then the program will inform the user that a credit can not be given to the student when the course is dropped. Dropping a course which has been charged to a student will result in changing the charge to $0.00 if the class was dropped within the allotted refund period. If the class was dropped after the allotted refund period, the charge will remain in the student's account record.
When a student is charged for future classes (Semester 2 classes) at the beginning of the school year but drops the class within the allowable 'refund' time once he/she participates in the class, the program will change the charge to $0.00.
i.e. All classes for Semester 1 and 2 are assigned at the beginning of the school year. Student drops a Semester 2 class within the 'refund time'. Program will calculate the 'refund' option as of Semester 2 start date. The Account transaction for the class fee will be changed to $0.00.
Edit, Query or click Query button
Click Query on the Edit Timetable tab. This option provides information about specific classes so that counsellors may make effective timetable changes. The window may look like this:
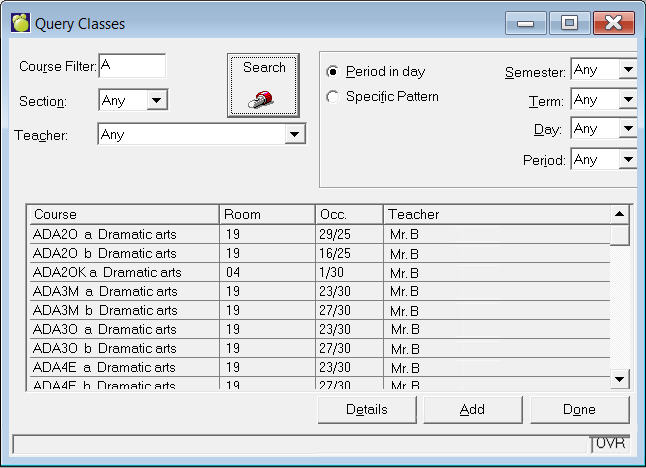
This query was a search on all English classes (those starting with "E") in Semester 1, period 1. You can do a query using any of the following criteria:
-Choose the pattern (e.g.
E*** to display all classes starting with "E", ***3* to display
all grade 11 classes).
-Section
-Teacher
-Period in Day, or Basic Period
-Semester 1 or 2, or both (by checking both boxes) -Day
-Period
Click Search when you have specified all criteria.
A list of all matches will appear. It will show you the class code, room
number, occupancy, and teacher. To get further information on one of the
classes (e.g. other students enrolled in this class) highlight the class
and click the Details button. To add the class to the student's timetable,
highlight the class and click Add.
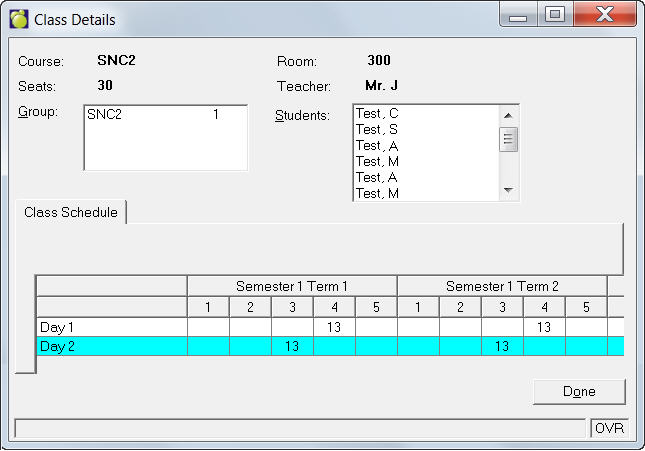
Details
This option will provide you further information about a chosen class.
Highlight the class and choose Details Information displayed includes,
class code, teacher, room, number of seats, grouped classes, other students
enrolled in the class, and which period the class is on each day of the
cycle.
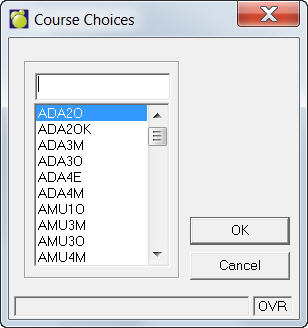
This option will add classes to the student's timetable to be used in conjunction with the suggestions button. Click the Choices button to produce the list of courses. Choose a course from the list. This course will be added to the list of classes in the student's timetable in bold. The sections of the course can be seen, but the course will not display in blue until you assign that class to the student. For now, the course is simply another choice to be used with the suggestions option.
Once the courses the student wishes to take have been added using the Choices button, use this option to see the timetables the computer suggests for the student. There are two windows that will appear using this option
To see any possible timetables, click the Suggestions button from the Change Student Timetable screen menu. Enter the suggestion parameters and click OK on the box that appears.
The program will prepare as many timetables as possible.
If you want to look through the list of possible
timetables, use the Next and Previous buttons. When you see a timetable
that you like, click the Accept button and then click Done.
You can return to the original timetable if you don't see a timetable that
you like, or if you want to see what the original timetable looked like
(before you began editing). Any courses that you added (and timetabled
successfully) will still be there; also, any courses that you added to
the bottom of the list for future timetable suggestions will still be
there.
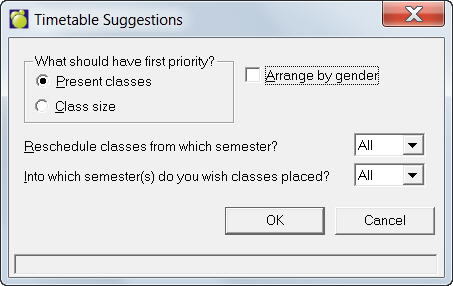
Before the timetables may be suggested, the
top window will appear. You will be asked to consider the following:
1. Which should have first priority? Present Classes or Class Size. if
new courses are being merged into an existing timetable, you have the
option of prioritizing the student's present timetable so that minimal
changes are made to the existing timetable, or prioritizing the class
size so that the classes are not overloaded.
2. Reschedule classes from which Semester? All, 1 or 2. If classes in the
student's existing timetable need to be rescheduled, you may restrict
which classes may be rescheduled. By selecting first semester, only classes
in the first semester may be rescheduled. By selecting All, the classes
in both may be rescheduled.
3. Into which semester(s) do you wish classes to be placed? All, 1, or
2. The new courses which the student wishes to take any courses which
may require rescheduling may be scheduled (or rescheduled) into the first,
second or all semesters.
After you have considered these questions, click OK and the computer will
display the suggested timetables one a time. You can see from the example,
that the computer produced three suggestions. The top left corner displays
"1 of 3" to tell you that you are viewing suggestion 1 or 3
suggestions.
If you like the suggested timetable, click Accept and this timetable will
be given to the student. If you want to see another timetable click Next.
You will then be able to choose the Previous button to return to the previously
suggested timetable.
If you accept one of the suggested timetables, you can always revert back
to the original timetable by clicking the Orig. Timetable button which
will restore the student's timetable exactly as it was prior to accepting
one of the suggested timetables.
Original
Button
If you click Original,
the original timetable can be restored. The timetable returns to the way
it was before you started editing the student's timetable.
If you were editing the student's timetable for This Year, you will be
shown the Register upon exiting the editing window. The register form
shows all the classes the student has added or dropped. If you have deleted
numerous classes from the student's timetable, making the a part time
student, you will be prompted to change their attendance type. When any
changes have been made to a student's timetable for This Year, teacher
notifications and the student's new timetable may be printed to obtain
printed records of the class changes. Choose Students,
Print Timetable Changes, Print Timetables and Notification.
Student's next years timetable no longer displays the Register option on the toolbar, nor will it show the Add/Drops when you click on Done after you have added/deleted a class to/from the timetable.
Withdrawals in History Records
If a student deletes a class from his/her timetable, when you leave the edit classes screen, it will ask you to enter the mark to be recorded for the withdrawn course in the student's transcript. It will show the marks currently recorded in the 6 mark columns. You can enter a mark, or enter 'X' if you don't want it recorded in the transcript.
Note on withdrawn courses for French students: you can enter A for the credit value (for "annuler?") rather than W for withdrawn.
When you look at the student's history record, it will show the course with a credit value of "W" for withdrawn. When you print the transcript, it will ask if you wish to print the withdrawn/failed courses (grade 9 and 10).