Here is how to use the Maplewood Table Synchronization utility to standardize the tables for all schools.
With this approach, the board creates one set of tables. These tables become the new “standard tables that all the schools in the board will use. The new standard tables are transferred to each school. Schools can then simply select the new menu option to run the utility. When the application is run, it will compare the school's current table min#s to the min#s in the new tables. If any min#s are found in the school, but not in the "standard" tables, the process will halt so that the min#s can be corrected at the school. Once the min#s are all accounted for, the program will move the student's pointers so that they refer to the corresponding min# in the "standard" tables, and then will copy in the new "standard" tables. Although each school is done individually, all tables are done at once, and a backup is automatically created.
After a school has its tables synched, if you need to make changes to the master table (e.g. additions or code#/title changes only), you can simply copy over the new table since the students' pointers will still line up. This utility only considers the following table files:
cooren, coorenx = country type (aka Country of origin)
excepts, exceptsx = exceptionalities l
lang, langx = language type (aka first languages)
programs, xprogram = remedial program type (aka special ed programs)
citz, citzx = residence status type (aka citizenship) *
plcsett, plcsettx = special ed placement type (aka placement settings)
source, sourcex = student board resident status type (aka non-resident fees source)
destin, destinx = mobility type transfer/retirement codes (aka destination types)
origin, originx = mobility type admission codes (aka origin types)
All of the files are located in the Maplewood CU folder. The aka (also known as) descriptions correspond to the term used in the Maplewood software. * Citizenship table is optional, as it doesn’t require changes for OnSIS, but you may opt to standardize it between schools. Below are the specific steps to use the Synchronize to Board Tables utility.
Each School must have the standard tables in their Maplewood data folder in a new folder called SyncTabl\cu. Proceed to Step III.
Each School must have the standard tables in their Maplewood folder in a new folder called SyncTabl\cu. Since the process of distributing files and getting schools to create folders can be problematic, the following guidelines provide a fool-proof method for accomplishing this task.
If the “standard tables were not created in Central Office, copy the tables into the CU folder of the Central office data (e.g. m:\central\cu). Do not copy the tables into the individual schools folders (e.g. not into m:\schools\schl1\cu).
In Central Office, select File, Maintenance, Package Standard Tables. Check off the tables you wish included in the backup, as these will be the tables the schools will ultimately use. Note the destination folder where the backup will be saved, changing the folder if desired (it will default central office data folder\synctabl). Click Backup and it will create the backup. Click Done to exit. This will create the SyEnta.mwb file for distribution to the schools (e.g. m:\central\SyncTabl\SyEnTa.mwb).
Distribute the SyEnTa.mwb to the schools (e.g. by email) instructing them how to save it and where to save it. Note: the software, by default, will look for the file in the school's data folder in a new folder called SyncTabl. The file can be saved anywhere, but they will need to be able to find this file.
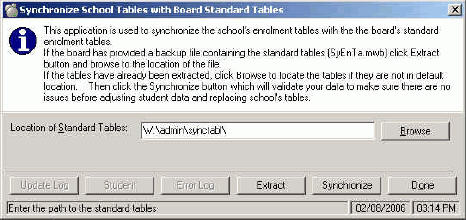
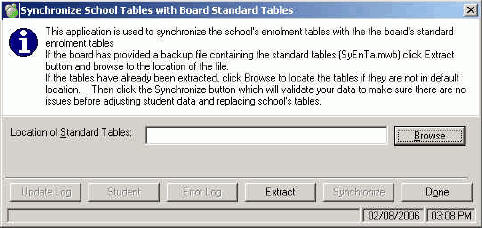
At the school, select File, Maintenance, Synchronize to Board Tables and you will see this window:
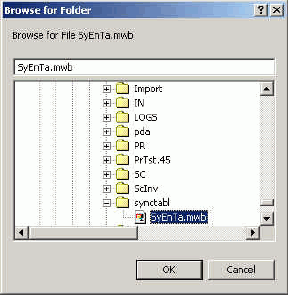
Click the Extract button (not Browse). This will open a browse window. Select the SyEnTa.mwb file in the folder in which it was copied in the previous step, as shown here:
Click OK. A progress bar should quickly flash as the tables are restored from the backup. They are restored into the school's SyncTabl\cu folder. This path should also now appear in the Location of Standard Tables box. Proceed to step 3.
At the school, select File, Maintenance, Synchronize to Board Tables.
In the Location of Standard Tables Box, it will automatically default the school’s SyncTabl folder. The tables in the CU folder of this location must already have the new standardized tables.
Select the Synchronize button.
A backup of the school's data is automatically created and stored in the school's backup.mw folder. The backup is a precaution in the event that the desired results aren't obtained after step 9 has been completed.
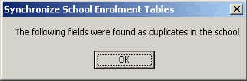
If min#s exist in the school's table, but not in the standard table, the following message will appear:
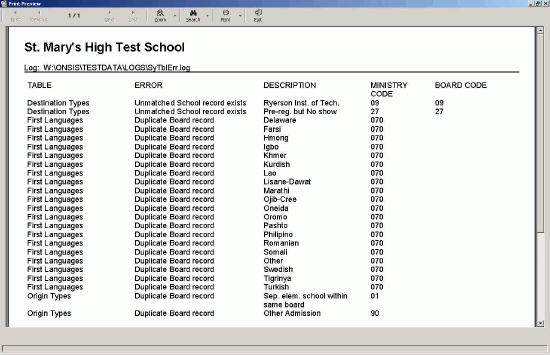
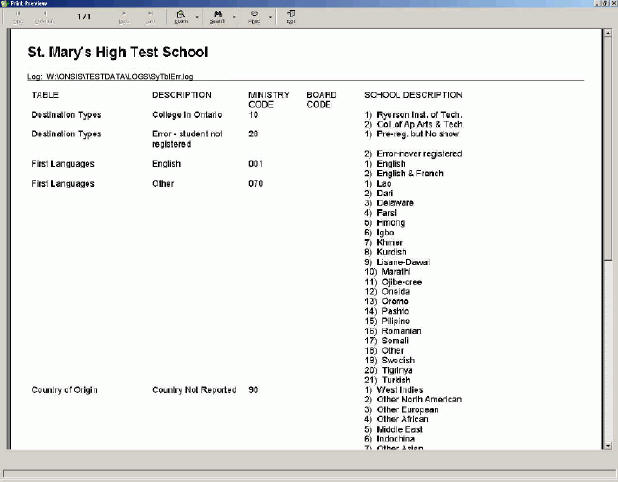
Click OK then use the Error Log button to see the errors. If a ministry code exists in a school, but not in the standard table, the error log will indicate something like this:
In this example, the school has a destination type called Ryerson Inst. of Tech. with the ministry code 09, and there is no corresponding ministry code with the value 9 in the board's table. This error must be resolved before the synchronization process will run. To resolve this error, either add the code to the board's table (which is generally not advisable), or edit the school's table and change the min# to correspond to the most appropriate entry in the board's table (e.g. change the min# from 09 to 10 (for student who left to attend college) and change the min# from 27 to 28 for Pre-reg. but No Show). It is not advisable to just remove the entry from the school's table as there may be students who have used this code.
The error log may also indicate "Duplicate Board record". These are simply warnings that the board table has used the same min# for multiple table entries. This will commonly occur in the first language table where new languages have been added for OnSIS, and these languages all have the same legacy ministry code. The first occurrence of the min# will not appear in the list (e.g. min#70 is used for the language Dari but it doesn't appear in the list). These errors will not prevent the synchronization process from running.
Upon changing the school's table entries to correct the Unmatched School Record Exists error, return to the start of Step III to start the synchronization process again.
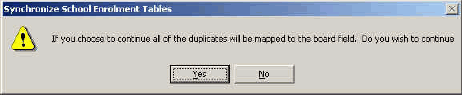
When duplicate board records exist, students with those min#s in the old table will be assigned to the first occurrence of the min# in the new table. The following message will appear:
From the example below, the language "Other" is the first occurrence of a language code with the min#70 in the new table. The list of other languages that also use that code are listed to the right. All students currently assigned one of the languages on the right will end up with "Other" when the transfer is completed.
When you exit the print preview, the following confirmation message will appear.
Click Yes to begin synchronizing students with the new tables. If synchronization can successfully run, you will see the following message:
When you see the above message, then the school has been synchronized with the new tables. Optionally, click the Update Log to see how the tables have been modified, and click the Student button to see how students who required changes have been affected.