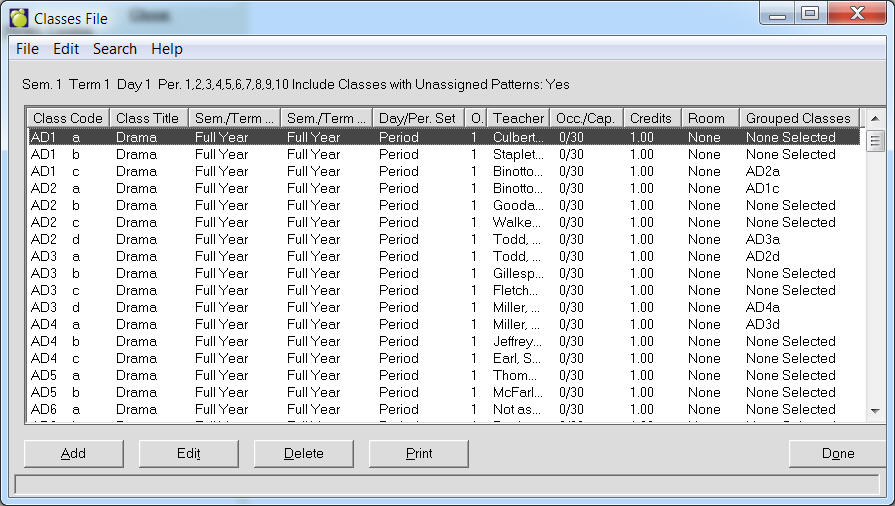
Enter classes that are available in the school. To access the Classes File list, choose File, School Setup, Classes to see a list of classes. On this box there is a menu and option buttons.
Menu
- File: Print the displayed list of classes or Exit.
- Edit: Add, Delete, Edit or Filter classes. When Filtering Classes you can display those classes taught in specific semesters, terms, periods or days.
Note: When the user opens a table, the program will select (highlight) the first item on the table. Without using the search menu, the user can enter e.g. "S" and the focus will move to the first item starting with "S".
- Search: Choose Find and enter a Search String and Search Column. The Search can be case sensitive. Click Apply to locate the first class.
Option Buttons
- Click Add to set up a new class.
- Select a class and click Edit to make changes to an existing class.
- Select a class and click Delete to remove a class from the list.
- Click Print for a list of classes.
- Click Done to return to the main Administration system screen.
If the students’ timetables will be recorded in each student's record, the classes must be entered into the Classes File. Before you can enter classes, the corresponding course codes must be entered into the Courses File. For example, if there were two classes of MAT1A1, the Courses File would require the course code MAT1A1 and the Classes File would contain the two classes MAT1A1a and MAT1A1b. Note that the class name is comprised of the course code and the section letter. The first class has the section letter 'a', the second class has 'b', and the third class would have the section letter ‘c’, etc. Each course may have up to 26 sections (a through z).
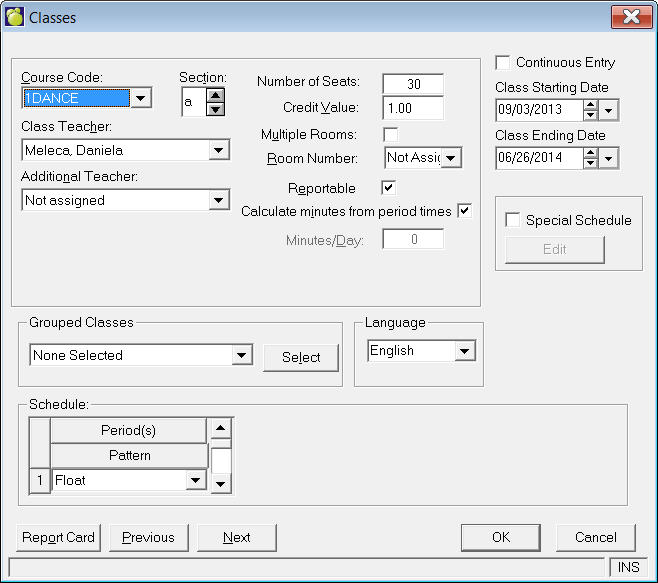
Schools on patterns will notice a Special Schedule checkbox when they edit a class. This box should be checked only when the class is taught in a unique semester/term/day/period schedule. When checked, the current pattern assignment will be lost upon confirmation of the warning. Then the Edit special schedule button is available to setup the schedule by checking the boxes corresponding to the semesters and terms (on the first tab) and days and periods (on the second tab) where the class is taught.
The class will be assigned to a Special Schedule set with a corresponding pattern name representing the class code. Although the pattern will exist in School Information, it is only viewable (any edits must be done in the classes file). Special Schedule classes may still be grouped (all classes in the group will have the same special schedule, even if the pattern name corresponds to each of the different classes). Clicking Special Schedule will enable the Edit button (see below Classes window), where you can set up when the class is offered.
In some schools, a class' schedule does not follow any specific pattern, and the Special Schedule button allows the school to specify where the class is taught. In some rare cases, the class' period assignment changes between semesters or terms. For these situations, check the new "Multiple Occurrences" box within Edit Special Schedule. Once checked, the first occurrence is defaulted so that the user can select the semester/term and day/period boxes representing when the class is taught. The Add button can then be selected to add the second occurrence, again selecting the required semester/term and day/period boxes. Up to four occurrences may be added. The class is then scheduled in all the semester/term and day/period combinations selected.
Continuous Entry Class
Mark the course as Continuous Entry if it is e.g. an online course where there is no set entry or completion date and students can sign up and work at their own pace until the course is completed.
- Alberta Only:
-
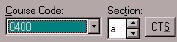 Alberta schools will see a CTS button beside the Course Code. In Alberta students can have a class 'Master' with associated modules that are related to the curriculum. In Maplewood a Master class is a class with patterns and modules are classes without a pattern (i.e. period x). When you click on this button, you can flag a class as Master class and select from the list of classes the class(es) that are to be assigned to this Master. When you click on the CTS button on an assigned class the user will see the Master class this class was assigned to.
-
- Course Code: Select a course code from the drop-down list. Then enter a Section or use the spin buttons to see the available sections. Sections that are already assigned will not be shown as it is not allowed to select duplicate sections.
-
- Class Teacher: Select the teacher responsible for the class.
Grouped Classes: Enter the class(es) taught in the same room at the same time. The computer will consider the total number of students in all classes taught in a room so that rooms are not overloaded with students. If you need to group the class with another one, click the Select button.
- Language: Select the language of instruction, English, French. or Native (Cree, Ojibwe, Delaware, Mohawk, Cayuga or Oneida).
-
- Number of Seats: Enter the maximum number of students permitted in the class.
-
- Credit Value: Enter the credit value of the class.
-
- Multiple Rooms: Enter if there is more than one room for this class.
-
- Room Number: Enter the room number.
-
- Reportable: If a class is left unchecked, any data connected with that class will not be reported. It is, therefore, important that this checkbox is checked. Classes that you may not want reported on might be recreational classes.
- Calculate Minutes from Period Times: click the checkbox to have the minutes automatically calculated. Uncheck the box and enter the number of minutes manually.
-
- Day/Period: You can edit the period(s) when the class is taught. If the class is taught in more than one period, the periods must be separated with a comma so two digit periods may be distinguished from one digit periods (e.g. enter 9/10 for periods 9 and 10). You can edit the period(s) when the class is taught. If the class is taught in more than one period, the periods must be separated with a comma so two digit periods may be distinguished from one digit periods (e.g. enter 9/10 for periods 9 and 10).
-
- Days Taught: The day(s) the class is taught may be edited. The days do not need to be separated with a comma as the day is always one digit. If the class is taught on days 1 and 2, enter ‘1,2’.
-
- Semester/Term: The semester in which the class is taught may be edited. The semester appears only if your school is semestered.
-
- Special: If this is a special class, click the check box.
Report Card: (Available if the user has access to change Modify Files). Click the Report Card button to set up Weights and Terms. The homeroom must be saved before entering the Report Card setup. Do you want to save changes and setup the homeroom for the Report Cards? If the user selects yes the homeroom must be saved and then the Report Card setup can be loaded. On the Assign Terms and Weights box, click Edit in the Terms frame to enter Weight and Term values, and click Edit in the Topics frame to enter Topic and Weight values.