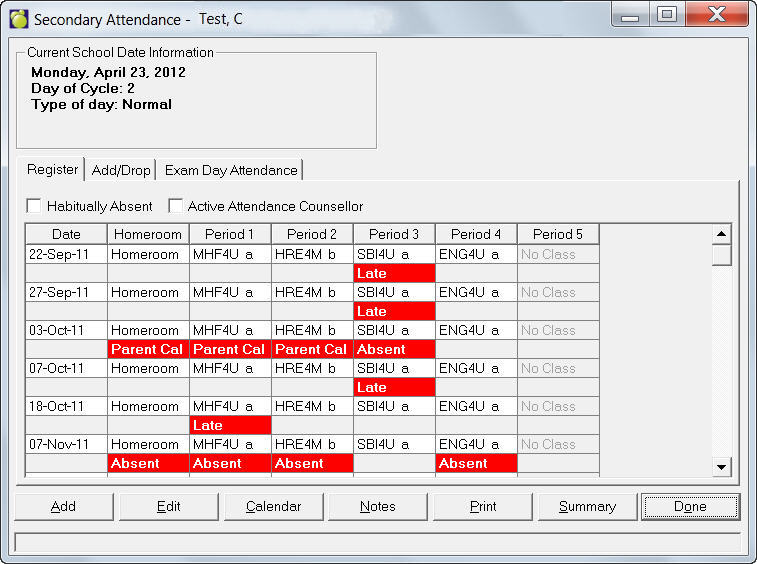
If you want to view or edit the Attendance Register, choose Attendance, Display/Modify Register and select a student. You will see an editing box similar to this one:
Habitually Absent (Ontario only) - this feature is used and defined by the school.
Active Attendance Counsellor Flag (Ontario only) - this means that the student is being supervised by an attendance counsellor, and it supersedes the rule in Maplewood where a student is not counted as being enrolled until the student attends school for the first time in a school year.
This will be a checkbox, that when activated will over-ride the requirement of a student's name to appear on the register only after their first day of attendance.
Ontario register rules state: Enter a pupil's name in the register on the day on which the pupil actually begins to attend classes for the current school year. Although pupils' names from the previous school year may be stored in a school's computerized system for administrative purposes, a pupil's name must not be entered into the current register until the pupil actually begins to attend classes.
Exceptions to this requirement are the following pupils, whose names may be entered in the register on the first day of school for the current school year:
So, if a student is flagged as “Active Attendance Counsellor” and missed the first 5 days of school, you could get the attendance register to print with Absent for the first 5 days of school. If the student is NOT flagged as Active attendance counselor, and you print the attendance register, he/she would show up as “Not Enrolled” until he/she actually showed up.
Adding an Entry to the Registry
Choose Attendance, Display/Modify Register and select a student. Then click Add to call up a Date Selection box.
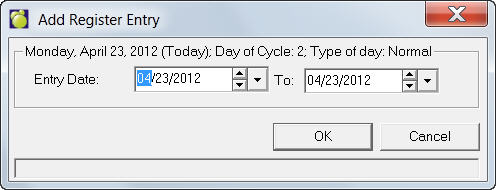
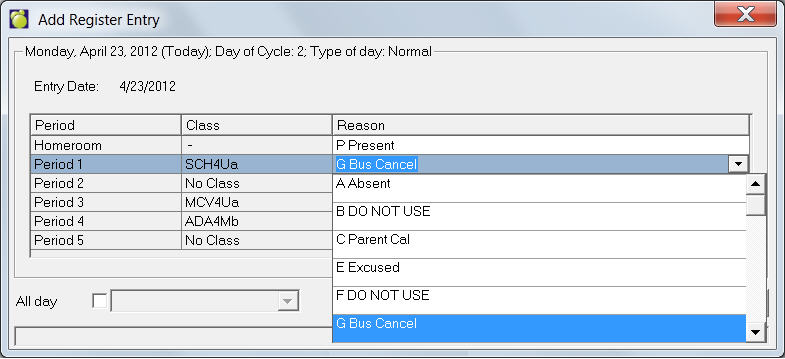
Select a date or date range and click OK. If you want to apply the Reason to the whole day, click the All Day checkbox and select a Reason from the drop-down list.
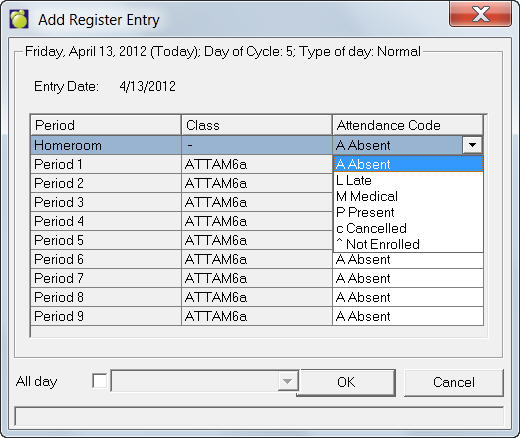
On the Add Registry Entry screen that appears, click the row under the Attendance Code column and make a selection from the drop down list.
For Enterprise users, on the Add Registry Entry screen that appears, click the row under the Reason column that you want to create and entry and make a selection from the drop down list. If you want to apply the Reason to the whole day, click the All Day checkbox and select a Reason from the drop-down list. Attendance reasons are set up by choosing Attendance, Attendance Codes.
Editing a Registry Entry
Choose Attendance, Display/Modify Register and select a student. Click the Edit button and make a selection from the drop-down list in the Attenance Code column or Attendance Reason Code for Enterprise users.
Adding Notes to the Registry
Choose Attendance, Display/Modify Register and select a student. Click the Notes button on the Attendance box to enter/edit attendance notes. Use the Add, Edit, Delete and Print buttons to work with information on the attendance notes box.
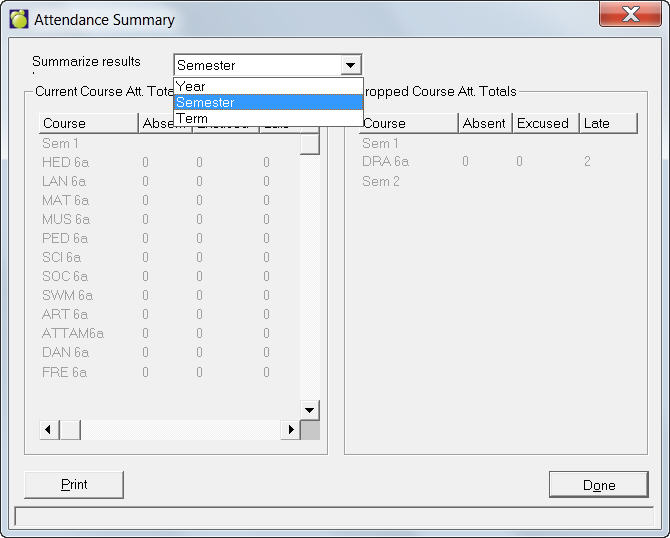
Understanding with the Summary Screen
Choose Attendance, Display/Modify Register and select a student. Click the Summary button on the Attendance box to View and Print attendance. You can view the summary by Year, by Semester, and by Term. Depending on the date, the program will show the attendance summary for its corresponding semester/term. To send the Summary Results to the printer click Print.
Notes:
If admin date is within Semester 1, Term 1 you will only see data for that timeframe.
If admin date is within Semester 1, Term 2 you will see a complete breakdown for Semester 1, Term 1 and 2.
If admin date is within Semester 2, Term 2 you will see a complete breakdown for Semester 1 and 2 and Term 1 and 2.
Note: You can also access this screen by first selecting a student using the Attendance tab under Student Records, and then clicking the Summary button.
Working with Attendance Calendar
Choose Attendance, Display/Modify Register and select a student. Click the Calendar button on the Attendance box.
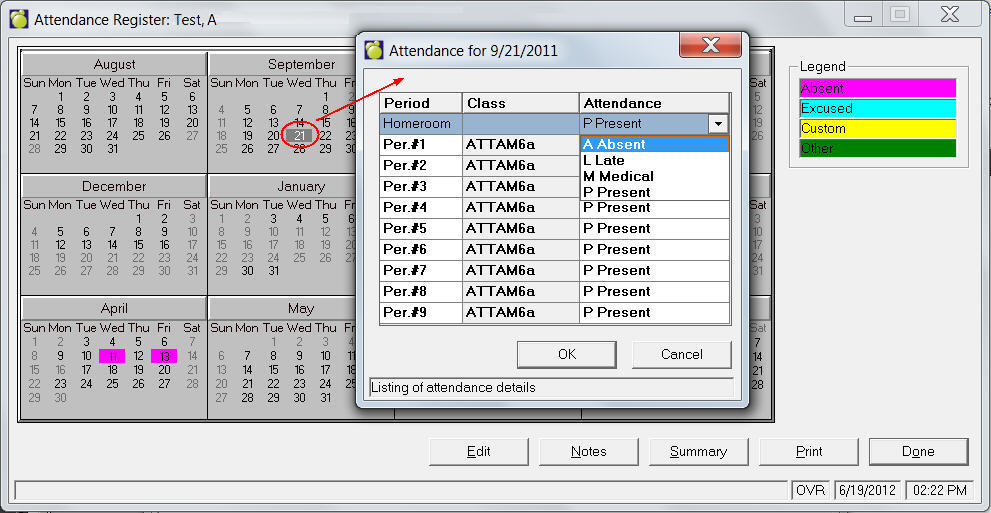
On days with colours the letters indicate the Attendance Codes applicable for morning and afternoon.
To edit a day, double-click or select that day and click Edit. Shows you an attendance summary for the current student, and lets you make changes. Click in the Class or Attendance box and you will see a drop-down arrow. Select from the list your school has set up earlier.
You cannot enter attendance for a date when the student is not enrolled (e.g., a date before the entry date to this school or a date after the retirement/ transfer date. These dates are disabled.
Notes: You can enter attendance for dates before but not after today’s date.
If a student was transferred in the month you are printing, and you are printing all homerooms then the student will show up in the homeroom he's currently in and not the one he transferred from. The only time the student will show up in the previous homeroom list is if you do not include the student's current homeroom in the range of homerooms.
Ontario Only - on pre-loading attendance during initialize 'grant day' interpretations will be marked as office override for corresponding periods.