To build the Classes File from scratch based on the courses in the Courses File choose Scheduling, Rebuild Classes, Assign All New Classes. This is run only once.
Within Assign All New Classes, the courses from the Courses File are presented.
For each course, indicate the number of classes based on the number of students requesting the course is displayed on the screen and click on the OK button.
The first class is displayed on the screen.
Any or all of the following information may be entered.
Tip: Keep restrictions to a minimum to allow the Master Builder the best opportunity to reduce student conflicts.
Number of Seats: This is used as a guide in balancing class sizes when loading students. Classes may be limited to these sizes.
Credit Value: The credit value of the class must be changed if its value is different than 1.00.
Reportable: This indicates that this class is to be included on report cards and ministerial reports.
Room: If a restriction exists, specify the room number. Automatic Placement will not place the class where both rooms are occupied.
Teacher: If a restriction exists, specify the teacher. Automatic Placement will not place a class where it conflicts with that teacher’s timetable
Semester Set and Pattern: Sets must be selected, however, patterns do not need to be assigned unless there is a restriction.
Fixed: If this box is checked, Master Builder will only use the selected Set and Pattern.
Scheduling, Rebuild Classes, Snapshot of a Timetable
A snapshot saves the master timetable at any point in the process of its development. Later, if you necessary, you can restore the timetable at the point where the snapshot was taken. This is an excellent scheduling tool.
From the tally of student choices, you can decide the number of classes that you will need for each course ahead of time, or use the Rebuild Classes program to tell you the number of requests for that course. To assign classes, choose Scheduling, Bebuild Classes, Assign All New Classes. Use this feature to build the Classes File from scratch based on the courses in the Courses File, the number of student choices for each course, and the number of sections you choose.
A warning box will appear telling you that previous class assignments will be destroyed.
The first window will require that you fill in the number of classes (sections) based on the number of requests. This screen will show you the course code and the number of students who requested this course. Based on this information you must specify the number of classes (sections) necessary for this course.
By default classes are set to Reportable and after the fact (i.e. once all sections are established) the schools can go under Scheduling, Modify Files, Classes and make any further class-specific adjustments to our defaults. Fields that are available in Scheduling, Modify Files, Classes that have defaults assigned to them in the Assign Classes tool and are there not available there include:
Type of Course (default assigned in Assign Classes is Regular)
Dual Credit (default assigned in Assign Classes is greyed out/na)
Delivery (default assigned in Assign Classes is Day School)
Grouped Classes
Multiple Rooms
Reportable (default assigned in Assign Classes is checked to Yes, Reportable)
Calculate Minutes from period times and Minutes per day (default assigned in Assign Classes is check to Yes).
Language (default assigned in Assign Classes is English for English schools)
Assign Classes (and Continue to Assign Classes) can be thought as a tool for setting up the sections.
After specifying the number of classes (sections) this window will appear.
Note: If you click Cancel, the program will remember where you ended the procedure, and will begin from there the next time you restart the process.
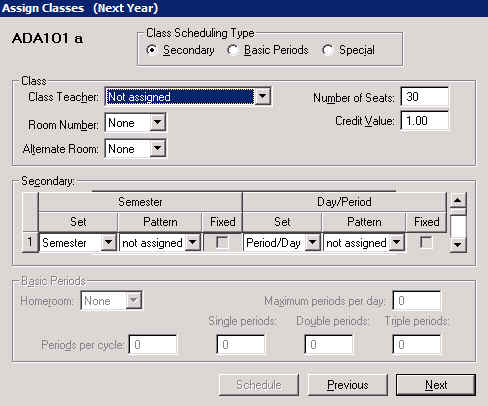
Within Assign All New Classes, courses will appear in alphabetical order. When you enter the number of classes required, the first class will be displayed on the screen. Classes are named according to the course code followed by a section letter (e.g., the 4 classes for the MAT4A course would be called MAT4Aa, MAT4Ab, MAT4Ac, and MAT4Ad).
You can enter any or all of the following information at this time. In preparation for the automatic placement feature of Master Builder, be careful to enter only those characteristics of each class which must not change. Leaving more fields unassigned results with greater opportunity to reduce student conflicts.
Class Teacher: If you know the teacher of the class, assign him/her to the class by entering the teacher's partial surname only (e.g., do not enter Mr. Smith, just enter Smith). If you enter a teacher for a class, the automatic placement feature of Master Builder will not place the class where it conflicts with that teacher's timetable.
Room: If the class must be taught in a specific room, enter the room number. If you enter a room for a class, you may enter an alternate room. The automatic placement feature of Master Builder will not place the class where both of those rooms are occupied. If the class is placed in a period where the room is occupied and the alternate room is free, Master Builder will automatically exchange the room with the alternate room. Multiple rooms can only be added after a class is scheduled. Multiple rooms are used when a class is taught in different rooms through the school's cycle. e.g. on day 1 it is taught in room 101, on day 2 it is taught in room 17.
Number of Seats: Enter the maximum number of students who should be assigned to this class. This number is used as a guide by the computer to balance class sizes. The classes are not limited to these sizes but the enrolment is compared to these figures when students are assigned classes and you can choose to use the number or not when placing students.
Credit Value: You can change the credit value of the class if its value is different than 1.00.
Once this information is entered for the class, click on the Next button and the next class will appear on the screen ready for information to be specified. If this is the last section for the current course, the next course will be displayed with the number of student requests and the area to indicate how many sections are to be offered.
To indicate any further changes required for that class, use Scheduling, Modify Files to modify.
Having started the process of assigning classes through Assign All New Classes, it may be stopped and continued at a later time using the Continue To Assign Classes choice.
Remove the semester and period information from the existing scheduling classes file. Choose Scheduling, Rebuild Classes, Reset All Classes.
This method is appropriate if the number of classes for each course, along with the teacher, room, semester, and period assignments are similar to those of the current year, it may be easier to modify the scheduling Classes File rather than building a new Classes File.
Modifying the Classes File
Before modifying the Classes File, you may want to remove the period and semester assignments for all the classes. You can reset using this box:
Choose Scheduling, Rebuild Classes, Reset All Classes.
Select one of the Reset Assignment options and click OK.
As the program runs, the class name will be displayed in the grey Class box.
Removing the semester and period assignments allows the automatic placement feature of Master Builder to place the classes into time slots with the least number of conflicts.
This method is used when few changes are required from the current year to the scheduling year. Simply edit the classes for which changes are necessary and/or add new sections. Choose Scheduling, Modify Files, Classes.
Schedule
Semester Set and Pattern: The Semester Set must be entered to indicate the set within which the class is taught. The Pattern may also be indicated for the class, but if the Pattern is left as "Not Assigned", then the automatic placement feature of Master Builder will find the best pattern to assign to the class based on the number of conflicts. Beside the Pattern, there is a "Fixed" check box. When this is fixed, the automatic placement feature of Master Builder will not re-assign the class to another pattern.
Day/Period : The Set must be entered to indicate the pattern of periods where the class may be taught. The Pattern may also be indicated for the class, but if the Pattern is left as Not Assigned, then the automatic placement feature of Master Builder will find the best pattern to assign to the class based on the number of conflicts. Beside the Pattern there is a check box to let you fix the set and pattern. If you would like Master Builder to find the best Period Pattern within a set, it is best to assign a set but not a pattern, and fix the class this way.
To the right of the Semester and Day Period Patterns there is a scroll bar. This allows you to set up multiple occurrences or view multiple occurrences of the class if you have set these up. Multiple occurrences are only used in very rare occasion if the pattern that the class follows for one semester is different than the pattern that the class will follow in another semester.
Once this information is entered for the class, click on the Next button and the next class will appear on the screen ready for you to enter information (if you specified that there was more than one class for the course). If this is the last section for the current course, then the next course will be displayed with the number of student requests asking how many sections you would like.
Once this information is entered for a class, it is then added to the Classes File. If any further changes are required to that class, use Scheduling, Modify Files to make the changes.
If the number of classes for each course, and the teacher, room, semester, and period assignments are similar to the current year’s, you may find it easier to modify the scheduling Classes File rather than building a new Classes File. See Modifying the Classes File, below. In general, it is best to assign all new classes to allow more flexibility when generating the master timetable.
Printing the scheduling Classes File
The information entered for each of the classes may be printed at any time using Scheduling, Modify Files, Classes. Click the Print button. You will be asked if you want to print any other information than course section and number.
