It is essential that the school's data be protected against unauthorized viewing or change. Although most networks provide a security system, it is recommended that the school implement Maplewood's own security system. The Maplewood security automatically provides passwords for everyone on the school's staff list and allows for Maplewood security profiles. The security is activated and assigned by logging in as the Supervisor. Once enabled, the Maplewood Supervisor can set up the security rights for individual staff members or groups. To enable the security, log in using the Supervisor's password. It is under this login that security rights of the staff members should be established.
Prior to setting up group permissions, it is necessary to understand what Security roles a school has in place. This information is derived from the Staff Record, Role field. The Maplewood system automatically assigns the role letter of 'T' for all new staff in order to save a bit of work, no other role letter is assigned by default. Any letter of the alphabet can be assigned to any staff member as a role letter. The rights must then be assigned to all the staff members individually or by role, nothing is grandfathered.
Assigning Passwords
The first time a staff member is assigned access rights, a password is automatically assigned to that staff member. The password can be no more than 10 characters in total.
The password is determined as follows:
Changing Passwords
Staff members can change their own passwords in the Administration system and/or in Classroom Manager once they are logged in by going to File, Change Password and enter the desired password. The staff member's password may also be changed by the Supervisor within Change Security.
Note: Two users can have the same default password. For example, John Smith and Jenny Smith would both have 'smithj' as their default passwords. It is strongly recommended that staff members change their default password as this information is also presented on our manual's portion of the web site.
Supervisors will see a new login screen that has been implemented so that the supervisor can enable and disable security and set up the right for each staff member before security is enabled.
All of the areas within the Maplewood System will be displayed so you may enter the type of access you would like assigned to staff members. Depending on the area of the system, any combination of the following seven access rights may be displayed:
When Security is enabled members have an extra option under File, Coffee Break. This puts his or her screen saver on the screen and will not let anyone back into the system without a password.
The security feature can be turned on or off by the supervisor using the Supervisor Disk. If you want to change your password or use the coffee break feature, the security must be turned on.
*Note for Central Office users. Any boards running central office have to make sure that security is turned off in their copies of each schools data. An individual school with security on, or security on at the board level should work fine. If the security is turned on,
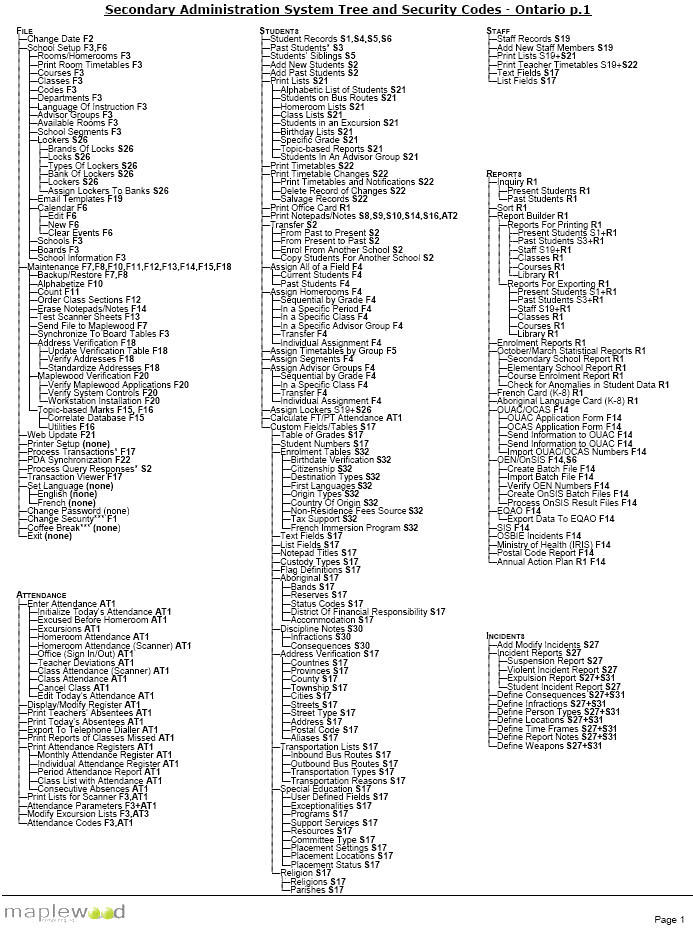
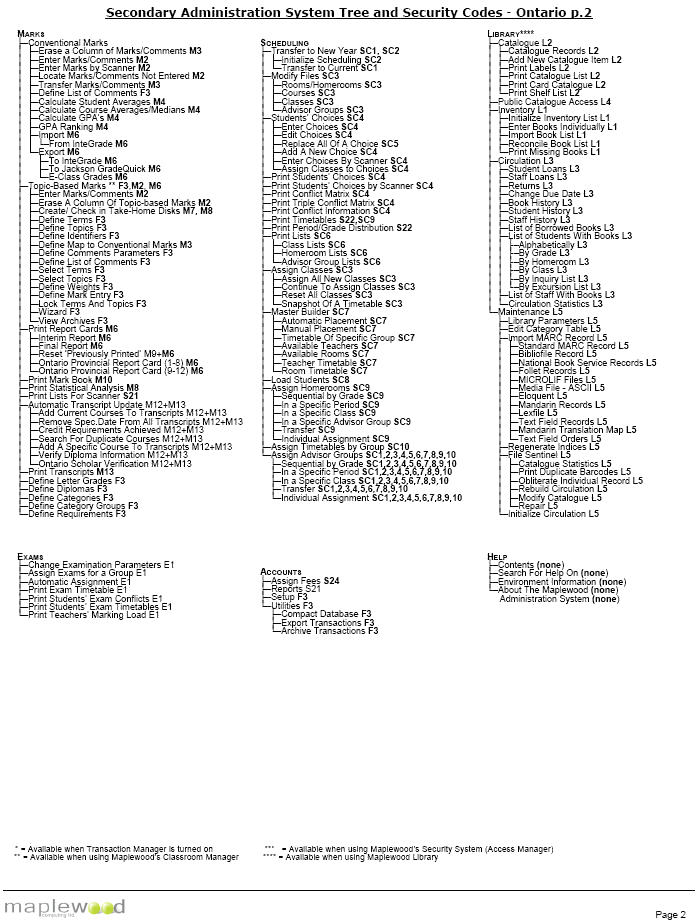
This section deals with security codes and how and what they affect in the Secondary System. Click the link below to see this is a print-out of the security codes for the Secondary System. Cross-reference these numbers with the menu tree (below) to see what areas are affected by turning on and off various security areas.
The following link also shows Security Codes for Student Records.
Secondary Security Reference Codes for the Menu Tree
Click the links below (JPG format) to see the Secondary System Menu Tree. Beside each option you will see a number that corresponds to the security code chart.
The option under File, Change Security allows any staff member with the privilege of Change Security to modify the privileges for any staff member, including their password. Initially all staff members will have this option disabled except for the Supervisor. This feature is only available if security is enabled.
Note: Not all users will have rights to the Change Security menu option itself.
Default security rights:
Newly added staff members are automatically given a role of T but no security rights are assigned by default.
A staff member's Role letter can be changed by choosing Staff, Staff Records, selecting the staff member and editing the Biographics tab.
Classroom Manager - Entering Marks/Comments Rights
Use this procedure to set rights so staff/teachers can enter Marks and Comments using Network Classroom Manager or Take-Home Classroom Manager:
Classroom Manager - Take Attendance Rights
Use this procedure to set rights so teachers can enter attendance using Network Classroom Manager
With these rights teachers can use the Classroom Manager attendance and seating plan screens to enter daily attendance and view a students permanent attendance register.
Use this procedure to set rights so teachers can use the Classroom Manager attendance and seating plan screens to enter daily attendance and view a students permanent attendance register.
Note: Attendance cannot be entered using Take Home Classroom Manager.
Classroom Manager - Enter IEP/Literacy Test/Community Involvement information
Use this procedure to set rights so teachers can enter IEP/Literacy Test/Community Involvement information using Network Classroom Manager and Take Home Classroom Manager (Ontario only)
With these rights teachers have access to the Classroom Manager mark and comment entry screens and can select Edit, Details to flag a student as IEP, ESL or ELD, enter Ontario Secondary Literacy Test results and Community Involvement hours.
Administration System - Enter IEP/Literacy Test/Community Involvement information
Use this procedure to set rights so office staff can enter IEP/Literacy Test/Community Involvement information using Maplewood Administration system (Ontario only)
Click the Student/Staff Records tab and select/highlight the option for Present Students and/or Past Students.
With these rights staff members can use the Maplewood Administration system to access a students records and select View, Ontario Report Details to flag a student as IEP, ESL or ELD, enter Ontario Secondary Literacy Test results and Community Involvement hours.