Transferring students from Present to Past allows you to move students who have graduated or left the school out of the current year and into a the past. Conversely, if you have a student who has been enrolled but was transferred to the past but decided to re-enrol, moving from the past to the present is a handy feature.
Using Enrol Students From Another School and Copy Students For Another School found under the Students, Transfer menu provides the ability for one school to create a file containing student information, which can then be imported into another school using Maplewood administration software. For example, an elementary school may create a file containing the information on their graduating students. Some, or all, of the students on the file may be transferred into the secondary school, eliminating the need to re-enter their data.
What is it for?
Allows schools to create a file containing student information which can then be imported into another Maplewood school. Especially useful for secondary schools who don’t want to manually enter students coming from feeder elementary schools, but can be used between any two Maplewood databases. Some or all students on a file can be imported.
Use these options to transfer and enrol students:
Enrol Students from this Board
Enrol Students from Another Board
Copy Students for Another Board
Copy Past Students for Another Board
Before students can be transferred to Past their Enrolment Status must first be set to Deleted.
1. To transfer students choose Students, Transfer, From Present to Past to see a Transfer screen.
![]()
2. Select an order: Alphabetically, Grade, Homeroom, Defined Character,
Inquiry List, Excursion List, Advisor Group, and then click the Select
button. The student name(s) will appear in the Selected area.
3. When you have made your selection(s) click Transfer.
Caution: Once a student starts attending your school and then leave, you should not move them to past.
Note: Everything is now taken from the attendance history tab, including Attendance History, FTE, and French/Native hours.
1. To transfer students choose Students, Transfer, From Past to Present to see a Transfer screen.
![]()
2. Select an order: Individual Student, Grade, Defined Character, Inquiry
List and then click the Select button. The student name(s) will appear
in the Selected area.
3. When you have made your selection(s) click Transfer.
When enrolling students from the same board, users will not be selecting an exported file for import.
Select the Enrolment Information:
Status, Origin Type, Origin School and Entry Dates to this School and Secondary school if not on file.
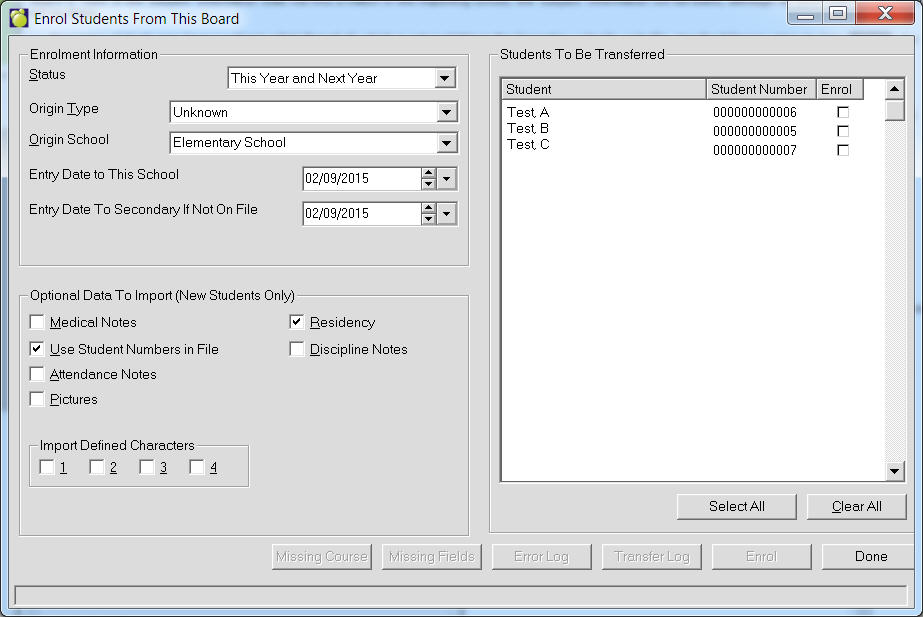
Users will find this feature handy when setting up pre-pegistration for other schools in the Board This feature is intended for students who will remain in a particular while at the same time, register for another school within the same division. Click here to see how to set up pre-registration.
If you require that a student's full detailed information for the French Card entries be transferred, we recommend that the 'subject' information be copied into the 'Board #' field. If the 'subject' information does not find a match in the importing school, the 'subject' information will be blank, although all other data for the entry will be there.
i.e. Elementary Schools may have a subject called 'French 8' which is not available in the Secondary school's code file. Use the following steps to Copy Students For Another School:
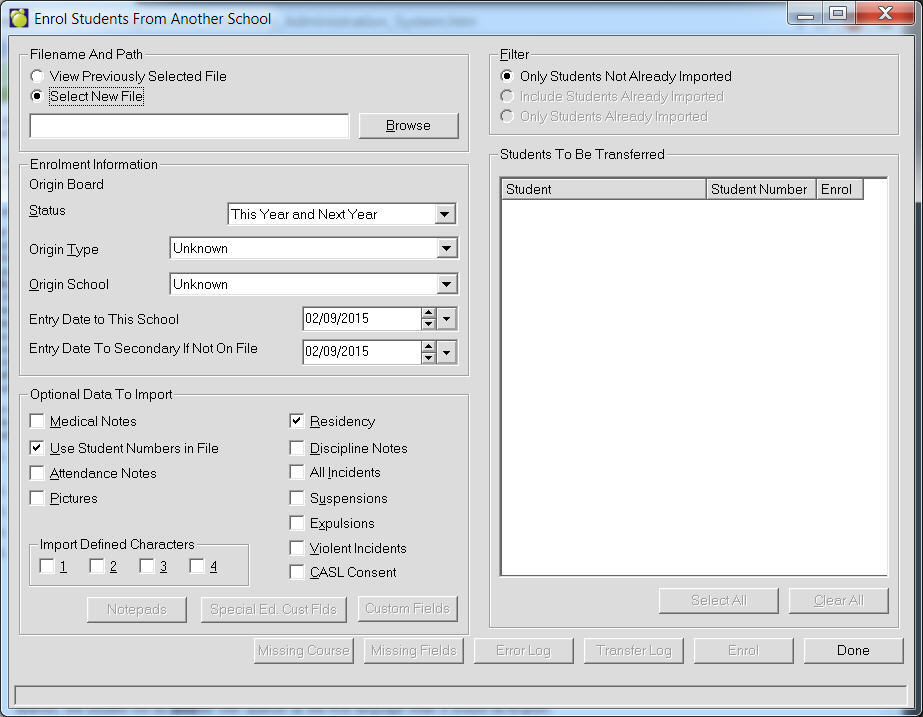
This will take a file (created by another school using Copy Students For Another School) and allow you to enrol some or all of the students directly into your school. "This application is used to enrol students from a file sent from another school. Select a file to enrol the students from. Once a file is selected it will display the students whose records are in the file. You can select the Special Ed. Custom Fields and Custom Fields that you wish to import by selecting appropriate button. Select enrolment information and then click Enrol."
The Enrol Students From Another Board will check to see if the student on the file already exists. If a matching student is found, you are given various options as to how to proceed. One option would be to proceed with the enrolment of the student on the file. Another option would be to update the data from the file, into the student’s record already in your system, and another option would be to not enrol the student. There’s even an option to move the matching student from the past records to the present records.
Enrol Students From Another School: What does it do?
This program allows the user to enroll some or all of the students directly
into the school from the file created by another school using Copy Students
For Another School.
Note regarding backups: No backup is created. A warning appears but
schools should be encouraged to create a backup of their admin data.
Note about 3-letter codes: A new 3-letter code is automatically assigned.
3-letter codes are not changed, overwritten or duplicated. Pictures are
renamed to the newly assigned 3-letter code.
The user does the following to enroll students:
·Enter the location of the file from which students will be enrolled (Use ‘select new file’ and enter the path to the file).
·Select the ‘Only Students Not Already Imported’ option (see the ‘View
Previously Selected File’ option described below.)
·Confirm the Origin Board.
·Choose the Status, Enrolment Type, Origin School, Entry Date to This School,
Entry Date to Sec (if missing in the file) that will be assigned to each
student enrolled.
·Put checkmarks next to the optional data to be imported:
- Medical Notes
- Student Numbers in File
- Attendance Notes
- Pictures
- Residency
- Discipline Notes
- All Incidents
- Suspensions
- Expulsions
- Violent Incidents
- CASL Consent - Privacy Information and any accompanying notes
as authorized by the supervisor or individual who created the export file.
- Import Defined Charactes - check the ones you would like included (up to 4)
If the student number of the origin school is already used by another
student, the number will be reset to zeros or a new number from the bank
of student numbers will be assigned if the school has enabled the automatic
assignment of student numbers.
If Destination school’s student number is too short it will truncate numbers
from the left (e.g.: 123456 becomes 3456).
Press Buttons for Notepads, for Special Ed field, for Custom Text/List Fields to import these and then match up the Notepads, Special Ed fields and Custom Text/List Fields from the ORIGIN school to the corresponding fields in the DESTINATION school. If you select ‘No Match’, the field will not be imported.
Select which students are to be imported with a checkmark next to the name.
Press ‘Enrol’ to start the process.
Optionally, click the Transfer Log button to view/print the list of students that were enrolled. This log is stored in \admin\logs\transfer.log.
The program checks surname, given name,
birth date and gender for matches in both past and present student
before importing. When matches are found the user can view the data
in the import file to decide if the student should be imported or
not. The user can then do one of the following for each match found:
·Enrol the student anyway (if looking at the student file indicated
the student isn’t already in the student records).
·Update the existing student’s record based on what is in the file.
This is useful to update transcript information long after pre-registrants
have been entered for scheduling purposes.
·Transfer a Past student to Present and create a record of previous
enrolment if the student exists in past already.
·Do not enroll the student.
·If there are missing fields warnings check the relevant logs for missing
coursed/choices, mismatched codes, missing custom fields, and the
error log.
Note regarding tables that don’t match: Some student record data
comes from tables. Mismatched tables between schools will result in
incorrect data. For instance, if the origin school has the first language
table with 01 English but the destination school has modified the
table so the first language has 01 Spanish, the student will be enrolled
with Spanish as the first language when it should be English.
The program attempts to enrol the student using the table entry that
has an identical Ministry Code.
If it doesn’t find the same Ministry Code, it will look for a table entry
that has the identical title. When the tables are the same between schools,
there should be no problems.
When no match is found at all the program prints a list of any missing fields for each student. Users must consult this list and edit the newly enrolled students to check/correct those fields.
The Enrol Students From Another Board program unzips the encrypted .MWE file and creates a file with the same name but with the extension XML (this file is in the Admin\Import folder). The XML file is used by the software to keep track of students who have already been enrolled. When viewing a previously selected file, you may refine the list of students on the right to include:
·Only Students Not Already Imported (default)
·Include Students Already Imported
·Only Students Already Imported
Generally, you would not enrol students that you have already imported.
These options may be useful if you forgot to include some data when they
were first enrolled and it may be faster to enrol the students again (and
use the ‘Update Current File’ option when the student appears as a match).
It may also be useful if an error report showed that some data was not
imported because something was missing in your data (such as codes or
scheduling courses or elements of a table). It may be faster to make adjustments
in your data (e.g: tables) and then enrol the students again, rather than
fixing up the data one student at a time.
Here’s an example where the update data from the file would be really beneficial.
If a number of secondary students are moving to another school next year,
you can enrol them early enough to include them in the scheduling process,
but then update their information at the end of the school year so their
transcripts are right up to date.
Note: When the students are enrolled, some of the data fields use tables (i.e. you select the student’s entry from a drop down list rather than typing an entry). Although many of these tables are predetermined for the schools, it is possible for each school to modify them. For each entry in the table, a Ministry Code and a Title are entered.
For the fields that use tables, the program will first attempt to enrol the student using the table entry that has the same Ministry Code. If it doesn’t find the same Ministry Code, it will look for a table entry that has the exact same title. When the tables are the same between schools, there should be no problems. However, if a school changes the table, the student may result in very different information. For example, if the origin school has the first language table with 01 English but the destination school has modified the table so the first language has 01 Spanish, the student will be enrolled with Spanish as the first language when it should be English.
Note: We strongly recommend that you make a backup prior to enrolling students from another school. To make a Backup, choose File, Maintenance, Backup/Restore.
Choose Students, Transfer, Enrol Students From Another Board.
If you have received a new file of students
from another school, choose the Select New File option then click
the Browse button to find the new file.
Note: If you have previously transferred some students from the file,
you can choose View Previously Selected File (explained below).
The names of the students on the file are listed on the screen. Beside each student, check the Enrol box if you want that student enrolled in your school. All students will be checked by default, but you can click the Clear All button to remove the check mark from all the students.
Enter the enrolment information to be
recorded for these new students. The following fields should be entered:
- Enrolment Status (e.g. select Next Year Only if students are enrolling
for next year)
- Origin Type
- Origin School
- Entry Date (to this school)
- Entry Date to Secondary School (secondary schools only)
Check the boxes if you want the following
information transferred from the origin school:
- Medical Notes
- Student Numbers in File*
- Attendance Notes
- Pictures
- Residency
- Discipline Notes
- All Incidents
- Suspensions
- Expulsions
- Violent Incidents
- CASL Consent - Privacy Information and any accompanying
notes as authorized by the supervisor or individual who created the
export file.- Medical Notes
- Student Numbers *
- Defined Characters
- Student Pictures (only if origin school included them in the file)
- Choices **
- Discipline Notes ***
- Attendance Notes
- Notepad ****
* Student Numbers - If the student number of the origin school is already
used by another student, the number will be reset to zeros or a new
number from the bank of student numbers will be assigned if your school
has enabled the automatic assignment of student numbers.
if the student number of the origin school is already used by another
student, the number will be reset to zeros or a new number from the
bank of student numbers will be assigned if your school has enabled
the automatic assignment of student numbers.
** Choices - The Enrol function has a checkbox to include the importing
of the students' choices. The program warns the user to initialize
scheduling. If Initialize Scheduling is run after the import, the
Choices being imported will be overwritten. If the user selects No
(not initialized scheduling) the checkbox to include choices will
become unchecked. The Enrol function will have the checkbox to Import
Choices disabled if the *mwe file for importing does not include choices.
*** Discipline Notes - The Enrol function
lets the user click the checkbox to include the student's discipline notes.
If fields for Infractions and Consequences are not available in the destination
school, the Missing Fields log will report them along with the students
who need them.
**** Notepads - All 3 Notepads will be included. The Enrol function lets the user click the Notepad checkbox. A new interface will appear in which the user can select the notepads and match them with the current school's notepad titles.
Click the Special Ed Fields button if you
want to include the user-defined special education fields. *
Click the Custom Fields button if you want to include the text and list
fields. *
Click the Enrol button to commence the enrolment of the selected students
into your data. If a backup of the school's data was made, click Yes to
continue past the warning message, otherwise click No and make a backup
before clicking the Enrol button again.
Click the Missing Courses button to create a list of missing courses. If a backup of the school's data was made, click Yes to continue past the warning message, otherwise click No and make a backup before clicking the Enrol button again.
If you receive a message about matching students, see below for further information.
If you receive any error messages, or references to log files, you should examine those log files (the buttons will be activated). See below for further information.
You can then click the Transfer Log button to see/print the list of students that were enrolled. Note: This log is stored in \admin\logs\transfer.log.
* Since the field names and contents may be unique for each school, your fields may not match the fields in the origin school. For each of the fields on the file, you will need to try to match them with the corresponding fields from the origin school. If you select No Match, the field will not be imported.
To prevent against multiple records for the same student, the program checks to see that the student you want to enrol is not already enrolled in the school (it checks both the current and the past student records). If a potential matching student is found, the following message will appear:
"There were students found with possible matches. Do you wish to review matches and see if these students are actual matches?"
If you click No, the students who had potential matches will not be enrolled.
If you click Yes, each match will be presented, one match at a time, so you can decide if you want to proceed with enrolling the student. For each match, you will see the basic information for the student already enrolled in your school (on the left of the screen) and the corresponding information for the student you are considering enrolling (on the right of the screen). If you are not sure if they are the same students, you can click the Display File button to see all the information on the student you are considering.
You need to make a decision for each matching student by selecting one of the following options for each student:
Not to be enrolled: The student will not be enrolled into your school.
Enrol: The student will be enrolled into your school.
Transfer to Current (only available if the corresponding student was found in past students): The student on the file will not be enrolled, however the matching student already in your past student records will be moved to current and updated with the data in the file. Original entry/retirement dates will be automatically moved to Previous Enrolment so be sure to check those dates after the student is transferred to current.
Update Current File: The student will
not be enrolled into your school, however the data in the file will
be copied into the existing record for the student, therefore updating
your records to match the data on the file.
Yes - the program will apply update to this student and will suppress
this message from appearing for subsequent selection of Update option
for other students. The following options will appear.
Title: Overwriting Files - This will overwrite transcripts, choices
(if being imported, special ed., any notes
(if being imported) and some of the files in enrolment.
No - applies the update to this student
Cancel - cancels the Update option for this student.
After you select one of the 4 above options, you can update all of the records found by clicking Update All or use the the Next button to move to the next student, or examine the file by clicking Display File. The information that appears on that form cannot be edited there. When you have finished, click Done.
When a file is created using Copy Students For Another School, the resulting file is encrypted and given a MWE extension. When you use Enrol Students From Another School, and unzip the MWE file, a file will be created with the same name but with the extension XML (this file is in the admin\import folder). The XML file is used by the software to keep track of students who have already been enrolled. When viewing a previously selected file, you may refine the list of students on the right to include:
Only Students Not Already Imported (default)
Include Students Already Imported
Only Students Already Imported
Generally, you would not enrol students that you have already imported. These options may be useful if you forgot to include some data when they were first enrolled and it may be faster to enrol the students again (and use the Update Current File option when the student appears as a match). It may also be useful if an error report showed that some data was not imported because something was missing in your data. Overall, it may be faster to make adjustments in your data and then enrol the students again, rather than fixing up the data one student at a time.
Log Files
Log files created using Enrol Students From Another School:
Transfer LogTransfer.log - For each student copied to the file (OUT) or enrolled into the school (IN), the following information will print: Direction (In or Out), Students Letters, Name, Destination (if Out) or Origin School (if In).
Error LogErTransI.log - This will report any problems encountered (e.g. students that could not be copied to the file or students that could not be enrolled). An error log should rarely occur and Maplewood should be contacted if you encounter one.
Missing Fields LogUpdFld.logAppended
- Missing Fields Log: Since many of the student fields use tables,
there will be times when the tables are slightly different between
the origin and destination school. The software will use the Ministry
number of the table entries to match the data between the schools.
For example, at the origin school, a student’s First Language may
have English with Ministry number 01. When the student is enrolled
into the new school, the student will be given the First Language
that has 01 for the Ministry number at the destination school.
Since the program will not modify the tables to include table entries
from another school, when there are differences, the student will
appear in the Missing Fields Log. These fields should be corrected
manually in the student’s record. If many students are impacted, you
may be able to add the table entry to your school and then enrol the
students again (using the Update Current File option when the matching
student is found).
Should the destination school have 2 table entries assigned to the
same number, the students will be assigned to the first title that
appears in the table, but the report will show that the field has
a duplicate title.
Mismatched Code Log - CodeMis.log: This
log file will only appear if students’ transcripts are copied in from
the origin school (e.g. when transferring students between secondary
schools). If the exact course code already exists, but the title or
categories are different, it will print on this log file. Carefully
check the transcripts for these students because different categories
will result in different compulsory credits on the transcript.
Note: If a course code exists in the student’s transcript but is not
in the destination school’s Codes file, the new Code will be added
(along with the title and categories). These newly added codes will
not appear on the log file.
Missing Courses Log - MissCrs.log - If the student has courses selected in the Origin school that are not available in the Destination school, MissCrs.log will report the courses that are not in the courses (scheduling) file which may, or may not, be offered in the destination school. It is up to the school to enter the course if they decide to offer it. The command button, Missing Courses, will show the user the report.
Duplicate Numbers log - DupNums.log
If the school has 'assign new numbers' flagged in Custom Fields/Tables,
Student Numbers, the program will search the database for students
with duplicate numbers. It will inform the user of its findings with
a message box. Here the user has the option to continue, or not, with
the enrolment function. The list of students with duplicate numbers
will be reported on the DupNums.log in the Log directory.
Note: Appended means the log file is not cleared between each use (at the moment). New means that a new log file is created (if a previous file exists, the older file will have the log extension renamed to a number (e.g. transfer.001).
Error Messages that may appear using Copy Students For Another School:
"Some of the students were not copied successfully please check error log to see what error occurred.”: See Log Files: Error Log.
"File already exists. Do you wish to overwrite?": The file you are creating already exists. Click Yes to overwrite the existing file.
"Error Loading Log File.": Contact Maplewood if this error appears. The log file is likely corrupted.
"CDS are not an acceptable media to write files to.": When creating the file, you may not create a file on a Compact Disk.
Error Messages that may appear using Enrol Students From Another School:
"Some of the students were not transferred successfully please check error log to see what error occurred during transferring": See Log Files: Error Log.
"There were some discrepancies in the codes that were in transcripts of students being enrolled and this school's current codes. Do you wish to display the code discrepancy log?": See Log Files: Mismatched Code Log.
"There are students who were found with possible matches. Do you wish to review matches and see if these students are actual matches?": See Matching Students.
"There were fields in the students files that didn't exist in the current tables. Click the Missing Fields button to view log.": See Log Files: Missing Fields Log.
"Error Loading Log File": Contact Maplewood if this error appears. The log file is likely corrupted.
If you require that a student's full detailed information for the French
Card entries be transferred, we recommend that the 'subject' information
be copied into the 'Board #' field. If the 'subject' information does
not find a match in the importing school, the 'subject' information will
be blank, although all other data for the entry will be there.
i.e. Elementary Schools may have a subject called 'French 8' which is not
available in the Secondary school's code file. Use the following steps
to Copy Students For Another School:
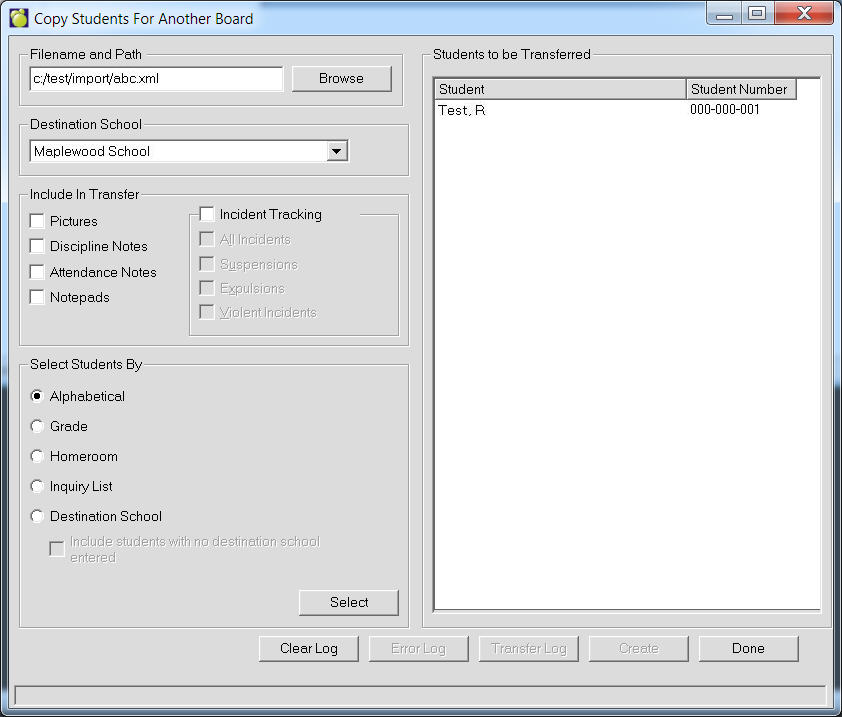
Use the following steps to Copy Students For Another School:
Choose Students, Transfer, Copy Students For Another School.
The box called Filename and Path will suggest a name and location for the file you are about to create. If you want to put the file in a different location, click the Browse button. We suggest the filename be ######yyyymmdd.mwe (your school's number and today's date). Note: The file type is called MWE representing a Maplewood Encrypted format. By encrypting the file, it may be safely transmitted electronically.
Select the Destination School. If you
are creating the file for a specific school, select the school name
from the list. The destination school is printed on the Transfer Log
that may be optionally printed (see step 6). The Destination School
is important if you are creating the file based on the destination
school in step 4.
Note: the school that receives the file does not use this Destination
School.
Choose the group of students to be included
in the file by selecting Alphabetical, Grade, Homeroom, Inquiry List,
or Destination School then clicking the Select button. Once you finish
selecting the student options, the group of students to be included
in the file will appear on the right side.
Note: If the students are based on a destination school, select the
destination school from the list. Any students with that destination
school (in the Enrolment area of student records) will be included
in the file.
Click the Create button to create the
file. If anything unusual occurs during the process of creating the
file, messages will be presented and the Missing Fields and Error
Log buttons will provide detailed information.
Note: if creating the file on a diskette in drive A, you may be prompted
to allow the disk to be cleared if not empty, then after the students
are processed, you will be prompted to insert the first disk so that
the data may be written onto the disk. If multiple disks are required,
insert them as prompted. You will be asked if you want the log file
entries added to the previous log file? If you select No, all log
previous log entries will be cleared.
You can then click the Transfer Log
button to see/print the list of students in the file. This log is
stored in \admin\logs\transfer.log.
Note: Clicking the Clear Log button will allow the user to delete the
ErTransO.log file in the LOGS folder or not. ON ALL OTHER LOG FILES,
the program will create new log files and rename the older to *.001,
etc., on all other log files.
The file (as specified in step 2) can now be sent to the school that needs to enrol these students into their school. The receiving school can choose which of the students it wants to include.
This program makes a copy of the data for the selected students. The
data is stored in a file that is encrypted so that it can be safely sent
by email. The resulting file is encrypted and given a MWE extension, e.g.,
99999920041231.mwe
The following information is included in the file generated through Copy
Students For Another School:
·Biographical data
·Custody information
·Family information (excluding sibling links)
·Enrolment information
·Emergency information (including sitter information for students with
a This Year Grade of 8 or lower).
·History/transcripts (including attendance history and year end promotion
information), FTE, and French/Native hours.
·Special education and alternate programs information
·(Ontario Secondary only) Ontario Report Card Details for literacy test
& community hours
·Choices (optional) Initialize Scheduling must be run before creating an
export file with this option.
·Pictures (picture files are renamed to the newly assigned 3-letter code).
·Discipline Notes (optional)
·Attendance Notes (optional)
·Medical Notes (optional)
·Notepads (optional)
·Text Fields (optional)
·List Fields (optional)
· Private and Catholic schools will transfer all information on students'
Religion tab.
Some info is excluded because it is specific to the student’s enrolment
at the new school (e.g. homeroom, attendance per period/class, achievement,
etc).
Creating the file automatically creates these folders in Admin: Export\XML\TransPic.
The file create is called: ######yyyymmdd.mwe in the location specified
by the user.
If creating the file on a diskette in drive A, you may be prompted to allow
the disk to be cleared if disk is not empty, then after the students are
processed, you will be prompted to insert the first disk so that the data
may be written onto the disk. If multiple disks are required, insert them
as prompted
Log files created using Copy Students For Another School:
Transfer LogTransfer.logNew
Error LogErTransO.logAppended
This will make a copy of the data for the selected students. The data is stored in a file that is encrypted so that it can be safely sent by email.
The following information is included in the file generated through Copy Students For Another School:
Biographical data (including custody)
Family information (excluding sibling links)
Enrolment
Emergency information
History/Transcripts (including attendance history (e.g. year end promotion information))
Special Education and alternate programs information
(Ontario Secondary only) Ontario Report Card Details for literacy test & community hours
Choices*
Attendance Notes
Discipline Notes
Notepads
Private and Catholic schools will transfer all information on students' Religion tab.
Incidents - When creating a Copy for
transfer for Past or Current student, the program will only include
the incidents that were selected - All, Suspensions only, Expulsions
only, Suspensions and Expulsions, or Violent Incidents.
When running the Enrolment, the program will recognize from the file
the type of incidents that are on the file. However, if the Copy consisted
of All incidents, then the enrolment functions still gives you the
options to either enrol the student(s) along with All incidents, Only
Suspensions, Only Expulsions, Only Suspensions and Expulsions, or
Only Violent Incidents. If the Enrolment file includes Expulsion and
Suspensions, you have the option to enrol the student(s) with only
Expulsions, or only Suspensions, or with both types of incidents.
* Only available for secondary schools.
Copy function allows the user to include Choices. It will request that
the user has initialized scheduling to ensure that the course choices
in student record are the current choices.
There will be some individual fields excluded because they are specific to the student’s enrolment at the new school (e.g. homeroom).
Use the following steps to Copy Past Students For Another School:
Choose Students, Transfer, Copy Past Students For Another School.
The box called Filename and Path will suggest a name and location for the file you are about to create. If you want to put the file in a different location, click the Browse button. We suggest the filename be ######yyyymmdd.mwe (your school's number and today's date). Note: The file type is called MWE representing a Maplewood Encrypted format. By encrypting the file, it may be safely transmitted electronically.
Select the Destination School. If you
are creating the file for a specific school, select the school name
from the list. The destination school is printed on the Transfer Log
that may be optionally printed (see step 6). The Destination School
is important if you are creating the file based on the destination
school in step 4.
Note: the school that receives the file does not use this Destination
School.
Choose the group of students to be included
in the file by selecting Alphabetical, Grade, Homeroom, Inquiry List,
or Destination School then clicking the Select button. Once you finish
selecting the student options, the group of students to be included
in the file will appear on the right side.
Note: If the students are based on a destination school, select the
destination school from the list. Any students with that destination
school (in the Enrolment area of student records) will be included
in the file.
Click the Create button to create the
file. If anything unusual occurs during the process of creating the
file, messages will be presented and the Missing Fields and Error
Log buttons will provide detailed information.
You can then click the Transfer Log
button to see/print the list of students in the file. This log is
stored in \admin\logs\transfer.log.
Note: Clicking the Clear Log button will allow the user to delete
the ErTransO.log file in the LOGS folder or not. ON ALL OTHER LOG
FILES, the program will create new log files and rename the older
to *.001, etc., on all other log files.
The file (as specified in step 2) can now be sent to the school. The receiving school can choose which of the students it wants to include.

This program makes a copy of the data for the selected students. The
data is stored in a file that is encrypted so that it can be safely sent
by email. The resulting file is encrypted and given a MWE extension, e.g.,
99999920041231.mwe
The following information is included in the file generated through Copy
Students For Another School:
Choices and Homerooms are not available with this option.
Pictures (picture files are renamed to the newly assigned 3-letter code).
Discipline Notes (optional)
Attendance Notes (optional)
Notepads (optional)
Incidents - When creating a Copy for transfer for Past or Current student, the program will only include the incidents that were selected - All, Suspensions only, Expulsions only, Suspensions and Expulsions, or Violent Incidents.
When running the Enrolment, the program will recognize from the file the type of incidents that are on the file. However, if the Copy consisted of All incidents, then the enrolment functions still gives you the options to either enrol the student(s) along with All incidents, Only Suspensions, Only Expulsions, Only Suspensions and Expulsions, or Only Violent Incidents. If the Enrolment file includes Expulsion and Suspensions, you have the option to enrol the student(s) with only Expulsions, or only Suspensions, or with both types of incidents.
Creating the file automatically creates these folders in Admin: Export\XML\TransPic.
The file create is called: ######yyyymmdd.mwe in the location specified
by the user.