Click the Populate Missing Data checkbox if applicable- if this is checked off and you have specified any of the default Values if students are missing the default value(s) their records will be populated with them. The View Log is useful only after the fact in that it lists all student records that have changed.
School Setup
Before you begin verifying addresses, set up information at the school.
1. Enable real-time Address Verification at the school
2. Choose File, School Setup, School Information, Configuration tab, select the appropriate Address Verification settings:
Enabled Verification: Turns on address verification
Allow All Addresses: Addresses will be stored even if an address is not in the address verification database. The user will be prompted as to whether they want to save this address even though it could not be found in the database.
Allow Streets Outside Boundary: Allows addresses that are outside of the school's attendance boundary. These addresses must still be considered valid addresses according to the Address Verification database.
Editing Address Data at the school
When adding a new student or editing an existing student address, the address will be verified against the Address Verification database. The student's address, as well as the mother, father and guardian addresses are all verified.
What happens when an invalid address is entered in an address field depends on what settings are selected in School Setup (above).
If an invalid address is entered in the address fields, the user will either be prompted to select an appropriate address from a list, or will be informed that the address does not match anything in the database and that the changes will not be saved. If the "Allow All Addresses" option is selected in School Setup, the user will be allowed to save the invalid address.
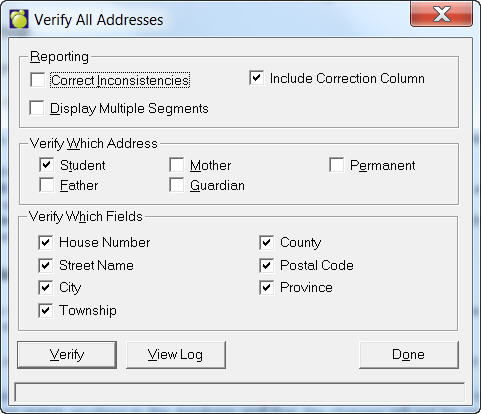
Verification of all school data- Verifying Addresses
To verify address data for all students in the school, choose File, Maintenance, Address Verification, Verify All Addresses. Then make the appropriate selections and click Verify to begin. An error log gets created and can be viewed by the user.
Reporting
Correct Inconsistencies: With this option selected the program will stop on each invalid address and the user will be presented with a list of appropriate corrections. The user can either choose one of the corrections or click Continue to ignore the suggestions and continue to the next student. Note: It does not correct invalid entries of one value.
Include Correction Column: In the error log that is created, a column containing Corrections will be printed with each invalid address.
Display Multiple Segments: When the program stops on an invalid address and is presented with a list of corrections, that list will consist of one item for each segment of the street. This option only applies if: 1) Correct Inconsistencies is selected, and 2) The Address Verification database has multiple segments for each street.
Verify Which Address
Select which address in the student record to verify. It is advisable to select one address at a time.
Verify Which Fields
Select which fields in each of the selected addresses to verify. Selecting different fields or different combinations of fields will result in very different reports. Select one field at a time at the beginning of the address verification process, then select more fields as the data gets cleaned up.
View Log
At the end of the address verification process you'll be prompted to see the log. You can also click the View Log button to see the log at any time afterwards. The log file is kept in Admin\Logs\AddVer.log and is overwritten each time the verification is run.
Setting Up Addresses
To set up addresses, choose Students, Custom Fields/Tables, Address Verification. For more information on setting up addresses, click here.
Updating the Verification Table
After you have set up your Address Table you can update them by choosing File, Maintenance, Address Verification, Update Address Verification Table. For more information on setting up addresses, click here.
Maplewood provides an option to validate addresses using standard address tables. The standard address tables can be managed by the district or built from an external source such as transportation systems. This document outlines the steps to import standard addresses from an external source, as well as the steps required to validate and enable Address Verification in Maplewood.
Choose File, Maintenance, Address Verification, Import Verification Data.
Importing Address Verification data to Central Office has three options:
Existing Maplewood Data: Specify which Maplewood Addresses to use: Student, Mother, Father and/or Guardian. Specify which fields from the Maplewood data are to be used for which fields in the Transportation system.
External File: The only requirement here is that a delimited text file must be used, not a fixed-length file. Indicate the delimiter and the location of the file. Specify which fields in the external file will be imported to which Address Verification fields. Please see below for field specifications.
"Required" checkboxes: Use these boxes to specify whether or not to import the field.
Click Start when all options have been selected.
Once the import is finished, the file CU\AddVer32.mdb can be distributed to schools.
A blank copy of AddVer32.mdb must be obtained before running the import, as the import appends all records to the existing database.
External Import File Specifications:
The file must be character-delimited with the following possible fields:
|
Field Name |
Required |
Type |
Size (chars) |
Description |
|
Left Low |
Yes |
Numeric |
10 |
Lowest street number on the left side of the street segment. |
|
Left High |
Yes |
Numeric |
10 |
Highest street number on the left side of the street segment. |
|
Right Low |
Yes |
Numeric |
10 |
Lowest street number on the right side of the street segment. |
|
Right High |
Yes |
Numeric |
10 |
Highest street number on the right side of the street segment. |
|
Street Name |
Yes |
Alphanumeric |
255 |
Street Name (e.g. North Service Road) |
|
Street Pre Direction |
No |
Alphanumeric |
50 |
Street Pre-direction (e.g. North Service Road) |
|
Street Post Direction |
No |
Alphanumeric |
50 |
Street Post-direction (e.g. Main St West) |
|
Left City |
Either City or Township is required |
Alphanumeric |
50 |
City name on the left side of the street segment |
|
Right City |
Either City or Township is required |
Alphanumeric |
50 |
City name on the right side of the street segment |
|
Left Township |
Either City or Township is required |
Alphanumeric |
50 |
Township name on the left side of the street segment |
|
Right Township |
Either City or Township is required |
Alphanumeric |
50 |
Township name on the right side of the street segment |
|
Left County |
No |
Alphanumeric |
50 |
County name on the left side of the street segment |
|
Right County |
No |
Alphanumeric |
50 |
County name on the right side of the street segment |
|
Postal Code |
No |
Alphanumeric |
50 |
Postal Code/Zip Code |
|
Province |
No |
Alphanumeric |
50 |
Province |
|
Segment ID |
Yes |
Numeric |
10 |
Segment identification |
File - Maintenance - Address Verification - Verify All Addresses
To verify address data for all students in the school, make the appropriate selections and click Verify to begin. An error log gets created and can be viewed by the user.
Correct Inconsistencies: With this option selected the program will stop on each invalid address and the user will be presented with a list of appropriate corrections. The user can either choose one of the corrections or click Continue to ignore the suggestions and continue to the next student.
Include Correction Column: In the error log that is created, a column containing Corrections will be printed with each invalid address.
Display Multiple Segments: When the program stops on an invalid address and is presented with a list of corrections, that list will consist of one item for each segment of the street. This option only applies if: 1) Correct Inconsistencies is selected, and 2) The Address Verification database has multiple segments for each street.
Verify Which Address: Select which address in the student record to verify. It is advisable to select one address at a time.
Verify Which Fields:Select which fields in each of the selected addresses to verify. Selecting different fields or different combinations of fields will result in very different reports. Select one field at a time at the beginning of the address verification process, and then select more fields as the data gets cleaned up.
View Log: The user will be prompted to see the log at the end of the address verification process. The user can also click the View Log button to see the log at any time afterwards. The log file is kept in Admin\Logs\AddVer.log and is overwritten each time the verification is run.
Enable real-time Address Verification at the school
File - School Setup - School Information
On the Configuration tab, select the appropriate Address Verification settings
Enabled Verification: Turns on address verification
Allow All Addresses:Addresses will be stored even if an address is not in the address verification database. The user will be prompted as to whether they want to save this address even though it could not be found in the database.
Allow Streets Outside Boundary: Allows addresses that are outside of the school's attendance boundary. These addresses must still be considered valid addresses according to the Address Verification database.
When adding a new student or editing an existing student address, the address will be verified against the Address Verification database. The student's address, as well as the mother, father and guardian addresses are all verified.
What happens when an invalid address is entered in an address field depends on what settings are selected in School Setup.
If an invalid address is entered in the address fields, the user will either be prompted to select an appropriate address from a list, or will be informed that the address does not match anything in the database and that the changes will not be saved. If the "Allow All Addresses" option is selected in School Setup, the user will be allowed to save the invalid address.