You may enter student choices manually or by scanner. Click here for scanner instructions.
Mandatory: The requested mandatory choice cannot be substituted by any other course. If a mandatory course doesn't fit in the timetable, it will show up in the list of conflicts to be resolved. The number of courses designated as mandatory cannot exceed the total number of periods available in the timetable.
Elective: As an option, the requested elective course can be substituted by an alternate course. Electives will fill in the blanks where there aren't any mandatory courses in the timetable. This is only of value if used in conjunction with Alternate Choice types.
Alternate: An alternate choice will only be scheduled in if you ask the computer to put in alternate course(s) if there are conflicts that prevent elective course(s) from being placed in the timetable. There is no requirement that any choice be set up as alternatives.
Note: For choosing single courses, it works as stated below. For selecting multiple courses, it works a little differently from what is stated below. You can use Alt C to open the courses list; then tab takes you to the first course in the list. Use the up and down arrow keys to move through the list and use the space bar to choose the courses you want to add. The Enter key will add the courses chosen. The mouse can also be used throughout the process.
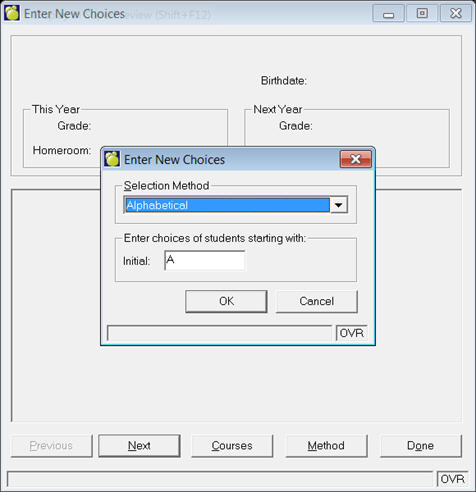
Choose Scheduling, Students’ Choices, Enter Choices.
Select a Selection Method from the drop-down list: Alphabetical, Grade, Homeroom, Defined Character, Inquiry List.
An entry box specific to your selection method will appear. This example will assign starting at the first student whose initial is A.
Click OK. The first box will close and you can enter student choices in the second box.
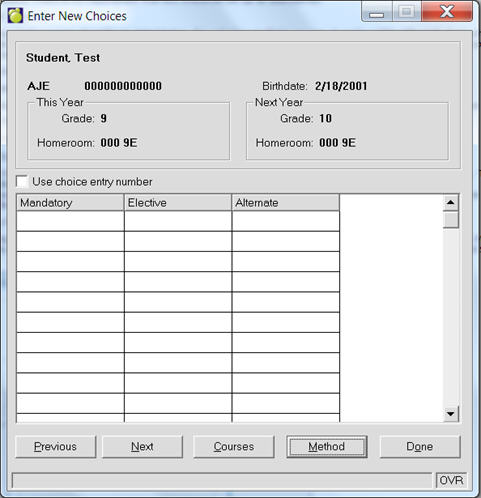
Click the Method button to access the selection method box again (if necessary).
Click the Courses button to see a listing of Courses. You can also manually enter course codes.
Click Next to move to the next student who has no previous choices entered. If you want to skip a student click Next. The skipped student will show up next time you want to Enter students' choices as long as you did not enter any choices into that student's list before clicking next.
Note: If you enter an invalid choice (a choice which is not in your school's courses file, you will be told that the course is not found. In which case you might need to edit your courses file: Edit Courses file.
When you have finished, click Done to save.
Warning: Pressing "Tab" will move to the Next student button. To move from cell to cell and to a different column (between Mandatory, Elective and Alternate), use the Enter key. Avoid using "Tab" while entering student choices. If you do hit "Tab" and need to get back to that student's choice list, access Edit Student Choices and use the student's last name to find him/her again.
If there is a "choice number, click the Use choice entry number and use that number. If there is not, use course number when entering or editing choices.
To modify individual student choice records after assignment, see Step 10 Make Changes to Students’ Choices.
Add A New Choice is helpful for entering one choice for a group of students. This feature will add a particular choice to one of the following groups of students: all students, students in a specific grade, students in a specific homeroom, students with a specific value for one of the Defined Characters, Inquiry Lists and students with specific choices.
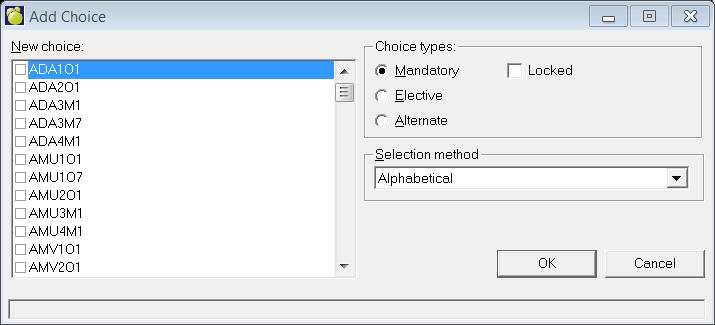
Choose Scheduling, Students’ Choices, Add a New Choice and you will see this box:
Select a choice from the list.
Click a Choice Type option button
Click the Method button to call up the selection list or you will be prompted to choose a selected method when you click OK. Your choices for applying the new choice are: Alphabetic, Grade, Homeroom, Defined Character, Inquiry List, and With Specific Choice.
Use Locked checkbox if applicable. Once set, this will prevent this choice from being changed in online course selection.
This is available in the Individual Edit of student Choices, as well as the option to Add a New Choice through the Scheduling menu. Checking this option means the student will not be able to change their choice entry for that specific choice.
Also, the feature allows for a user to confirm they have approved the choices a student has entered. Checking this box will add an entry that contains the logged in user who approved the choice.
Click OK
This feature is useful if, for example, all grade 9 students must take ENG1W. Choose ENG1W from the new choice menu, then Mandatory and finally, grade 9 from the selection method window. Clicking OK will automatically place ENG1W into the choices of all grade 9 students.
Note: when using the grade method of selection - be sure to choose Next Year to apply classes to those students which will be in that grade next year.