This guide contains information about the basic principles of creating reports with Report Designer. The Report Builder allows you to create new reports from scratch, bind them to data, and even pass them to another workstation and load them into another instance of the report designer. In addition to report editing capabilities, it allows you to display its Print Preview and send its output to a printer or export to a file.
Overview
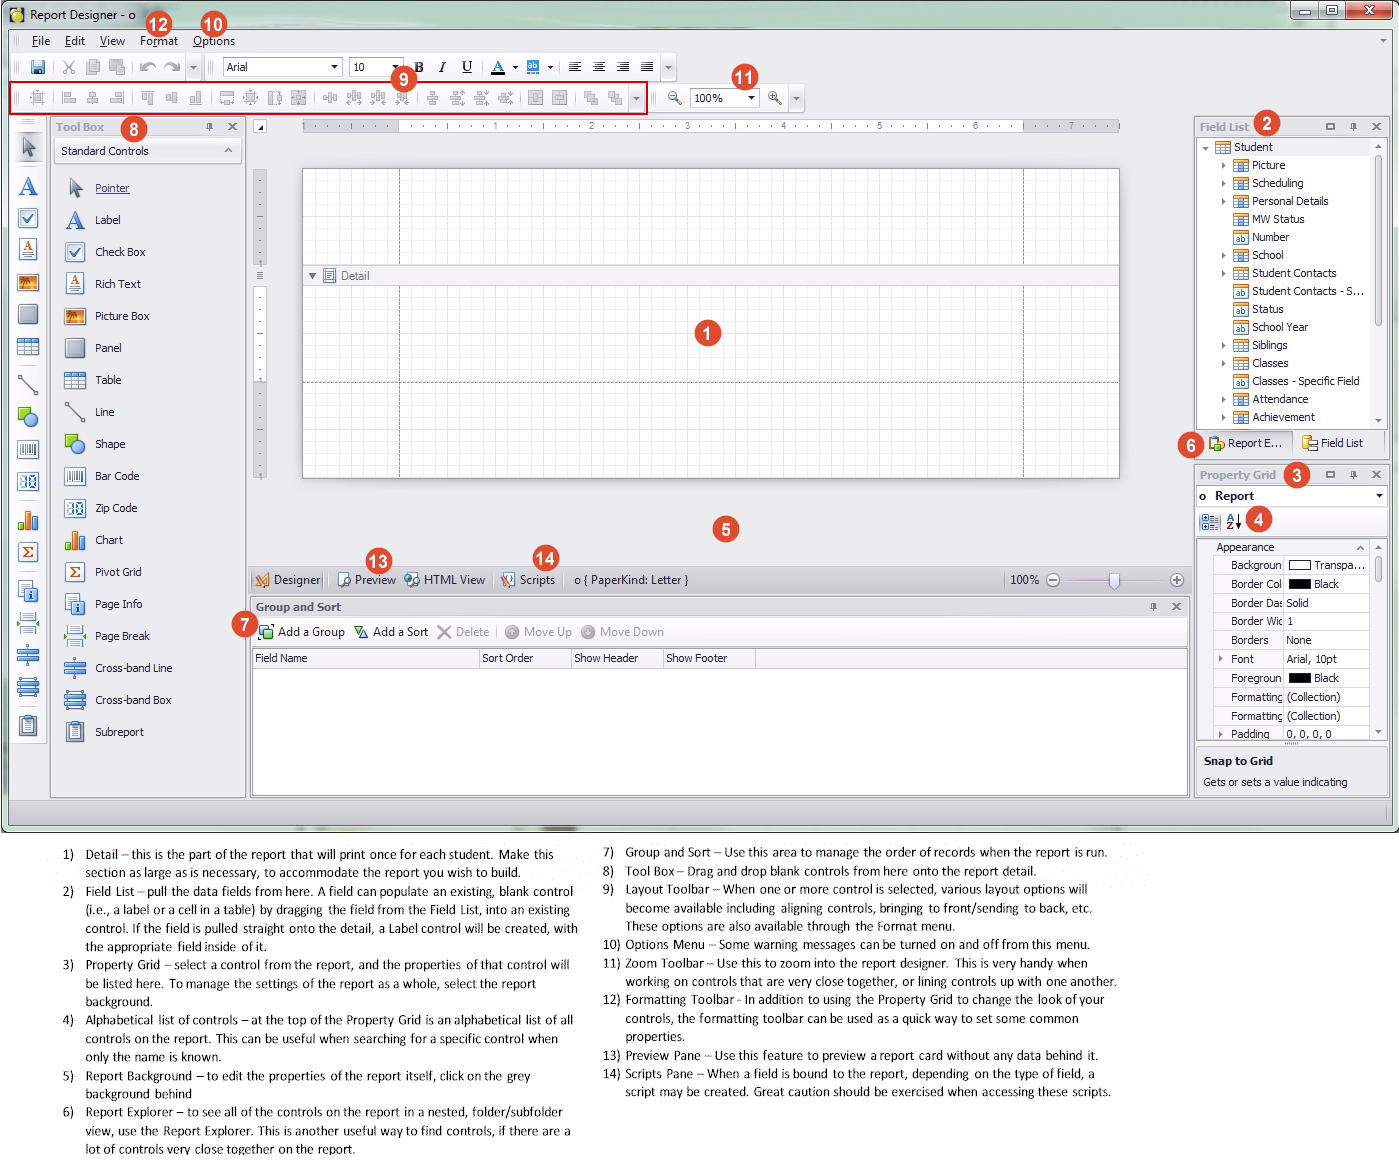
This is a brief overview of the main report screen that you will see when you start Report Designer.
Report Builder for Report Cards - Tips
1. If there are multiple reports that basically look the same but have slightly different layout, build one and then output to a PDF to see if you're going in the right direction (right fonts, padding, etc) -and make sure that the report close-to-perfect before using it as a template.
2. Before building, check the whole thing out and make sure that the resulting report card is possible to create: terms and topics must exist, behind-the-scene scripts in Report Builder will work etc.
3. If there are multiple labels and tables with the same attributes (e.g. can grow, can shrink, have same fonts), create one label and/or table, and then copy and paste it to create the rest.
4. Most of the time, the 'Can Grow' property should be set to be No, even though its default is Yes. Having 'Can Grow' enabled may end up adding extra horizontal space in the report and the report may not fit into the allotted number of pages.
5. To have the carriage return character actually show up when comments are printed, the Multiline property must be set to Yes.
6. Borders around cells in a table can be a challenge - if you set all cells to "All" for borders, the shared border between two cells will be doubled.
- To make a proper-looking grid, select all cells, give them all a border of Top, Right. Next select the cells on the bottom row and add the Bottom border. Then select the cells in the far left column and add the Left border. This will display every cell in the table being outlined once.
7. Similarly, when you have two cells beside or above/below each other, make sure the borders line up. A cell with a right border on top of a cell beside a cell with a left border won't line up.
8. In an elementary setup (homeroom plus one or two classes, many topics), one thing to make sure of is that each topic only gets a mark once for each student. This is because the report will not know which instance of that topic you want, when it goes to print/run.
1. Creating, Opening A Report
2. Navigating The Main Interface
a. Individual Reports
b. Combined Reports
c. Sharing Reports
d. Report Groups
e. Deleting Reports
3. Working With Report Settings
4. Determining Layout Type
5. Adding Report Controls
a. Page Breaks
b. Bands/Headers/Footers (if necessary)
c. Controls
6. Binding a Report to Data Fields
8. Running/Printing The Report
How to Run the Report
Email Functionality
9. Advanced Use
a. User Defined Parameters
b. Creating a Parameter List
c. Calculating a Student’s Average (Single Topic)
d, Conditional Formatting
e. Combining parameters and formatting rules
f. Bar graph representation of student’s marks
g. Checkbox representing a topic-based mark
12. Implementing Page Numbers in flexible-design reports